After only a few minutes you think you’ve found the bag. But there’s a problem. It’s locked with an 8 letter combination lock. The outside of the bag has an interesting stitched matrix with numbers on it, however.
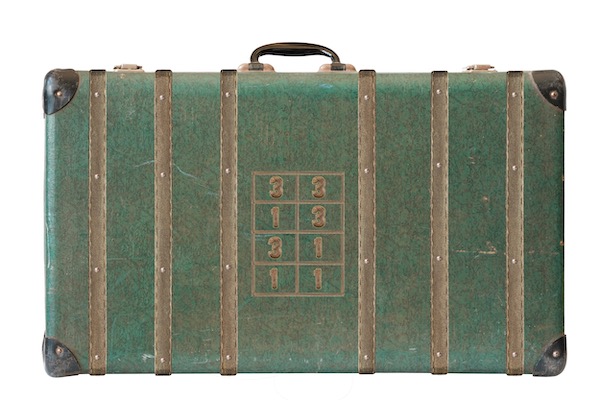
Unfortunately, the lock didn't open with that answer.
Enter Reager's Return
Use this Companion Guide to check your solutions as you play. Reager's Return unlock parts to the story for every puzzle you solve, so be sure to check these solutions. The Companion Guide can also be used to view hints. Most players use at least a few hints to get through the entire game.
Part I
The police officers in the small Victorian town of Blackbrim have been disappearing one by one. A package arrives at your door upon the disappearance of the final officer, Commissioner Farodson. Fearing that he too would be abducted by the mysterious figure known as Reager Skinner, the Commissioner instructed that the investigation materials be passed to you, the town detective. You are able to decipher the materials and discover that the officers are being held at Cordelia St. Manor.
Part II
Upon arrival at the manor, you are ambushed and knocked out by gas. You awake to find yourself locked inside. You explore the manor and find puzzles in each room. You decipher the puzzles, and in doing so, free the officers and escape the manor. Through your adventure, you learn that Cordelia St. Manor was Reager’s childhood home, that Reager was christened Rose at birth, and that she had an older brother—Alfred—who she locked away, likely causing him to perish.
You have freed the officers, and the entire town of Blackbrim is grateful for your heroic efforts. Of Reager, however, there is no sign.
Below is the list of items you should have for each part. If you are missing anything from Reager's Return, click here.
To begin with, you should have a 'Read Me First' pamphlet for Reager's Return.
Reager's Return - Part I
- Envelope with a letter from Antony Deione addressed to you, the Detective
- The Coach Carriage envelope containing an 'Open When Instructed' envelope (with 1 item inside), a letter from Reager, and a pamphlet from The London Express
- The Luggage Carriage envelope containing an 'Open When Instructed' envelope (with 1 item inside) and 8 distinct luggage tags
- The First Class Carriage envelope containing an 'Open When Instructed' envelope (with 1 item inside), a poetic note in Reager's handwriting, and a poem
- The Steam Engine envelope containing two different cipher disks, an encoded message, and a letter with several images on it from Reager
Reager's Return - Part II
- A letter from Reager
- The London Tour Itinerary
- A Map of North London
- The Victoria Terminal Train Bulletin
- A puzzle from Reager with Arrivals and Departures
- The Widow's Enigma advertisement
- The Grand London Ball flyer
- International Morse Code translation sheet
- Small sheet with apothecary notes and remedies on it
- Image of an apothecary shelf with numbered jars
- Apothecary Inventory page
- 'Open When Instructed' envelope with a sheet inside
-
Coach Carriage Initial Clue
This puzzle uses a letter from Reager and a pamphlet from The London Express. If you don't have an item, click here.
You will notice that there are 3 numbered notes scrawled on the London Express pamphlet. It seems Reager has used this pamphlet to encode a message to you. Each numbered note is a mini puzzle.
-
Coach Carriage Crossword Clue #1
This puzzle is similar to a crossword. Each of the 6 hints refers to a word in the grid. Each word is written twice - once horizontally and once vertically.
-
Coach Carriage Crossword Clue #2
Additional word-specific hints:
1. Also the plural of a type of weapon
2. Earth is another example
3. Comfortably synonym
4. A dog is also this
5. Also when you can understand someone’s perspective
6. Clothing has many varieties of these -
Coach Carriage Crossword Clue #3
The numbers in the parentheses each refer to a letter in the grid. These will spell out a word.
-
Coach Carriage London's Finest Mirrors Clue #1
The subject of the advertisement gives you a hint for what to do with the symbols.
-
Coach Carriage London's Finest Mirrors Clue #2
Each dotted line represents a way to mirror, or reflect the symbol above it.
-
Coach Carriage London's Finest Mirrors Clue #3
The vertical dotted line represents mirroring the symbol across a vertical axis. The horizontal dotted line represents mirroring the symbol across a horizontal axis.
For some symbols, there is more than 1 valid way to mirror them that will reveal different letters. You will need to decide which letter spells out a word. There are also spaces with no symbol to mirror, so you will have to decide what letter goes there at the end.
-
Coach Carriage Broken Window Advertisement #1
The subject of the advertisement gives you a hint for what to look for in the note.
-
Coach Carriage Broken Window Advertisement #2
These symbols are all derived from the same shape, but each one seems to be “broken” or missing a couple pieces.
-
Coach Carriage Broken Window Advertisement #3
The first square is missing the middle horizontal line, the top horizontal line, and the left vertical line.
The missing lines in each square create a letter.
-
Coach Carriage Solution
The crossword puzzle yields the word INSIDE (the words are spears, planet, easily, animal, relate, styles). The mirror puzzle yields the word CUSHION. The broken window advertisement puzzle yields the word FOUR.
The answer is INSIDE CUSHION FOUR. Now that you have the answer, select Check Solutions & Unlock the Story above. Then, input INSIDE CUSHION FOUR for the Coach Carriage to reveal the next part of the story.
-
Luggage Carriage Clue #1
This puzzle uses 8 distinct luggage tags. If you don't have an item, click here.
If you look at the side with the symbols, you can put them together to form Reager's initials. But it doesn't seem like you can do much more from there. So, take time to look at the sides with the letters on them. Do words start to appear when you arrange them?
-
Luggage Carriage Clue #2
Rearrange the luggage tags with the words on them to spell out a sentence. The first word is FIND.
-
Luggage Carriage Clue #3
After rearranging the luggage tags, the sentence FIND THE GREEN STRIPED CARGO appears. Now, check your solution to the Luggage Carriage. Select Check Solutions & Unlock the Story above and input GREEN STRIPED CARGO. The next phase of the story will be revealed.
-
Luggage Carriage Clue #4
At this point, you should have revealed a number matrix located on the outside of the green striped luggage. The matrix has the same number of rectangles as there are luggage tags. See if you can re-arrange the luggage tags to resemble the matrix shape by using the side of the tags without the letters.
-
Luggage Carriage Clue #5
After putting the luggage tags together to create an image with Reager Skinner's initials, the layout of the tags mimics the layout of the numbers matrix. Use each number to identify a letter from a tag.
-
Luggage Carriage Clue #6
Flip each card individually (so the upper left card stays in the upper left) and look at either the first or third letter. The eight cards will spell a word, and the code to the lock.
-
Luggage Carriage Solution
To recap, by rearranging the luggage tags to spell out FIND THE GREEN STRIPED CARGO, you first input GREEN STRIPED CARGO (see clues #2-3). You then find a lock on the green striped luggage. The word to unlock the green striped luggage is ENSNARED (see clues #4-6).
Now that you have the answer, select Check Solutions & Unlock the Story. Then, input GREEN STRIPED CARGO followed by ENSNARED for the Luggage Carriage to reveal the next part of the story.
-
First Class Carriage Clue #1
This puzzle uses a poetic note in Reager's handwriting and a poem. If you don't have an item, click here.
Read the instructions closely.
"Each line has a hidden word" - Each italicized phrase clues a specific, secret word.
“And each word, its own mate” - Each secret word on the left pairs with a secret word on the right. The name of the author gives you a hint of how they’re paired up.
-
First Class Carriage Clue #2
The secret words on the left are anagrams of the secret words on the right.
-
First Class Carriage Clue #3
Below are clues for figuring out each secret word.
Blue and green orb. You live here - think big!
A place of flowers and fruit. Many homes have one of these in the backyard.
Large swathes of land. 43560 square feet.
Branched plants. General term for tall plants.
Hooved creature. A cowboy’s mode of transport.
Babbling brook. Like a river but smaller.
Feathered friends. Old synonym for birds.
Wide-bottomed fruit. This description refers to the fruit’s shape. They grow on trees.
State of peril. Hazard is a synonym.
Ocean kisses the land. Another word for the beach.
Man of absolute skill. Someone who has become especially good at a craft.
Sharp, pointed rod. Also asparagus pieces.
Wild hound. They roam in packs.
Maneuvers. The captain uses a wheel on a ship to do this.
Inspire fear. Frightens.
Beating organ. There are many of these on Valentine’s day.
-
First Class Carriage Clue #4
“Travel the correct path between pairs to traverse letters that create.” Follow the vines between paired left and right phrases. Recall that phrases are paired if the secret words are anagrams of each other.
Each vine that goes between a correct pairing crosses 1 or 2 letters. Write out the letters, starting with the first line of the poem. You will NOT need to unscramble the final answer.
-
First Class Carriage Solution
The answer is WITHIN COVER. Now that you have the answer, select Check Solutions & Unlock the Story. Then, input WITHIN COVER for the First Class Carriage to reveal the next part of the story.
-
Engine Room Initial Clue
This puzzle uses two different cipher disks, an encoded message, and a letter with several images on it from Reager. These should all be found from the Steam Engine envelope. You also will need to use the three gifts (pocket watch, theatre glasses, bookmark) from the prior rooms. If you don't have an item, click here.
Each of Reager's four gifts (pocket watch, theatre glasses, bookmark, cipher disks) encodes a symbol that's also on the inner (smaller) cipher disk. Underneath each of the four symbols on the page is a clue for how to use a particular gift to extract the hidden symbol. The first step to decoding Reager’s message is to discover the hidden symbol from each of the four gifts.
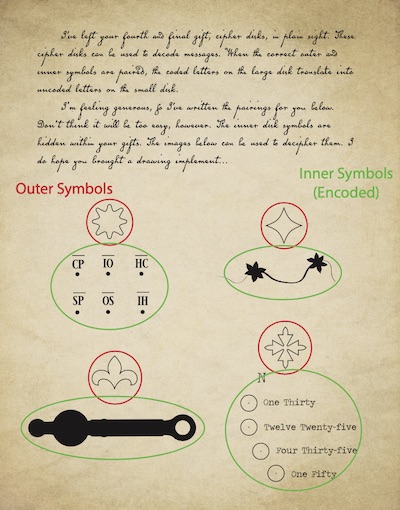
Once you have the four correct pairings, overlap the two disks so the smaller sits in the center of the large disk. Then use them to decode Reager’s message.
-
Engine Room Top Left Symbol Clue
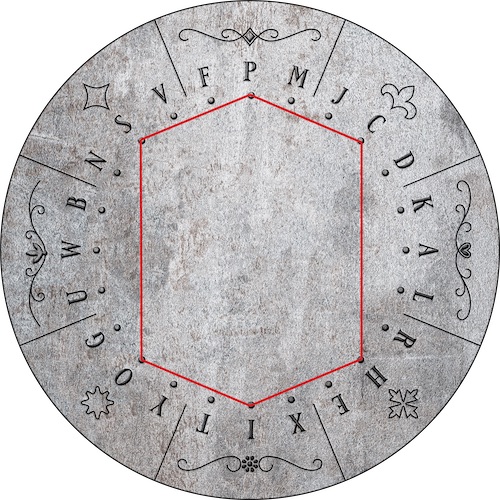
There is only one gift that has letters and dots like this, the cipher disks. The image includes six pairs of letters, with a line over each pair. Reager's note mentions that she hopes you brought a drawing implement. It may be useful here.
-
Engine Room Top Left Symbol Solution
When you draw lines between the letter pairs, the gem symbol is revealed.
-
Engine Room Top Right Symbol Clue
Below the symbol, the image's sillhouette looks very similar to the drawings on the bookmark. The silhouette is of a vine with two flowers, and the segment of vine between the two flowers is bolded. Reager's tip that she hopes you brought a drawing implement could be helpful here.
-
Engine Room Top Right Symbol Solution
Trace out the sections of vines that are between two flowers. The crown symbol is revealed.

-
Engine Room Bottom Left Symbol Clue
The sillhouette looks like the theatre glasses. Rotate the glasses into a position such that the silhouette matches the hint image. Then, pay close attention to the etched details on the glasses.
-
Engine Room Bottom Left Symbol Solution
The sword symbol is hidden within the theater glasses.

-
Engine Room Bottom Right Symbol Clue
Only one gift tells time, the pocket watch.
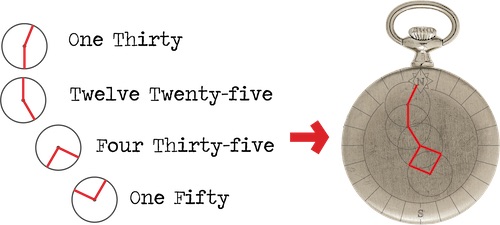
Find the "N" on both the watch and the image Reager has given you to get oriented. You will notice that the back of the watch also includes four circles with dots in the middle. Each of these looks a bit like an empty watch face. Draw the times on the four circles on the back of the watch.
-
Engine Room Bottom Right Symbol Solution
The little dipper is hidden within the pocket watch. This can also be intuited because the north star is the final star of the big dipper constellation. The “N” on the watch is also drawn as a star, and is the final star of the constellation.
-
Engine Room Letter Clue #1
Once you have the four correct pairings, overlap the two disks so the smaller sits in the center of the large disk. Then use them to decode Reager's message.
To solve for a letter, first look at the shape under the letter. Match the symbol on the large cipher disk to the corresponding symbol on the small disk. Find the letter on the outer disk, and translate it to the letter on the inner disk. The first letter should translate to “A”.
-
Engine Room Letter Clue #2
Once decoded, the letter reads: A friend’s letter betrays you. Look above the seat and below the window if you want to live.
Only one person on this journey has referred to themselves as "your friend" - who is it? You may need to search through previous materials.
-
Engine Room Letter Clue #3
Cpt. Deione called himself "Your friend and ally." Read his letter to identify what is above "the seat" and what is under "the window".
-
Engine Room Letter Clue #4
"Disorder" is above "the seat" and "Signature" is below "the window". Could Cpt. Deione’s signature be reordered to say something else? You can use an online anagram solver if you don't want to do it yourself!
-
Engine Room Solution
The answer is DECEPTION. Now that you have the answer, select Check Solutions & Unlock the Story. Then, input DECEPTION for the Engine Room to reveal the Part I ending!
-
Victorial Terminal Clue #1
This puzzle uses both the Victoria Terminal train bulletin and Reager's modified train schedule. If you don't have an item, click here.
Look first for patterns in the Victoria Terminal bulletin. Specifically, look for 3-letter city abbreviations that can be paired together to create words.
-
Victorial Terminal Clue #2
The three letter abbreviations for each of the "arriving from" locations can be paired with the three letter abbreviations for each of the "departing to" locations to create words. Pairs will also fit into Reager's modified schedule such that each rectangle also contains a complete word.
For example, the first line can be completed with the three letter abbreviations INF and EST, because "infest" is a word, "inflow" is a word, and "lowest" is a word.
Complete Reager's modified schedule, pairing up cities and using each one exactly once.
-
Victorial Terminal Clue #3
The filled out schedule looks like:
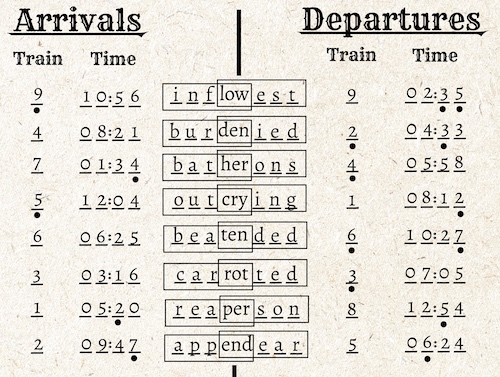
The next step is to extract the direction and distance. See if you can figure out what to do with the numbers that have dots below them.
-
Victorial Terminal Clue #4
Each dot instructs you to index into the central set of letters. For example, the first dot is under the number 9. The ninth letter in the central set of letters is a T.
-
Victorial Terminal Solution - Direction & Distance
The direction is THREE and the distance is FOUR HUNDRED. Now that you have the answer, select Check Solutions & Unlock the Story. Then, input 3 and 400 as the direction and distance.
To translate these into a destination, you will need to figure out how to use the Map of North London. Click here for the map hints if you are stuck - figuring out how to use the map is also a puzzle!
-
Victorial Terminal Solution - Next Destination
Using the map, the direction, and the distance, the next destination to go to after Victoria Terminal is quadrant (3, 2). Now that you have the answer, select Check Solutions & Unlock the Story. Then, input 3 and 2 as the final answers for where to head next (after inputting the direction and distance).
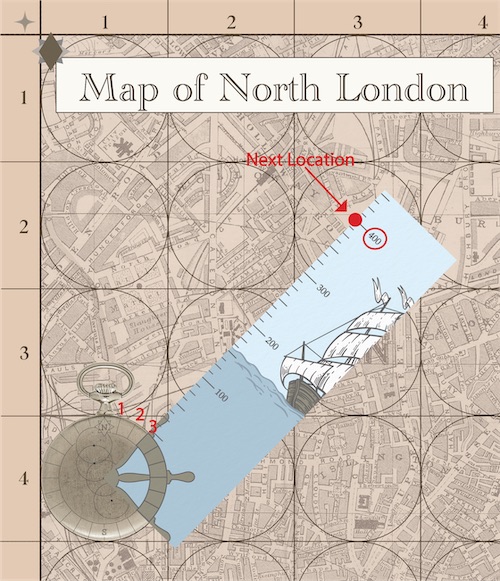
Click here for hints on how to use the Map of North London.
-
The Widow's Enigma Clue #1
This puzzle uses both the Widow's Enigma advertisement and theatre glasses from Part I. If you don't have an item, click here.
You must solve the mystery on the flyer by following the steps at the bottom. Note that this is not a typical mystery to solve - the chosen words can hold multiple meanings.
Also, to discover each suspect's value, the note that "her glasses reveal the truth" will be helpful.
-
The Widow's Enigma Clue #2
The glasses look similar to the theatre glasses you received from Reager in Part I. Line up your theatre glasses with the Widow's glasses and rotate the handle. As the handle passes over each of the quotes, the glasses will highlight one suspect’s initials and a number. These numbers are the suspects’ "value" in the case.
Now, can you identify the four prime suspects? Try to think of alternate meanings of the phrase.
-
The Widow's Enigma Clue #3
There are four suspects whose values are prime numbers (13, 37, 11, 23).
-
The Widow's Enigma Clue #4
Follow step 3. The motives and means are already paired with threads from spider webs. Try adding each pair together, then see if finding the difference between two prime suspects (subtracting them), matches any of these.
-
The Widow's Enigma Clue #5
Greed and Poison added together = 12, and Owen Campbell (23) - Fae Powell (11) also = 12. Since they are equal, we know that these are the motive, means, and guilty parties!
-
The Widow's Enigma Solution - Direction & Distance
You have already solved for the combined means and motive of Greed and Poison (6 + 6 = 12). The product of 11 and 23 is 11 x 23 = 253. Therefore, the direction is 12 and the distance is 253.
Now that you have the answer, select Check Solutions & Unlock the Story. Then, input 12 and 253 as the direction and distance.
To translate these into a destination, you will need to figure out how to use the Map of North London. Click here for the map hints if you are stuck - figuring out how to use the map is also a puzzle!
-
The Widow's Enigma Solution - Next Destination
To reach the next destination, you must first have solved the Victoria Terminal puzzle.
If you have already solved that puzzle, place the watch in the center of your current zone (3, 2). The direction 12 means your bookmark should be pointing straight down. The distance number 253 points to the center of the zone (3, 4).
Click here for hints on how to use the Map of North London.
Now, select Check Solutions & Unlock the Story. Then, input your answers to reveal what happens next.
-
The Grand London Ball Clue #1
This puzzle uses both the Grand London Ball flyer and the International Morse Code translation sheet. If you don't have an item, click here.
The diagram mentions that grand balls are how London high society telegraphs important subtext to one another. The itinerary description also mentions that you should arrive on the dot so you don’t need to dash. You will find the "International Morse Code" key useful.
-
The Grand London Ball Clue #2
Follow the dance instructions carefully, noting if you are passing over black or white tiles. If you look closely at the Morse Code key, you will notice that 3 black squares = a dash, and 1 = a dot.
Note that the dance instructions are written from the perspective of the dancer. This means the direction you go when taking a "step left" for the cross step depends on which direction you were facing for the first step. For example, if you move South on the dance floor first and then take a step left, you will be moving East on the dance floor diagram.
-
The Grand London Ball Clue #3
The procession from the crown to the main dance yields: dash, dot, dot, dot, dot. If you look at your key, this translates to the number 6.
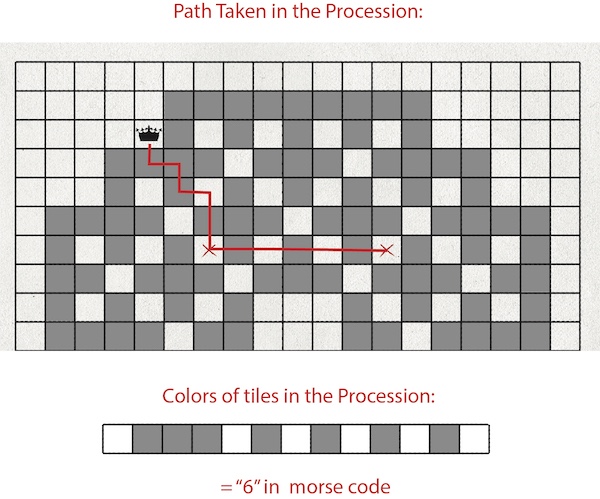
Note that the dance path ends at a red X. Ending at a red X can give you confidence that your path is correct.
-
The Grand London Ball Clue #4
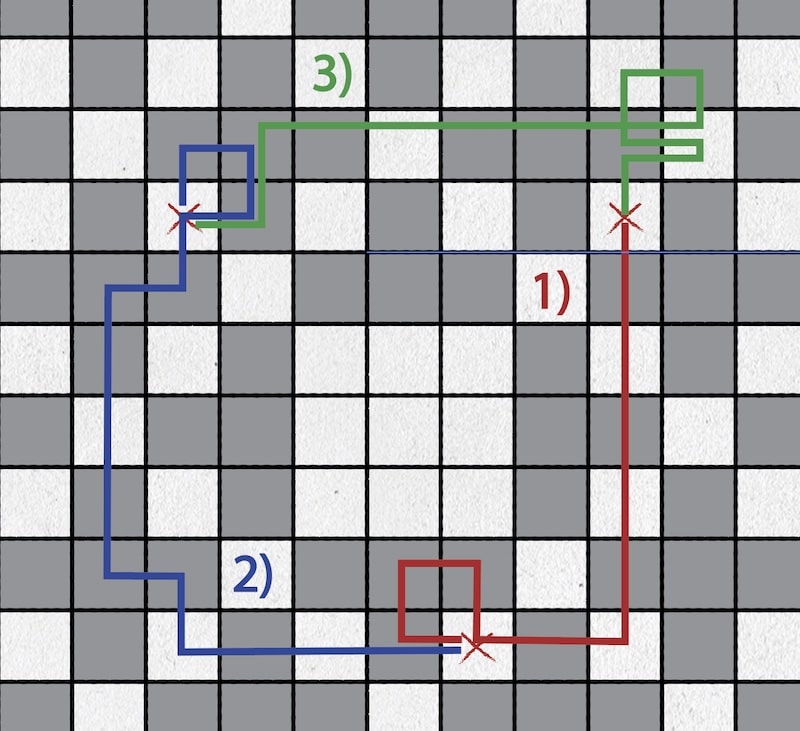
The main dance yields:
dot, dot, dot, dot, dash = 4
dot, dot, dash, dash, dash = 2
dash, dash, dot, dot, dot = 7

-
The Grand London Ball Solution - Direction & Distance
The procession yielded 6 and the main dance yielded 427. Since you know you're looking for 2 numbers, one of these should be the direction and the other should be the distance. Try to figure out which one should be smaller versus larger.
When you figure out the answer, select Check Solutions & Unlock the Story. Then, input the direction and distance.
To find the next destination, you must first have found the destination of the Ball and learned how to use the map. (Solve the Victoria Terminal and Widow’s Enigma puzzles to do this.)
To translate these into a destination, you will need to figure out how to use the Map of North London. Click here for the map hints if you are stuck - figuring out how to use the map is also a puzzle!
-
The Grand London Ball Solution - Next Destination
At this point, you should know that the direction is 6 and the distance is 427.
Click here for hints on how to use the Map of North London.
The number 6 points directly to the right, and 427 means you travel 3 zones. Your new coordinates are (6, 4). Now, select Check Solutions & Unlock the Story and input your answers to reveal what happens next.
-
The Apothecary Clue #1
Make sure you are looking at 3 pieces of evidence: the Apothecary Inventory, the drawn shelf of ingredients, and the remedies recipes. If you don't have an item, click here.
-
The Apothecary Clue #2
Each jar shape holds a different category of ingredient. Identify each ingredient as either a flower derivative, herb, berry extract, or special remedy. From looking at the drawing of the shelf, you know that there are 3 of each kind (there are 4 of each shape jar).
-
The Apothecary Clue #3
The categories are:
Rubus Fruticosus: berry extract
Aqua Rosa: flower derivative
Tanacetum Parthenium: flower derivative
Alum: special remedy
Artemisia Absinthium: herb
Prunus Virginiana: berry extract
Ferrum: special remedy
Phytolacca: berry extract
Salvia Officinalis: herb
Taraxacum Officinale: flower derivative
Stibium: special remedy
Mentha Longifolia: herb
-
The Apothecary Clue #4
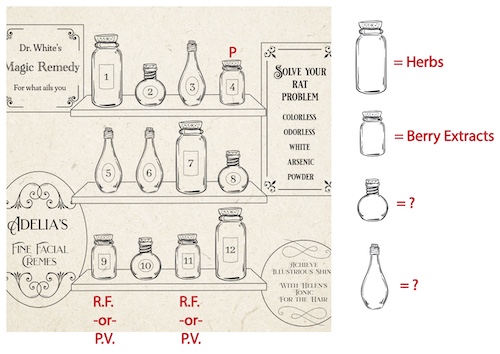
From: "Berry extracts and herbs are in cylindrical containers" and "Rubus Fruticosus and Prunus Virginiana are on the same shelf", you know that R.F. and P.V. must be flasks 9 and 11 (though you don’t know which is which yet). These are the only same shaped flasks that are on the same shelf, and are also cylindrical.
This means that the smaller cylindrical flasks are for berry extracts. And therefore, the larger cylindrical flasks must be for herbs.
This also means that Phytolacca must be in flask 4, since it is the only remaining berry extract, and this is the only remaining berry extract jar.
-
The Apothecary Clue #5
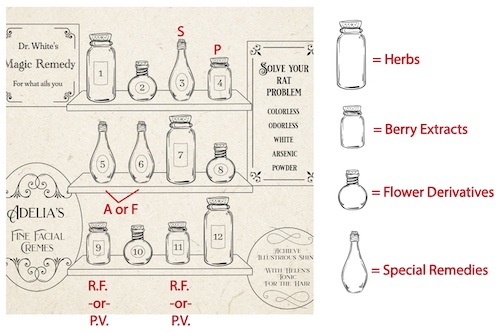
From “Alum and Ferrum are on the same shelf” you now know that these are flasks 5 and 6, since these are the only other same shaped flasks that are on a shelf together.
This means you also know that special remedies are in the tall bottle shaped flasks. This leaves flower derivatives in the small spherical flasks.
This also means that Stibium must be in flask 3, since it is the only remaining special remedy.
-
The Apothecary Clue #6
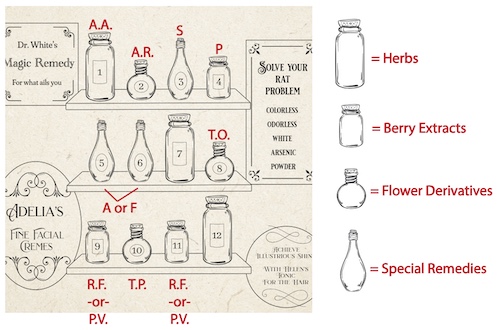
From "The ingredient in the median flower jar has seeds that take to the wind," flask 8 is Taraxacum Officinale (dandelion’s have seeds that fly away, and 8 is the median number between 2 and 10).
-
The Apothecary Clue #7
From “Artemisia Absinthium sits to the left of Aqua Rosa”, you know that 1 must be Artemisia Absynthium, and 2 must be Aqua Rosa. This is the only remaining place where an herb sits to the left of a flower derivative.
This means that flask 10 is Tanacetum Parthenium, since this is the only remaining flower flask.
-
The Apothecary Clue #8
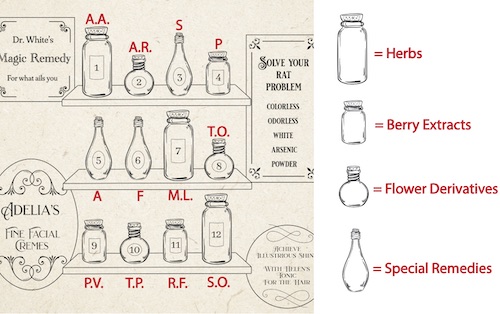
You can now use Mentha Longfolia (7 or 12) + Ferrum (5 or 6) = Rubus Fruticosus (9 or 11) + Aqua Rosa (2) to determine that M.L. = 7, F = 6, R.F. = 11.
This means that Alum = 5, Prunus Virginiana = 9, and Salvia Officinalis = 12, by process of elimination.
-
The Apothecary Solution - Direction & Distance
Add the three ingredients for remedy 1 together to get your direction. Use the 3 ingredients for remedy 2 as the 3 digits in your distance. You get two numbers, 21 and 153. Since you know you're looking for 2 numbers, one of these should be the direction and the other should be the distance. Try to figure out which one should be smaller versus larger.
When you figure out the answer, select Check Solutions & Unlock the Story. Then, input the direction and distance.
To find the next destination, you must first have found the location of the Apothecary and learned how to use the map. (Solve the Victoria Terminal, Widow’s Enigma, and Grand London Ball puzzles to do this.)
To translate these into a destination, you will need to figure out how to use the Map of North London. Click here for the map hints if you are stuck - figuring out how to use the map is also a puzzle!
-
The Apothecary Solution - Next Destination
At this point, you should know that the direction is 21 and the distance in 153.
Click here for hints on how to use the Map of North London.
Using direction 21 and distance 153 from your previous destination, your new coordinates are (5, 3). Now, select Check Solutions & Unlock the Story and input your answers to reveal what happens next.
-
The Final Puzzle Clue #1
This puzzle uses a 1-page letter from Reager found inside the Open When Instructed envelope. If you don't have this item, click here.
Remove the letters that are “X”d out from each of the destination names.
-
The Final Puzzle Clue #2
You get "White Powder Vermin Poison." Do you have a material that references a specific kind of white powder? Alternatively, some quick research into Victorian Era poisons will yield a result.
-
The Final Puzzle Clue #3
The drawing of the apothecary jars has a poster that advertises arsenic as a rat poison. Arsenic was a very commonly used poison in the Victorian Era, both for killing rats and for other more nefarious purposes.
You may also recognize elements of the Lion’s crest from one of your gifts!
-
The Final Puzzle Clue #4
If you orient your two cipher disks so they match the Lion’s crest image, you can translate "arsenic" into map coordinates. Look for "arsenic" on the outer cipher disk and get the translated letters from the inner cipher disk.
-
The Final Puzzle Solution
ARSENIC translates to FIVE TWO, which yields the final destination at (5, 2). Now that you have the solution, select Check Solutions & Unlock the Story. Then, input your answers to reveal the ending of Reager's Return.