Enter The Takedown
Use this Companion Guide to check your solutions as you play by selecting Check Solutions & Unlock the Story below. Sometimes, the story will progress as you check your solutions. The Companion Guide can also be used to view hints. Most players use at least a few hints to get through the entire game.
Part I
The FBI reaches out to you, a talented codebreaker, to aid in an investigation of utmost importance. While Al Capone has gained notoriety, the FBI reveals that another criminal organization, known as La Famiglia, is in fact pulling the strings of the Chicago underground. Moreover, their leader, Vincent Milano, is planning something big. With the help of undercover FBI agent Joseph Morris, you acquire a variety of coded messages and determine that La Famiglia plans to assassinate the Chicago mayor’s upcoming election opponent. With this information, the FBI is able to put the challenger into protective custody, just in time to save his life from a bomb set off at his home.
Part II
After discovering the lengths to which La Famiglia would go to keep the current mayor in office, you surmise that the two must be working together. Agent Morris secretly raids the mayor’s office and returns with several coded messages, similar to others you’ve seen from La Famiglia. You decode the messages and find that William Thompson, the current mayor, has indeed been paid off by La Famiglia. With the evidence you uncover, the FBI is able to both remove Thompson from office and begin pursuing several leads to take down La Famiglia. Chicago is substantially safer thanks to you, but there is still more to be done.
Below is the list of items you should have for each part. If you are missing anything from The Takedown, click here.
To begin with, you should have a 'Read Me First' pamphlet for The Takedown.
The Takedown - Part I
- Envelope from Margaret Price with a one page letter
- Two pages of notes from Agent Morris
- Large diagram of the distilling process
- “Raw Supplies Store” sheet
- “Practical Italian Recipes” booklet
- Sheet titled "Use Sieve to Clarify Solutions"
- Sheet titled "indirizzo di consegna" containing colored squares
- Envelope titled “Materials Found on Bruno Costa” with several components inside:
- Three different small cards with holes punched in them
- Small slip of paper with “Clock” written out and numbers below it
- Three small pages with a black and white image on each side
- Sheet of paper with four sieve circles and "degrees clockwise" written out
- Sheet with "set levers" written at the top
- Sheet with "Set dials as the last step, using everthing" written at the top
The Takedown - Part II
- Envelope from “M. Price” (Margaret Price) with a one page letter
- Two pages of notes from Agent Morris
- Circular disk cipher
- Encoded message sheet with dates
- “In case something happens to me” note
- Five double-sided magazine sheets
- “Open when instructed” envelope with two sheets inside
-
Distillery Diagram Clue #1
Each item (or set of items) in the “Materials found on Bruno Costa” envelope pairs with another item found by Agent Morris. In this case, the three double-sided rectangles with black and white images pair with the large distillery diagram.
If you are missing any of the three double-sided rectangles with black and white images or the large distillery diagram, click here.
-
Distillery Diagram Clue #2
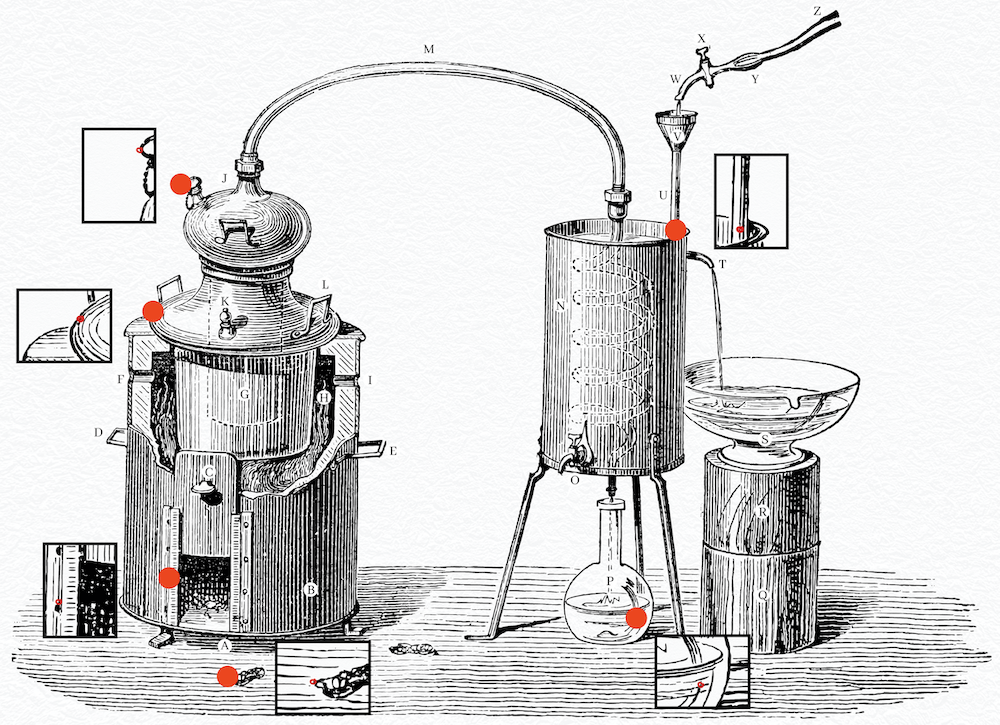
Each side of each card is an image of somewhere on the distillery diagram. The red circle denotes a particular spot.
-
Distillery Diagram Clue #3
The image below shows the locations of the six points indicated by the cards. Can you determine a way that these points indicate the specific letters on the diagram?
-
Distillery Diagram Clue #4
The images on the back and front of each card represent a pair. Draw a line between the paired points and they will cross letters. These letters will spell out a word.
-
Distillery Diagram Solution
The lines cross letters that, after unscrambling, spells BLACK. Only the gauge can point to colors, including black.
-
Raw Supplies Store Clue #1
Each item (or set of items) in the “Materials found on Bruno Costa” envelope pairs with another item found by agent Morris. In this case, the scrap of paper that says “clock” and has several numbers added together pairs with the Raw Supplies Store sheet.
If you are missing the paper that says "clock" or the Raw Supplies Store sheet, click here.
-
Raw Supplies Store Clue #2
From "S+T+O+R+E = 31" at the bottom of the page, we can surmise that each letter has a numerical value. The numbers next to each word are a sum of those letters. To solve this puzzle, you will need to find the numerical value of each letter.
-
Raw Supplies Store Clue #3
First, look for words that share a lot of the same letters. There are many different ways to solve the puzzle.
- From STORE = 31 and SORT = 24, you know E = 7
- From SORT = 24 and TO = 13, you know SR = 11
- From CORN = 18 and NO = 10, you know CR = 8
- From CARTON = 24 and CORN = 18, you know AT = 6
-
Raw Supplies Store Clue #4
Continue looking for overlapping letters in various words.
- From AT = 6 and A = 2, you know T = 4
- From TO = 13 and T = 4, you know O = 9
- From NO = 10 and O = 9, you know N = 1
-
Raw Supplies Store Clue #5
Continue looking for overlapping letters in various words.
- From CANE = 15, A = 2, E = 7 and N = 1, you know C = 5
- From CR = 8 and C = 5, you know R = 3
- From SR = 11 and R = 3, you know S = 8
- From YEAST = 27, A = 2, E = 7, S = 8 and T = 4, you know Y = 6
Now that you know the values for each of the letters, you can decode the “Clock” note.
-
Raw Supplies Store Solution
8+2+6+8 = S A Y S
9+1+7 = O N E
4+7+1 = T E NThere is a clock on the door, so it must be referring to set the time of the clock to 1:10.
-
Italian Recipes Clue #1
Each item (or set of items) in the “Materials found on Bruno Costa” envelope pairs with another item found by agent Morris. In this case, the three small cards with holes punched out pair with the recipe booklet.
If you are missing any of the three small cards with holes punched out or the recipe booklet, click here.
-
Italian Recipes Clue for "Page 1" Card
For the “page 1” card, point the black corner with a comma on it at the first comma on the page. Point the opposite corner at the final period. What do you notice in the punched out holes?
-
Italian Recipes Clue for "Page 2" Card
Line up the “page 2” card so that the notch at the top of the card covers half of the word “fat”, and the notch on the right side of the card covers half of the word “gravy”. Do you notice anything in the punched out holes?
-
Italian Recipes Clue for "Page 3" Card
Try underlining the words “Cook over a slow” with the black line on the final card. Do you notice anything in the punched out holes?
-
Italian Recipes Solution
The cards spell the phrase “thirteen minus seven”, resulting in the answer: 6. After looking through the door features, there is only one that can be set to the number 6, the slider.
-
Sieve Diagrams Clue #1
Each item (or set of items) in the “Materials found on Bruno Costa” envelope pairs with another item found by agent Morris. In this case, there are two distinct sieve diagrams (circles with mesh grids in the center) that pair together. One is titled "Use Sieve to Clarify Solutions" and the other has the note "degrees clockwise" on it.
If you are missing either of the two sieve diagrams, click here.
-
Sieve Diagrams Clue #2
For each diagram, there is one way to draw a line from the “S” (start) to the “F” (finish). Use the “use sieve to clarify solution” diagrams to find the pattern, then apply this pattern to the other diagram.
-
Sieve Diagrams Clue #3
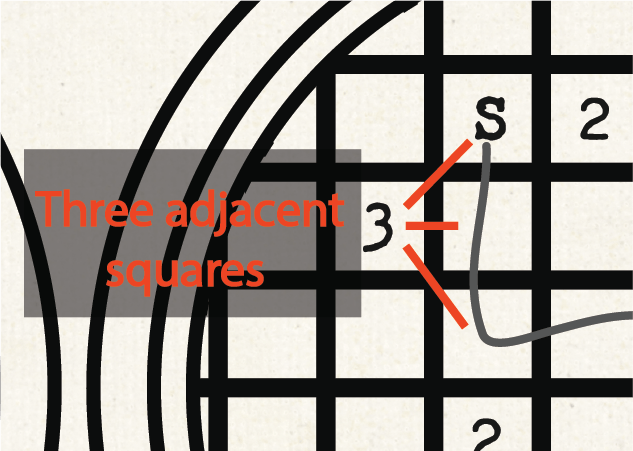
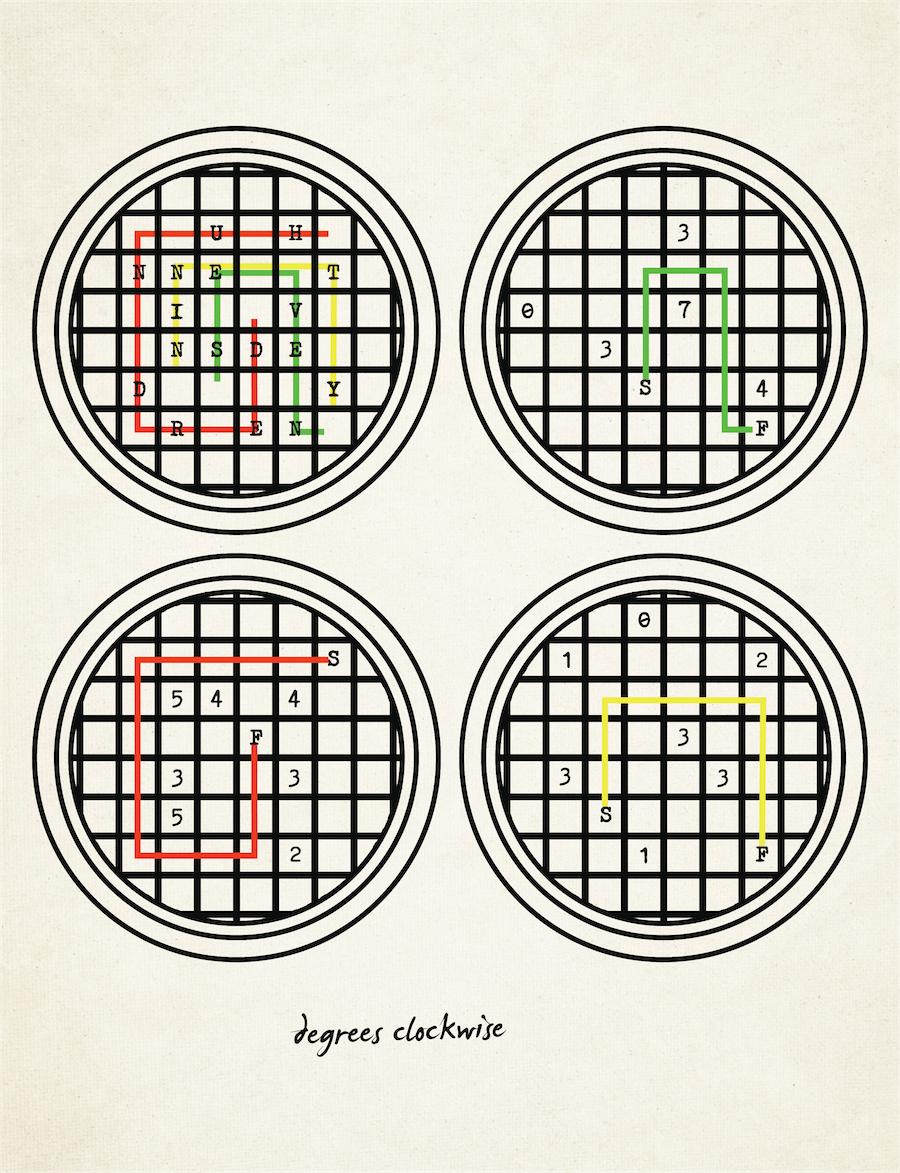
The numbers in each square represent how many adjacent squares have a segment of line in them. Use this to draw a line in each of the 3 sieve diagrams with numbers on the “degrees clockwise” sheet. There is only one possibility for each. How might these translate into words?
-
Sieve Diagrams Clue #4
Re-trace the path onto the sieve diagram with the letters. This will create 3 words - one for each path.
-
Sieve Diagrams Solution
The three paths trace the words: SEVEN HUNDRED NINETY. The wheel should be turned 790 degrees clockwise.
The three paths are below.
-
Colored Boxes Note Clue #1
Each item (or set of items) in the "Materials found on Bruno Costa" envelope pairs with another item found by agent Morris. In this case, the two distinct sheets of paper with the colored boxes pair together. One is titled "indirizzo di consegna" and the other is titled "set levers."
If you are missing either of the two sheets, click here.
-
Colored Boxes Note Clue #2
Start with the sheet that says “122” on it. Agent Morris noted that this may be related to a recent bust on “122 Grant Ave.” Try to translate the colored boxes into GRANT AVE.
-
Colored Boxes Note Clue #3
Translate the colors and numbers in each box into Italian (the note at the bottom says “use Italian” in Italian). Then use the black bar on the box to either look at the first, or last letter in the word. A bar on the left indicates the first letter, while a bar on the right indicates the last. This should spell “Grant Ave.”
Now translate the larger note with the red and blue boxes on it. Does this relate to any of the secret door features Agent Morris told you about?
-
Colored Boxes Note Clue #4
This puzzle is referring to the levers on the door. When you translate the boxes, you should get:
DUDUD 2 CORRECT
DDDUU 4 CORRECT
UUDUU 4 CORRECT
These are referring to the five lever positions (D = Down, U = UP), and how many of the positions are correct in each sequence. From these three, you can find the solution for the real lever positions (where all 5 are correct).
-
Colored Boxes Note Clue #5
The 2nd and 3rd sequences each have 4 correct. They are the same on 3, and different on two. This means that the 3 they share are correct, and of the two they disagree on, each is correct about 1. So, either the correct lever sequence is DUDUU or it’s UDDUU.
-
Colored Boxes Note Solution
The first sequence is DUDUD. We can now tell that UDDUU is the correct sequence, because this is the only sequence that allows “DUDUD” to have 2 levers in the correct position.
The final position of the levers is: Up Down Down Up Up.
-
Grid Metapuzzle Clue #1
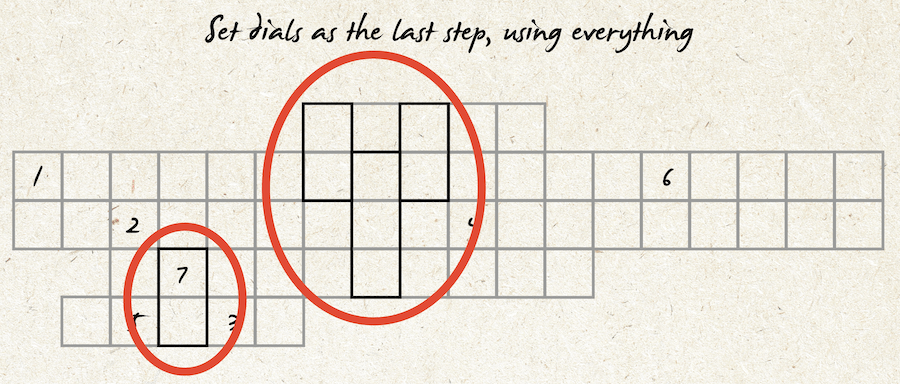
This puzzle uses a sheet that's titled "Set dials as the last step, using everthing." If you are missing this, click here.
Look at all of your previous answers to the puzzles. Try completing the grid with these answers.
-
Grid Metapuzzle Clue #2
Your previous puzzle solutions will fit into the rows of the grid. Some of the answers are the same length, yielding multiple ways to complete the grid. You will notice that some squares are outline in black though. Are there configurations where you notice something within these outlined areas?
-
Grid Metapuzzle Clue #3
There is a configuration where each outlined box contains the same letters. The answers you should be using to fill in the rows (not in any particular order) are: Seven Hundred Ninety, Thirteen Minus Seven, UDDUU, Black, and Says One Ten.
Can you figure out which row each answer goes in, and what final seven letter result that yields?
-
Grid Metapuzzle Solution
From top to bottom, the rows should read:
UDDUU
SEVENHUNDREDNINETY
THIRTEENMINUSSEVEN
SAYSONETEN
BLACK
Taking the numbered letters in order, you get the answer “Sicilia” to set the dials.
Now that you have the answer, input it using the Check Solutions feature to reveal what happens next in the story!
-
First Coded Message Clue #1
The number “2” at the beginning of the message indicates that page 2 of the magazine holds the key to decoding this message. Remember Agent Morris’ note though, that this may not be the only page in the magazine that is needed to decode the message!
If you are missing any pages of the magazine (pages 1-10) or the coded communication (a table with headers Date, I, and O), click here.
-
First Coded Message Clue #2
You will notice that page 1 is also written by “Jones & Richardson” and provides instructions on how to pick stocks. Use these instructions to pick your two stocks on page 2.
-
First Coded Message Clue #3
The note to “Look for stocks that have demonstrated strength” removes United Chemical Products from the running because it has not demonstrated greater than 15% growth over the past year ($3.90/$3.40 = 1.147 or 14.7% growth).
The note to “Pick stocks that have shown consistency” removes Detroit Steel because it has dropped in value for a total of 3 months during the past year.
Can you narrow it down to the final two stocks?
-
First Coded Message Clue #4
The note to “Invest in stocks that are complementary” shows that East Coast Electric and Millworks Industrial are the only two stocks (of the remaining 3) that do not drop in value at the same time. These are the correct two stocks.
-
First Coded Message Clue #5
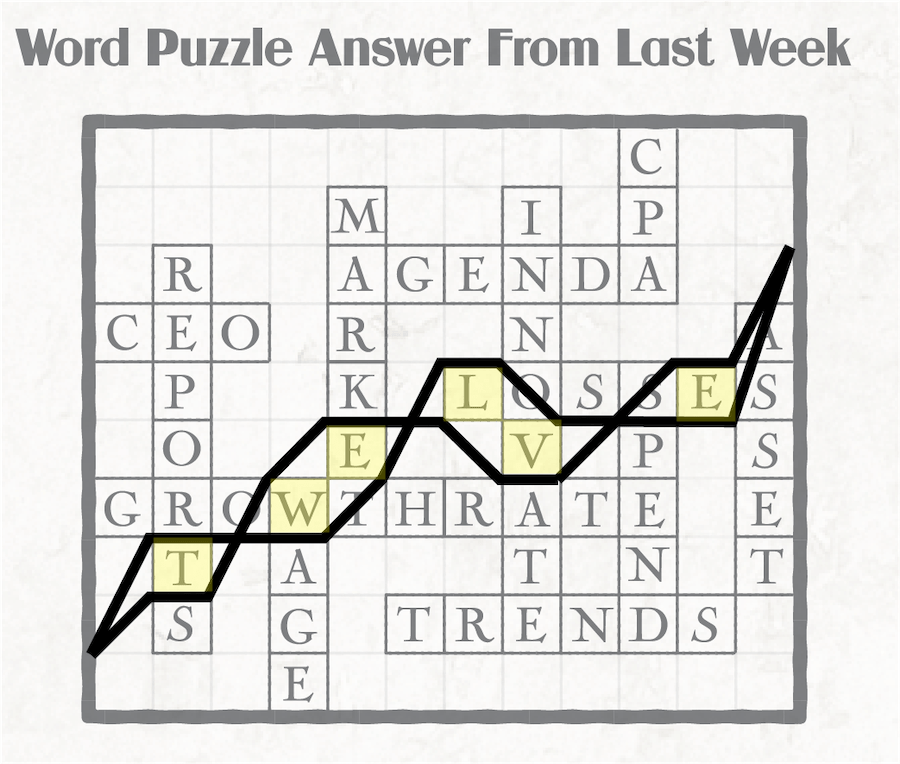
Review the article “Understanding the long term value of stocks.” Can you use your two stock picks to derive a word from the word puzzle answer on page 2?
-
First Coded Message Clue #6
Notice that the dimensions of the word puzzle are the same as the dimensions of the stock price charts. Try overlaying the lines of the two stocks onto the word puzzle.
-
First Coded Message Clue #7
The letters “TWELVE” should be between the lines.
-
First Coded Message Clue #8
Read Agent Morris’ note to see how to use this number (12) to decode the first coded line.
-
First Coded Message Solution
Use the number “12” to shift the letters in the first message. The first letter should be shifted by 1 (V -> W), second by 2 (F -> H), third by 1 (X -> Y) etc. You can use the cipher disk to help with this.
The decoded message is: WHY IS CERMAK ALIVE.
-
Second Coded Message Clue #1
The number “9” at the beginning of the message indicates that page 9 of the magazine holds the key to decoding this message. Remember Agent Morris’ note though, that this may not be the only page in the magazine that is needed to decode the message!
If you are missing any pages of the magazine (pages 1-10) or the coded communication (a table with headers Date, I, and O), click here.
-
Second Coded Message Clue #2
Page 10 also discusses automobiles. You will need both of these to find the number key to decode the message.
-
Second Coded Message Clue #3
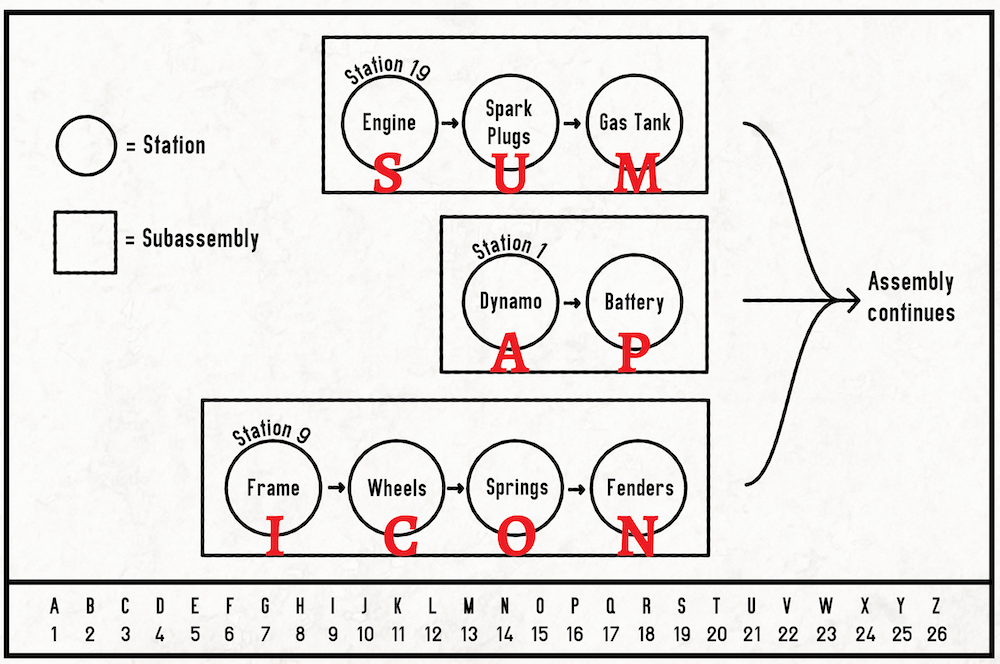
Find the car parts within the diagram on page 9, in the list of automobile parts on page 10. Each will correspond with a letter.
-
Second Coded Message Clue #4
The components on page 9 spell out “SUM AP ICON.” Is there an icon or logo somewhere on the page you might be able to sum?
-
Second Coded Message Clue #5
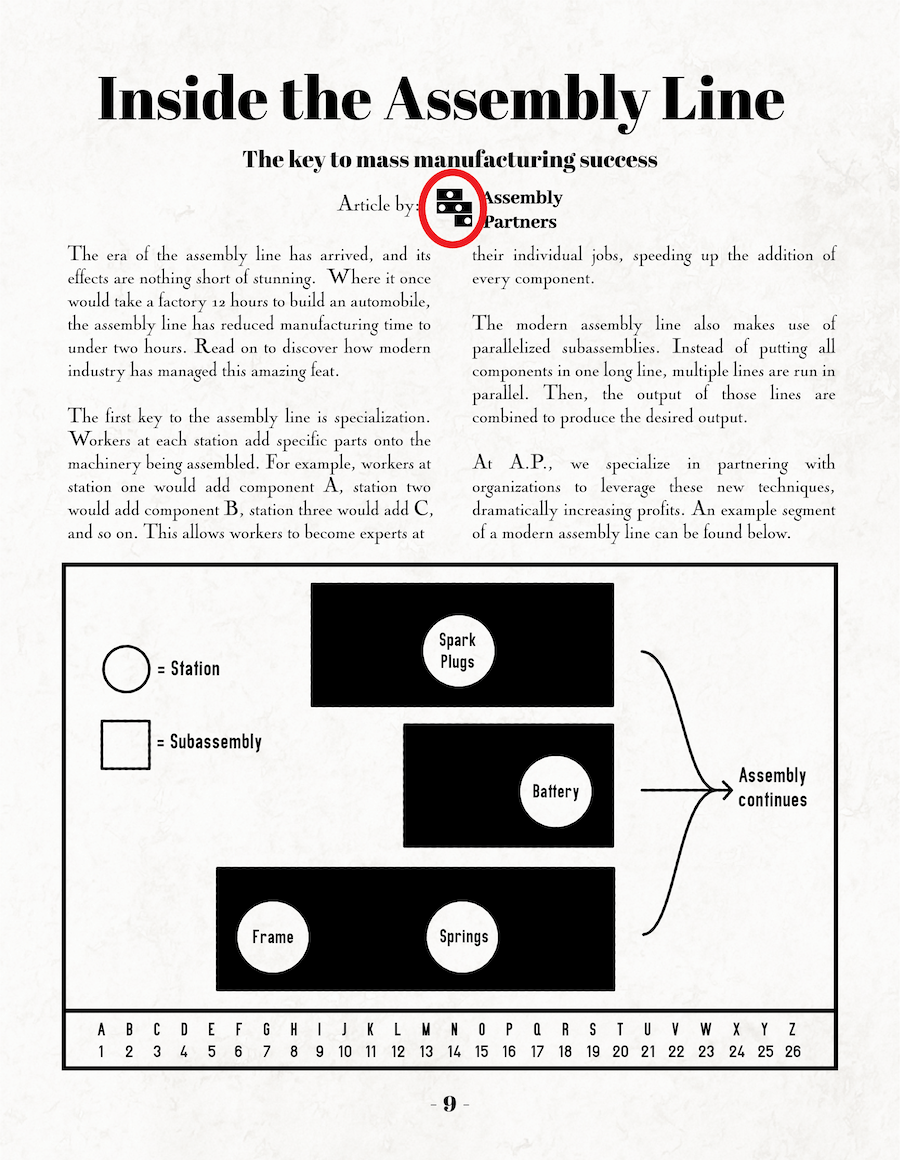
The Assembly Partners logo at the top looks similar to the diagram. The top black bar in the logo has a white circle in the center. This refers to the spark plugs in the diagram (center circle in its subassembly). The middle black bar shows white circles in the first and third positions. This refers to the frame and springs in the diagram. The bottom black rectangle has the second circle in white, referring to the battery. How might you sum these?
-
Second Coded Message Clue #6
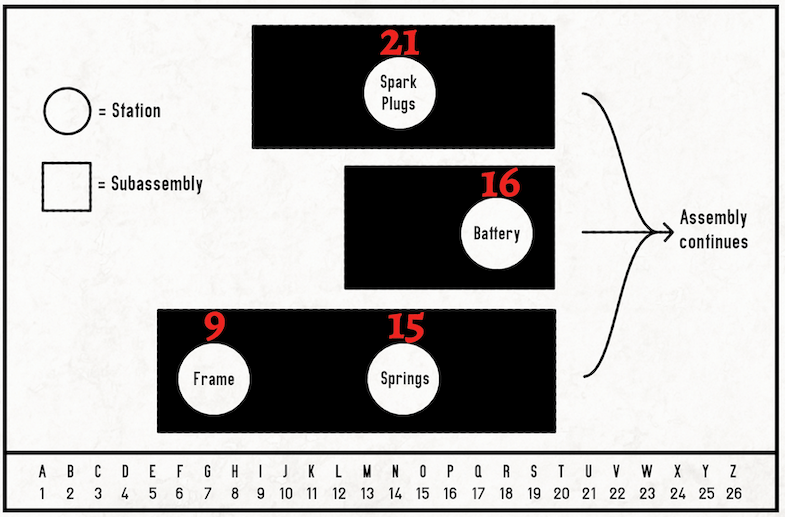
The article mentions that “station one would add component A, station two would add component B, station 3 would add C, and so on.” There is also a strip at the bottom of the diagram that equates letters to numbers.
Spark plugs = U = 21
Frame = I = 9
Springs = O = 15
Battery = P = 16
The sum of these numbers is 61.
-
Second Coded Message Clue #7
Read Agent Morris’ note to see how to use this number to decode the second coded line.
-
Second Coded Message Solution
Use the number “61” to shift the letters in the second message. The first letter should be shifted by 6 (N -> T), second by 1 (G -> H), third by 6 (Y -> E) etc. You can use the cipher disk to help with this.
The decoded message is: THE FBI INTERFERED.
-
Third Coded Message Overall Clue #1
The number “5” at the beginning of the message indicates that page 5 of the magazine holds the key to decoding this message.
If you are missing any pages of the magazine (pages 1-10) or the coded communication (a table with headers Date, I, and O), click here.
-
Third Coded Message Bob the Bee - Clue #1
From the third stanza of the poem, you learn that the number you are looking for is the same even if rotated 180 degrees. From the fourth stanza, you learn it's a two digit number.
This reduces the possibilities. First, what numbers are the same when turned upside down? 1 is still 1. 0 is still 0 but doesn't work well because when rotated, the two-digit number would start with a 0. 6 could become 9. So, the possibilities are 11, 69, and 96.
-
Third Coded Message Bob the Bee - Clue #2
Look at the fourth stanza. A divisor is a number that divides into another number without any remainder. For example, 1, 3, 5, and 15 are the four divisors of 15.
There's another way you figure out what number Bob the Bee is. Look at the fifth stanza. Through an Internet search, you will learn that a number is considered “semiprime” if it is the product of exactly two prime numbers (not including 1 and itself). For example, 15 is semiprime because its only factors are 3 and 5, and these are both prime.
-
Third Coded Message Bob the Bee - Solution
The sum of the divisors of 69 (1 + 69 + 3 + 23) is 96, which fits with the fourth stanza. Further, out of 11, 69, and 96, only 69 is semiprime, which also fits with the fifth stanza.
So, Bob the Bee is the number 69.
-
Third Coded Message The Pirate Code - Clue #1
Each symbol in the code represents a number and a function (add, subtract, multiply, or divide).
-
Third Coded Message The Pirate Code - Clue #2
From the first line, the sword must be subtract 4. There is no other whole, positive number that could be subtracted, added, multiplied, or divided to 1 that would yield -3.
-
Third Coded Message The Pirate Code - Clue #3
Given that the sword is subtract 4, from the second line we know that the chest must either be times seven or plus 12.
-
Third Coded Message The Pirate Code - Clue #4
From the third line: If the chest is times 7, the skull would need to be times 2 or plus 2. If the chest is plus 12, the skull would need to be times 8 or plus 14.
-
Third Coded Message The Pirate Code - Clue #5
From the fourth line: If the chest is times 7, the skull would need to be subtract 5. If the chest is plus 12, the skull would need to be times 8.
-
Third Coded Message The Pirate Code - Solution
The only solution that works for both lines three and four is: the chest represents plus 12 and the skull represents times 8.
The last line then translates to: + 12 x 8 - 4, which is 92. So, the value of the sea in the Pirate code is (plus) 92.
-
Third Coded Message The Geometric Conundrum - Clue #1
Solve the other two sections on the page before solving this one.
-
Third Coded Message The Geometric Conundrum - Clue #2
The “B” and “C” are values you are solving for on other portions of this page. B is referring to Bob the Bee, and C is referring to the Sea symbol.
-
Third Coded Message The Geometric Conundrum - Clue #3
Use the handy Pythagorean Theorem to solve for the third side of a right triangle.
-
Third Coded Message The Geometric Conundrum - Solution
The “B” refers to Bob the Bee (69), and “C” refers to the Sea in the Pirate Code (92). Using the Pythagorean theorem, sqrt(69^2 + 92^2) = 115.
-
Third Coded Message Overall Clue #2
Read Agent Morris’ note to see how to use this number to decode the second coded line.
-
Third Coded Message Overall Solution
Use the number “115” to shift the letters in the first message. The first letter should be shifted by 1 (X -> Y), second by 1 (N -> O), third by 5 (P -> U), and then repeat. You can use the cipher disk to help with this.
The decoded message is: YOU HAVE FAILED.
-
Fourth Coded Message Clue #1
The number “3” at the beginning of the message indicates that page 3 of the magazine holds the key to decoding this message. Remember Agent Morris’ note though, that this may not be the only page in the magazine that is needed to decode the message!
If you are missing any pages of the magazine (pages 1-10) or the coded communication (a table with headers Date, I, and O), click here.
-
Fourth Coded Message Clue #2
You will also need the second half of the article, on page 4, to find the key to decode the message. The Talkies movie poster “The Five Pairs” on page 6 may also be a helpful clue.
-
Fourth Coded Message Clue #3
The movie poster mentions five pairs that share a hidden connection. There are exactly ten places circled in the Talkie article. Can you find the hidden connection that creates five pairs?
-
Fourth Coded Message Clue #4
Each of the circled word(s) has a synonym that looks the same as but sounds different than another circled word's synonym. For example: another word for "sixty seconds" is a minute. Another word for "tiny" is minute.
-
Fourth Coded Message Clue #5
The five words are: minute, record, converse, tear, and drawer.
-
Fourth Coded Message Clue #6
Use the five words to fill in the crossword and discover “today’s lucky number.”
-
Fourth Coded Message Clue #7
Fill in each of the “?” columns with the five words. Then figure out which numbers fit in the 1, 2, 3, and 4 numbered rows.
-
Fourth Coded Message Clue #8
The answer is FOUR HUNDRED TWENTY THREE. Read Agent Morris’ note to see how to use this number (423) to decode the message.
-
Fourth Coded Message Solution
Use the number “423” to shift the letters in the first message. The first letter should be shifted by 4 (C -> G), second by 2 (G -> I), third by 3 (S -> V), and then repeat. You can use the cipher disk to help with this.
The decoded message is: GIVE ME TIME.
-
Fifth Coded Message Clue #1
The number “7” at the beginning of the message indicates that page 7 of the magazine holds the key to decoding this message. Remember Agent Morris’ note though, that this may not be the only page in the magazine that is needed to decode the message!
If you are missing any pages of the magazine (pages 1-10) or the coded communication (a table with headers Date, I, and O), click here.
-
Fifth Coded Message Clue #2
You will also need page 8.
-
Fifth Coded Message Clue #3
Page 7 says to buy two appliances from “trusted brands.” Using the articles on page 8, can you discover which appliances are trustworthy and which ones are not?
-
Fifth Coded Message Clue #4
The $63 radio ad claims that “9 out of 10 homes in the United States have radios in their homes.” Page 8, however, states that inaccurate statistics are signs of untrustworthy brands, and also states that “almost 70% of American homes now have electricity.” Since the radio needs electricity to operate, this must be a false statistic and represent an untrustworthy brand.
-
Fifth Coded Message Clue #5
The vacuum cleaner shows a plug with 3 prongs, but according to page 8, this feature has not yet been implemented in consumer products.
In addition, the can opener has not been released yet.
The lightbulb ad advertises “ventilated glass bulbs,” but the article on pg 8 states that lightbulbs must be vacuum sealed to operate (and therefore cannot be ventilated).
-
Fifth Coded Message Clue #6
The remaining two items are the toaster and refrigerator, representing the only two trustworthy brands on the page. If you buy both, and save $15 (from the top of the page), 215 + 14 - 15 = 214.
-
Fifth Coded Message Clue #7
Read Agent Morris’ note to see how to use this number to decode the second coded line.
-
Fifth Coded Message Solution
Use the number “214” to shift the letters in the first message. The first letter should be shifted by 2 (W -> Y), second by 1 (N -> O), third by 4 (Q -> U), and then repeat. You can use the cipher disk to help with this.
The decoded message is: YOU'RE OUT OF TIME.
-
Code to the Safe Clue #1
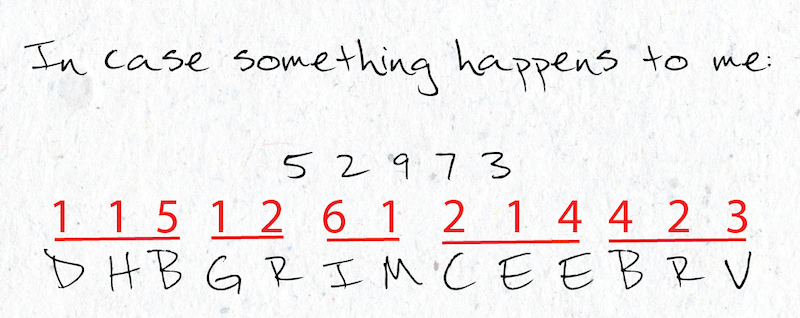
This puzzle uses a small note with the title "In case something happens to me." If you are missing this, click here.
Notice that the five numbers on the note are the same page numbers referenced on the coded message.
-
Code to the Safe Clue #2
Put the numerical answers to each of the pages one after the other in the order they are listed. Notice that there are as many digits as encoded letters. Can you translate the message now?
-
Code to the Safe Solution
Use the numerical answers from the magazine to shift the string of letters. The message reveals three numbers: EIGHT ONE FIFTY.
Now that you have the solution, select Check Solutions and input your answer. The next part of the story will be revealed.
-
The Final Puzzle Clue #1
This puzzle uses a 2-page letter inside the Open When Instructed envelope. If you are missing this letter, click here.
One of the pages in the magazine will help you decode this letter. Look for subtle references in the letter to clue you into the page.
-
The Final Puzzle Clue #2
The letter uses several car references: well-oiled machine, holding fuel in reserve, bumps in the road, and take the wheel.
Where in the magazine have you seen these types of references? You may need to look through previous materials.
-
The Final Puzzle Clue #3
Each of Milano’s bullets encodes a part of a car. Find these parts on page 10 in the magazine, and get the associated letter.
-
The Final Puzzle Solution
“Put a stop” to them in the first bullet refers to the Brake Lever - or “R”
“Bumps in the road” and being “flexible” refers to the Springs - or “O”
Holding “fuel in reserve” refers to the Gasoline Tank - or “M”
The “seamless facade” refers to Body Panels - or “E”Il Padrino can be found in ROME.
Now that you have the answer, select Check Solutions and input this answer. The final part of the story will be revealed!