Enter a world of progress and perfection
Use this Companion Guide to check your solutions as you play by selecting Check Solutions & Unlock the Story below. Sometimes, the story will progress as you check your solutions. The Companion Guide can also be used to view hints. Most players use at least a few hints to get through the entire game.
Below is the list of items you should have for each part. If you are missing anything from Synapse, click here.
To begin with, you should have a 'Read Me First' pamphlet for Synapse.
Synapse - Part I
- An introductory card that sets the scene
- A holoscreen that outlines the Part I objectives
- A holoscreen with a topographical map
- A holoscreen with chess and go boards, as well as two old newspaper clippings
- A holoscreen with a jeopardy-like layout, plus holocard with a television depicted
- Six holoscreen images and one base without an image
- A holoscreen with glowing yellow and red elements and a punchout sheet of fragmented sentences
Synapse - Part II
- A holoscreen of the Master Directive
- A holoscreen with a web of connected circles
- A holoscreen with housing and UBI statistics
- A holoscreen with a delivery map, as well as a sheet with two circular navigation core pieces
- A top-down cross-section diagram of a human brain
- A holoscreen with two video conference images
- A side view of an annotated human brain and sheet with electronic chips
-
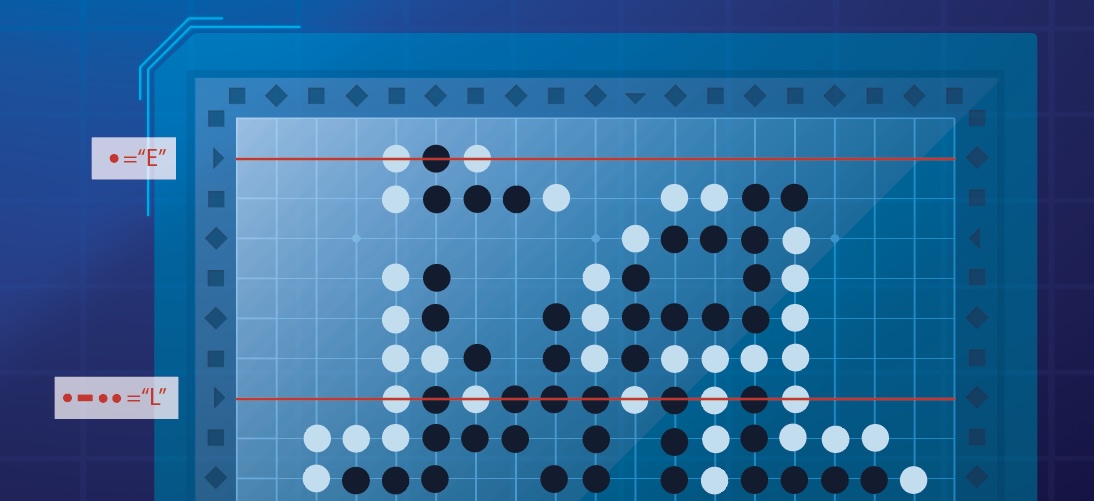
Topographical Map (Part I) Clue #1
The topographical map includes a key and list of statistics for the region on its bottom right, as well as 12 unique shapes that identify ore deposits scattered throughout the terrain. The type of ore at each deposit, however, is not provided. Can you identify what type of ore is at each deposit? From the statistics in the bottom right, two should be immediately identifiable.
-
Topographical Map (Part I) Clue #2
The statistics for this region note that the gold deposits can be found at the highest and lowest elevations. Can you identify these two deposits? Each white line on the map identifies an elevation change of 50 feet, and there are several elevations that are provided if you look carefully.
-
Topographical Map (Part I) Clue #3
The following two locations can be identified as being gold deposits. The deposit on the left is the only one below 4,200 ft., and the one on the right is the only one above 4,600 ft.
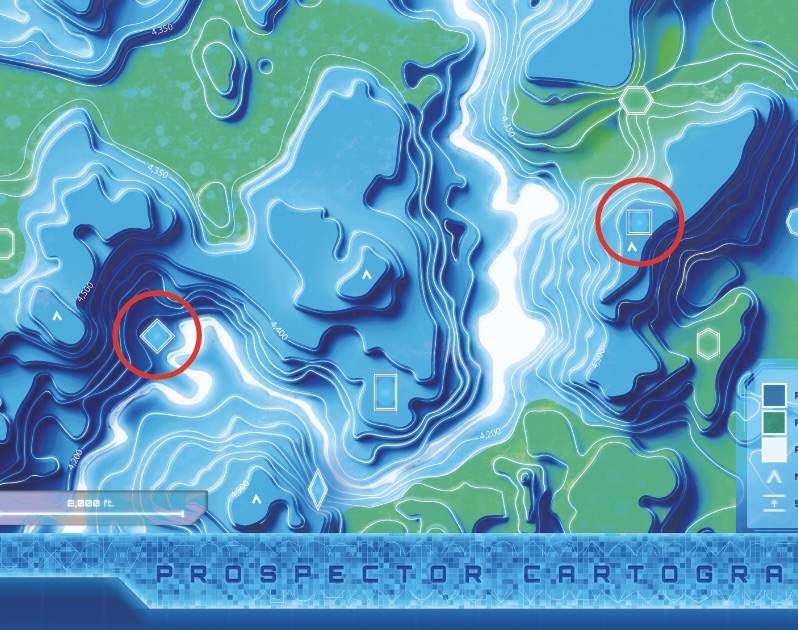
The statistics note that both gold deposits are within 4,000 ft of the same silver deposit. Can you identify it?
-
Topographical Map (Part I) Clue #4
There is only one location that is within 4,000 ft of both gold deposits. This location (which must be the silver deposit) is shown below.
The statistics note that the two steepest mine sites are occupied by lead and zinc. Steep locations are areas where there are lots of elevation lines close together (the elevation changes a lot over a short horizontal distance). We also know that each gold site is within 3,000 ft of both a zinc and copper site. This information should allow you to identify the locations of the copper and zinc sites near the left-most gold site, as well as a lead site.
-
Topographical Map (Part I) Clue #5
The low-elevation gold site on the left of the map only has two unknown deposits that are within 3,000 ft. One must therefore be a copper deposit and one must be a zinc deposit. One of these deposits is also the steepest on the map (meaning it has to be zinc or lead). The steep site is therefore zinc, and the other site is copper. The other steep site on the map can therefore be determined to be lead. The map can now be updated as follows:
You know that only two sites are in the same terrain type (rocky vs forested). The gold deposits are both in rocky terrain, so all other sites of the same kind must be in different terrain types.
There are now only two unknown sites within 3,000 ft. of the high-elevation gold site. One must be copper and the other must be Zinc. Can you determine which is which?
-
Topographical Map (Part I) Clue #6
We already have a zinc deposit in rocky terrain, and a copper deposit in forested terrain. That means that the rocky terrain site near the high-elevation gold site must be copper, and the forested terrain site must be zinc. The map can be updated as follows:
You now know that both zinc deposits are on the same side of the river. Given the stats, you now know that all remaining deposits must be on opposite sides of the river, and be in opposite terrain types (rocky vs. forested). From this information, you should be able to identify all remaining locations.
-
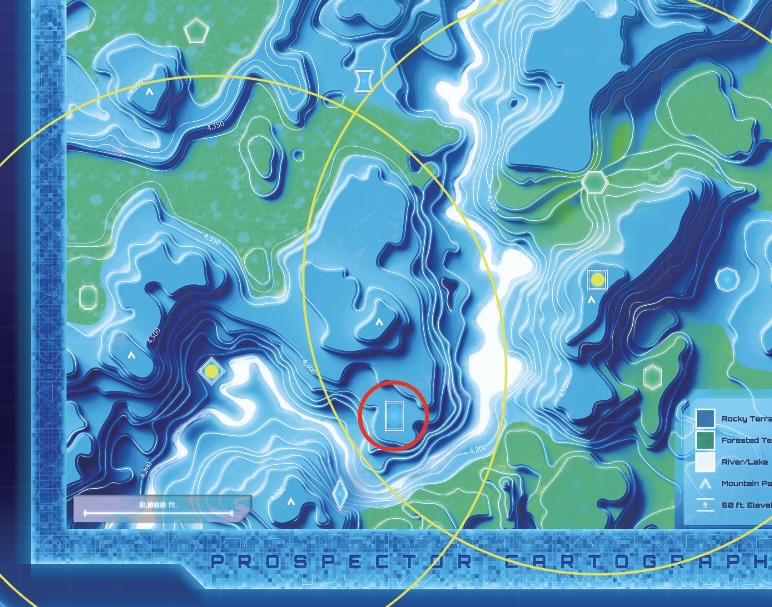
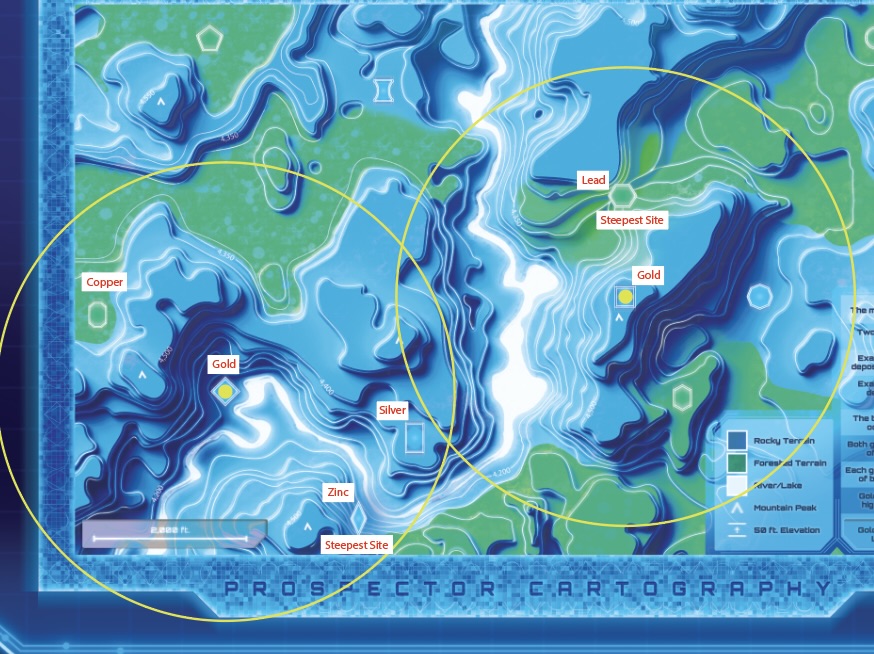
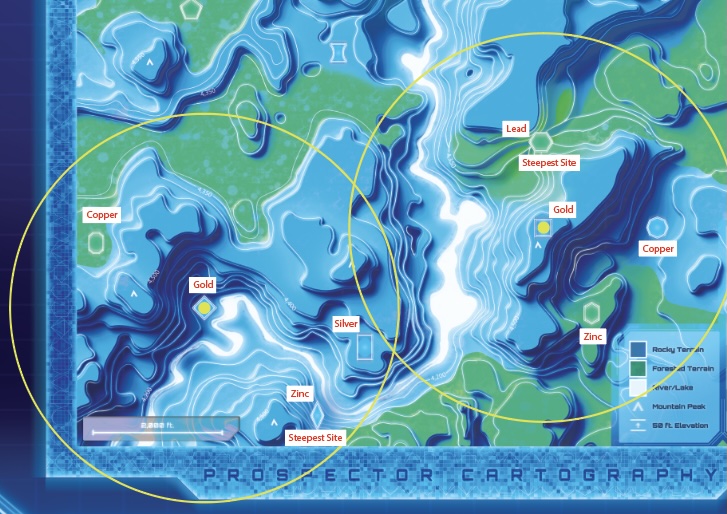
Topographical Map (Part I) Clue #7
A map with all deposits classified by ore type is shown below:
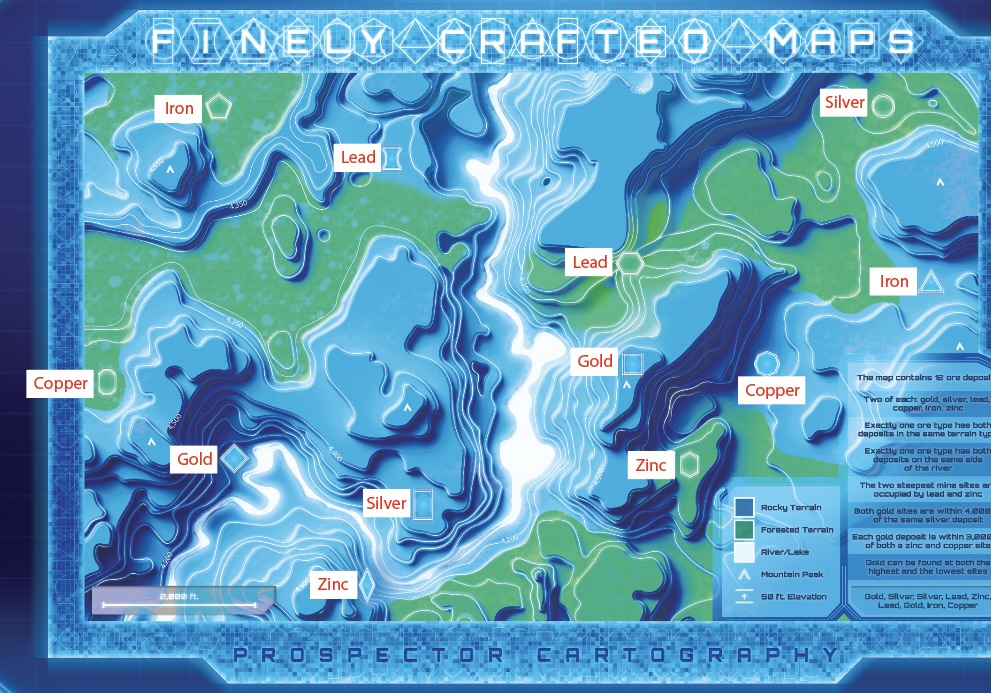
The last line of the statistics lists out the ore types in a peculiar order. Can you figure out a way to turn each ore type into a letter? You’ll need to use the classifications you just figured out!
-
Topographical Map (Part I) Clue #8
Take a look at the title of the map: “FINELY CRAFTED MAPS”. Do you notice anything familiar about this title? Anything that has to do with the locations you just identified?
-
Topographical Map (Part I) Clue #9
Each letter in the title is surrounded by two geometric shapes, and some of these are the same shapes as the ore deposits. There are two ore deposits of each type shown on the map - associated with two shapes. Gold, for example, is the square, and the square that has been rotated 45 degrees. Can you identify a letter in the title using these two shapes together? Now, can you identify the letters associated with the other ore types?
-
Topographical Map (Part I) Solution
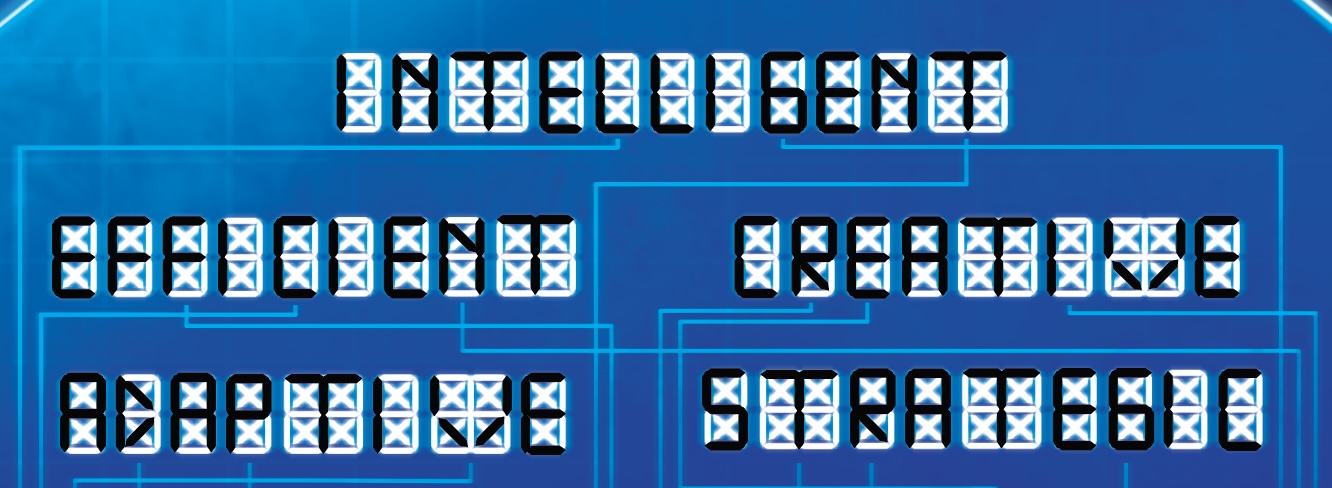
Combining each set of two shapes, and pulling the corresponding letter from the title, reveals the letters: E, F, F, I, C, I, E, N, T. The solution is “Efficient”. Input “Efficient” in the “Check Solutions & Unlock the Story” dropdown menu to progress the storyline.
-
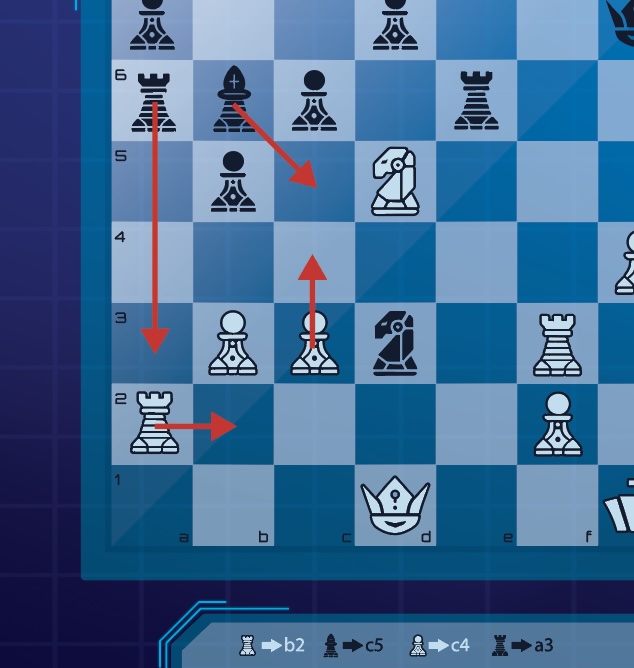
Chess & Go (Part I) Clue #1
Your Part I envelope should contain a holoscreen with a chess and go board, as well as two different newspaper articles. If you are missing any of these components, please click here.
The holoscreen that references all the other puzzles asks if you are able to “read the boards”. You will be looking to get a word from each board and can start with either.
For the chess board, there is a window below the board. What might this window be instructing you to do? Looking at the back of the chess newspaper article may help you.
-
Chess & Go (Part I) Clue #2
Each line of the window below the chess board indicates a series of moves that specific chess pieces can make. The symbol identifies a chess piece, and the letter/number combination identifies the square it ends up at. Try drawing the four moves from the first line on the board. Do you notice anything?
-
Chess & Go (Part I) Clue #3
The first line of chess piece moves are shown below. Do you see anything that’s being created by these moves? If not, try the next couple lines. Or, try shading in the squares that the moving pieces pass through (including their starting positions).
-
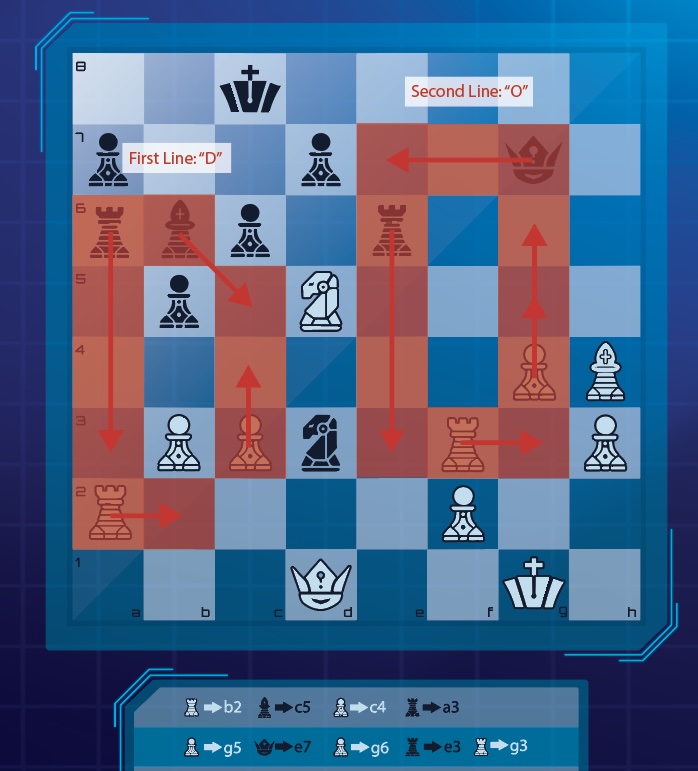
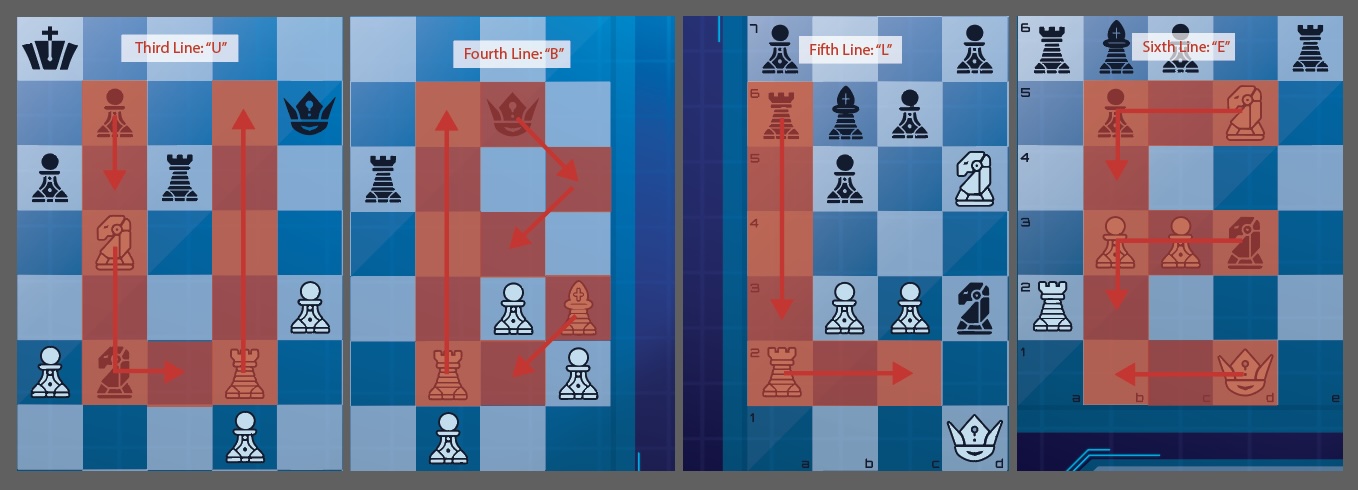
Chess & Go (Part I) Clue #4
Each line of moves in the window below the board draws a letter on the chess board. The first letter is a “D”, and the second is “O”. Can you figure out the remaining letters?
-
Chess & Go (Part I) Clue #5
The remaining letters are shown below. The rows spell the word “DOUBLE”.
-
Chess & Go (Part I) Clue #6
Next take a look at the Go board. You’ll need to use the back of the Go newspaper article to decipher the encoded word. You do not need to understand the rules of Go to solve the puzzle. Do you notice anything within the border of the board that sticks out and may connect to the morse code section on the back of the newspaper article?
-
Chess & Go (Part I) Clue #7
The majority of the symbols around the outside of the Go board are squares and diamonds, but there are a few triangles seemingly scattered at random. Are triangles used on the back of the newspaper article anywhere?
-
Chess & Go (Part I) Clue #8
In the table at the bottom of the morse code article, each letter has a triangle next to it that points to its corresponding morse code translation. Each triangle on the outside of the Go board also points to a line of black and white pieces that can be translated using morse code. At the bottom of the article it notes that a black dash is the length of 3 black dots. Can you figure out how to translate the lines that are identified by triangles into letters?
-
Chess & Go (Part I) Clue #9
Two lines and their translations are shown below. Can you do the remainder?
-
Chess & Go (Part I) Clue #10
The remaining lines and their translations can be found below. Reading clockwise, starting with “L”, you can find the word “Letters”.
Between the two boards you have now deciphered “Double Letters”. Take a look at the newspaper articles. Are you able to find the final word? Pay attention to the underlined portions.
-
Chess & Go (Part I) Solution
Taking the double letters within each underlined section, you get “STRAT” and “EGIC”. Combining these, you get the final answer “Strategic”. Input “Strategic” in the “Check Solutions & Unlock the Story” in the dropdown menu to progress the storyline.
-
Jeopardy (Part I) Clue #1
The Part I envelope should include a holoscreen of a jeopardy-like board, as well as an “IQ Entertainment” card. If you are missing either of these components, please click here.
Start by coming up with the answers to the Jeopardy board. What does each rectangle refer to?
-
Jeopardy (Part I) Clue #2
Solutions to the Jeopardy board:
- Not Animals: hot dogs, crane, white elephant, cricket, red herring
- U.S. State Symbols: maple, square dance, orange blossom, lobster, watermelon
- Famous Firsts: Neil Armstrong, Amelia Earhart, popsicle, George Washington, purple heart
- You Can’t See Me: gravity, time, black ice, love, oxygen
- Not Clothing: Robin Hood, hi-hat, green berets, bible belt, yellow jacket
- Nature’s Record Holders: Mt. Everest, blue whale, Nile river, Angel falls, dung beetle
Take a look at your answers and the “IQ Entertainment” card. Is there any connection you can find between the two?
-
Jeopardy (Part I) Clue #3
The TV on the IQ Entertainment card has a series of colored bars. Several of your answers within the Jeopardy board also have colors… are you able to identify letters using the words associated with each color?
-
Jeopardy (Part I) Clue #4
The list of answers with colors is as follows: red herring, white elephant, yellow jacket, purple heart, orange blossom, blue whale, black ice, green berets. Notice that the number of colored bars on the TV matches the number of digits in the phone number exactly (10 of each). Can you use the words that are associated with each color, and the numbers below the TV to find a 10 letter word?
-
Jeopardy (Part I) Clue #5
The leftmost colored bar on the TV is red, and the leftmost number is 5. The word associated with the color red is “Herring”, and the 5th letter is “I”. If you follow this pattern, can you identify a word?
-
Jeopardy (Part I) Solution
Pulling the 5th, 7th, 6th etc. letters from each of the associated words (herring, elephant, jacket etc.), the word “INTELLIGENT” is revealed. Input “Intelligent” in the “Check Solutions & Unlock the Story” dropdown menu to progress the storyline.
-
Artwork (Part I) Clue #1
Your Part I Envelope should include 6 distinct vertical pieces of artwork with titles below them, as well as one base that doesn’t include artwork, and instead of a title, has a series of blanks with arrows leading from one blank to the next. If you are missing any of these pieces, click here.
The holoscreen that mentions all of the other puzzles instructs you to “follow the unusual elements to find the hidden title”. Are you able to identify some “unusual elements” in the pieces of artwork?
-
Artwork (Part I) Clue #2
Do you see any unusual elements that crop up in multiple locations? How might you “follow” the unusual elements? Can you identify places your path might begin and end?
-
Artwork (Part I) Clue #3a "Catalyst" Clue
Try looking under the desk, on the computer monitors, and on a shelf.
-
Artwork (Part I) Clue #3b "Prophecy" Clue
Try looking on the side of the obelisk and on the ground in front of the obelisk.
-
Artwork (Part I) Clue #3c "Overlook" Clue
Try looking at the feet of the robot, and on top of one of the skyscrapers in the scene.
-
Artwork (Part I) Clue #3d "Fracture" Clue
Try looking at the screens in the alleyway, and in the shadows in the foreground of the image.
-
Artwork (Part I) Clue #3e "Conclave" Clue
Try looking on the left and right edges of the scene.
-
Artwork (Part I) Clue #3f "Infinite" Clue
Try looking in the stars surrounding the astronaut (3 items).
-
Artwork (Part I) Clue #4
The hidden item locations are identified below:
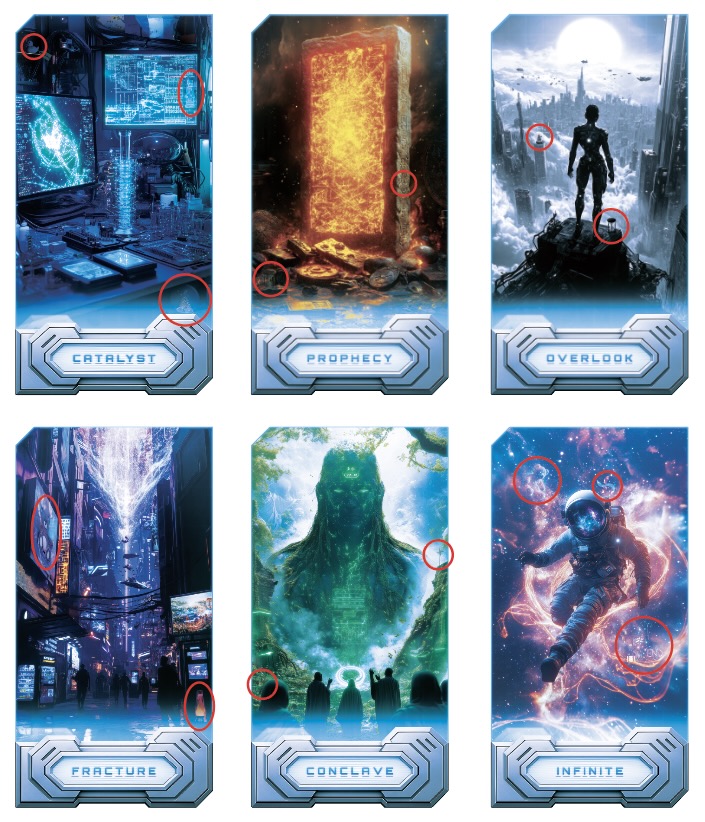
The base without an image shows 8 blank spaces with arrows going between them. You've likely noticed that each item has a pair in another image (2 teddy bears, 2 pinwheels, 2 lava lamps etc.). Can you identify a path to follow that connects all the items in the various images? For example, from the rubber ducky in Catalyst, to the rubber ducky in Prophecy, then from the hourglass in Prophecy to the hourglass in Overlook. How might this path identify 8 letters to fill the blanks in the base?
-
Artwork (Part I) Clue #5
The correct path is as follows: Catalyst to Prophecy (shared rubber ducky, with a “begin” tag in Catalyst), Prophecy to Overlook (hourglass), Overlook to Catalyst (snowglobe), Catalyst to Fracture (lava lamp), Fracture to Infinite (teddy bear), Infinite to Conclave (pinwheel), Conclave to Infinite (gnome).
To summarize the path: Catalyst - Prophecy - Overlook - Catalyst - Fracture - Infinite - Conclave - Infinite.
Notice that there are eight steps in this path, and there are eight blanks in the final base without an image. Notice also that the underlines under each of the letters in the artwork titles match the underlines for your missing letters. How might you pull letters from the sequence you’ve determined (1st image, 2nd image, 3rd etc.)
-
Artwork (Part I) Clue #6
Taking the first letter from the first image in the sequence, you get “C”, second letter from second image: “R”, third from third “E” - this looks promising! Can you find the remainder?
-
Artwork (Part I) Solution
Using the sequence you found to determine specific letters from the artwork titles reveals the word “CREATIVE”. Input “Creative” in the “Check Solutions & Unlock the Story” dropdown menu to progress the storyline.
-
Chat Fragments (Part I) Clue #1
The Part I envelope should include a holoscreen with red and yellow details, as well as a punchout sheet with the same red and yellow around the exterior. If you are missing either of these components, please e-mail us at support@puzzlingpursuits.com.
Your first step should be to punch out the small rectangles from the sheet. You can dispose of the frame that the small rectangles were in. Do you notice anything about these fragments? The original holoscreen that mentions all the other puzzles notes that you should “bridge the fragments”.
-
Chat Fragments (Part I) Clue #2
Some fragments are the ends of sentences, and some are the beginnings of sentences. Can you find fragments that might go together?
-
Chat Fragments (Part I) Clue #3
The fragments can be paired such that they create a full sentence, minus a single word bridging the two fragments. For example, “She carefully unlocked the treasure” - chest - “revealing glittering gold coins inside”. Try to find all the pairings and the missing words. Do you notice anything about the missing words you’ve discovered? If you’re struggling to find any of the words, noticing this pattern might help.
-
Chat Fragments (Part I) Clue #4
The correct pairings and their missing words are found below:
- She used the pole to - vault - over the 12 ft. bar.
- The glowing morning - light - shone through the curtains, waking her.
- The boxer knew when to - duck - to dodge his opponent’s punch.
- The jazz band featured a stand-up - bass - that kept the beat with deep notes.
- She carefully unlocked the treasure - chest - revealing glittering gold coins inside.
- The alarm caused the firemen to - spring - into action, grabbing their equipment.
- He placed a single red - rose - on the table as a symbol of his love.
- The lake is known for its trophy-sized - bass - making it a popular spot for anglers.
- She took a deep breath, feeling her - chest - rise and fall.
- The farm had a pond where a - duck - paddled around in lazy circles.
- If you train hard enough, you - can - achieve anything.
- He walked to the fridge and grabbed a - can - of soda to quench his thirst.
- The suitcase was surprisingly - light - making it easy to carry.
- They broke into the - vault - hidden beneath the bank.
- The mattress was so old that every - spring - inside it squeaked when she moved.
- The sun slowly - rose - over the mountains.
Do you notice any pattern when looking at the missing words you’ve discovered? How might you be able to fit the phrases you’ve discovered into the holoscreen, and how might these configurations yield letters?
-
Chat Fragments (Part I) Clue #5
Each word that bridges two fragments is used in two different sentences. Can you place the paired phrases into the holoscreen together? How might doing so yield letters?
-
Chat Fragments (Part I) Clue #6
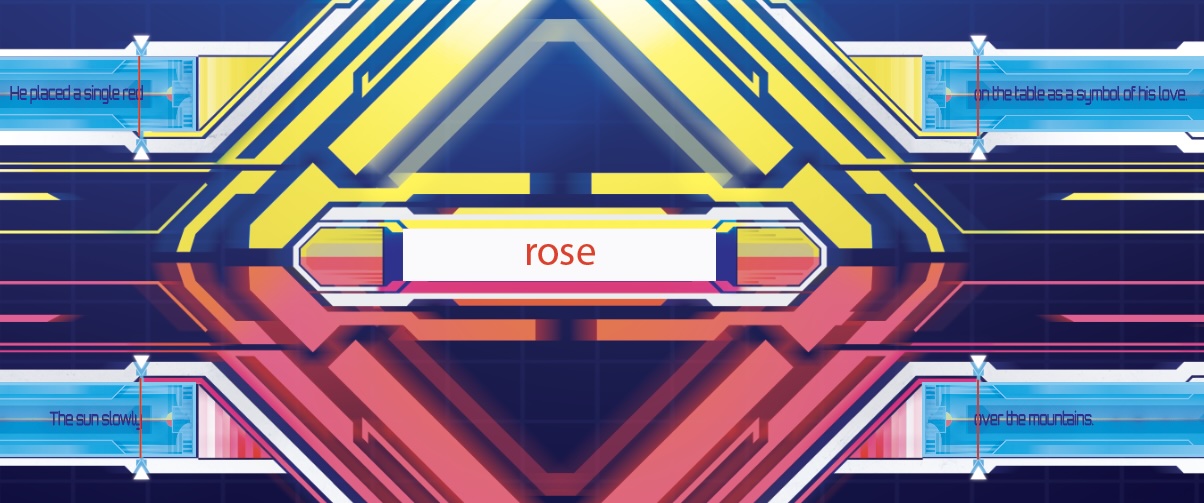
Notice that the rectangular fragments fit perfectly into the four rectangular spaces in the holoscreen. An image of four fragments that share a central bridging word is shown below. The sentences used are: “He placed a single red - rose - on the table as a symbol of his love.”, and “The sun slowly - rose - over the mountains."
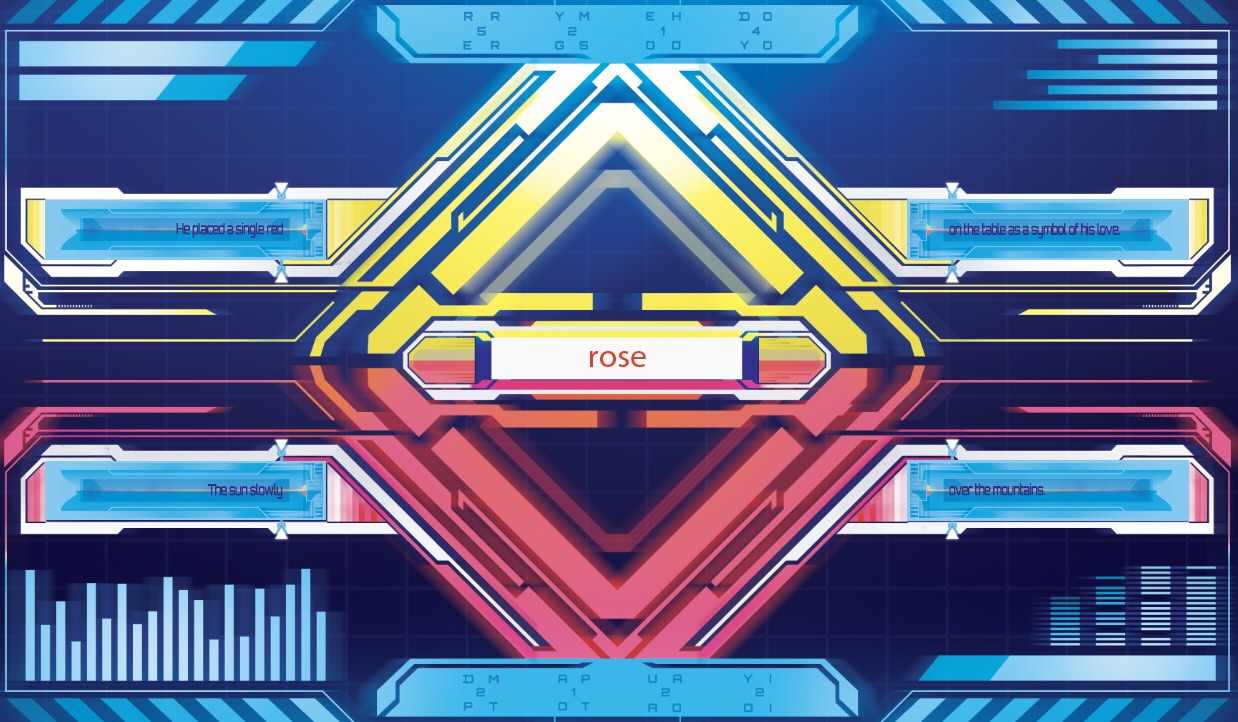
At the top and bottom of the holoscreen, you’ll also notice several groupings of four letters, each with a single number in the center. How might placing the fragments onto the holoscreen relate to these letters/number groupings? Can you discover a letter associated with each grouping?
-
Chat Fragments (Part I) Clue #7
When the fragments are placed in each rectangular box, there is a triangular indicator that points to either the first or last letter in each fragment. These can be used to extract 4 letters. In the case of the example (image below), the letters are “D, O, Y, O”: “He placed a single reD - rose - On the table as a symbol of his love.” “The sun slowlY - rose - Over the mountains.”
Does this connect with any of the number groupings at the top or bottom of the screen? How might the number indicate a single letter?
-
Chat Fragments (Part I) Clue #8
There is a grouping with the four letters (DOYO) and a number 4 at the top of the holoscreen. Given the layout of the fragments in the holoscreen, what might the 4 refer to? How could you get a letter?
-
Chat Fragments (Part I) Clue #9
The number 4 is in the center of the four letters. Within the holoscreen, the bridging word is located in the center of the four fragments. Taking the 4th letter of “rose” yields the letter “E”. Can you follow this process for the other fragments? What word do you discover?
-
Chat Fragments (Part I) Solution
By identifying the missing/bridging words associated with each four letter grouping, and then pulling the single letter identified by the number, the following letters are revealed:
Top letter groupings: 5th letter of “chest” = T, 2nd letter of “light”= I, 1st letter of “vault” = V, 4th letter of “rose” = E.
Bottom letter groupings: 2nd letter of “bass” = A, 1st letter of “duck” = D, 2nd letter of “can” = A, 2nd letter of “spring” = P.
The two fragments can be combined to reveal the solution: “ADAPTIVE”. Input “Adaptive” in the “Check Solutions & Unlock the Story” dropdown menu to progress the storyline.
-
Intro Holoscreen (Final Meta Puzzle) (Part I) Clue #1
The text dialogue says to “Complete the interface to the right with the deciphered words.” You will need to solve all five other puzzles before attempting to complete this puzzle.
-
Intro Holoscreen (Final Meta Puzzle) (Part I) Clue #2
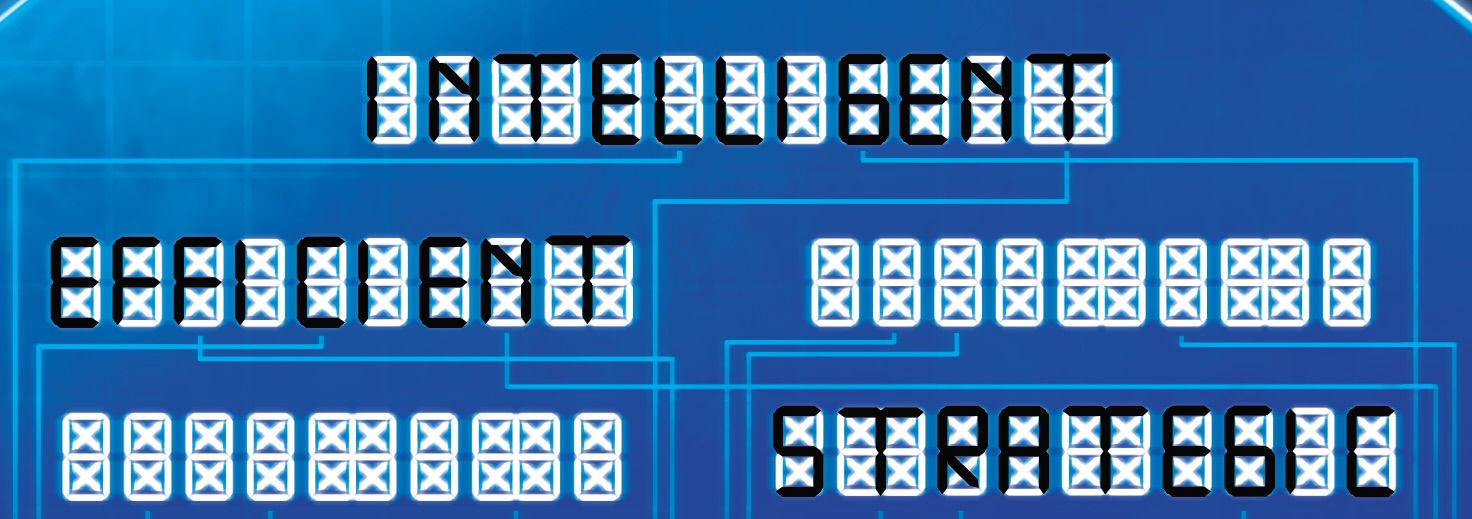
The five solutions from your other puzzles are as follows: Efficient, Strategic, Intelligent, Creative, Adaptive. The interface on the right contains five empty white display sequences. Using the letter key at the bottom of the display, can you place the solutions in the blanks? You may not be able to conclusively place all five right now.
-
Intro Holoscreen (Final Meta Puzzle) (Part I) Clue #3
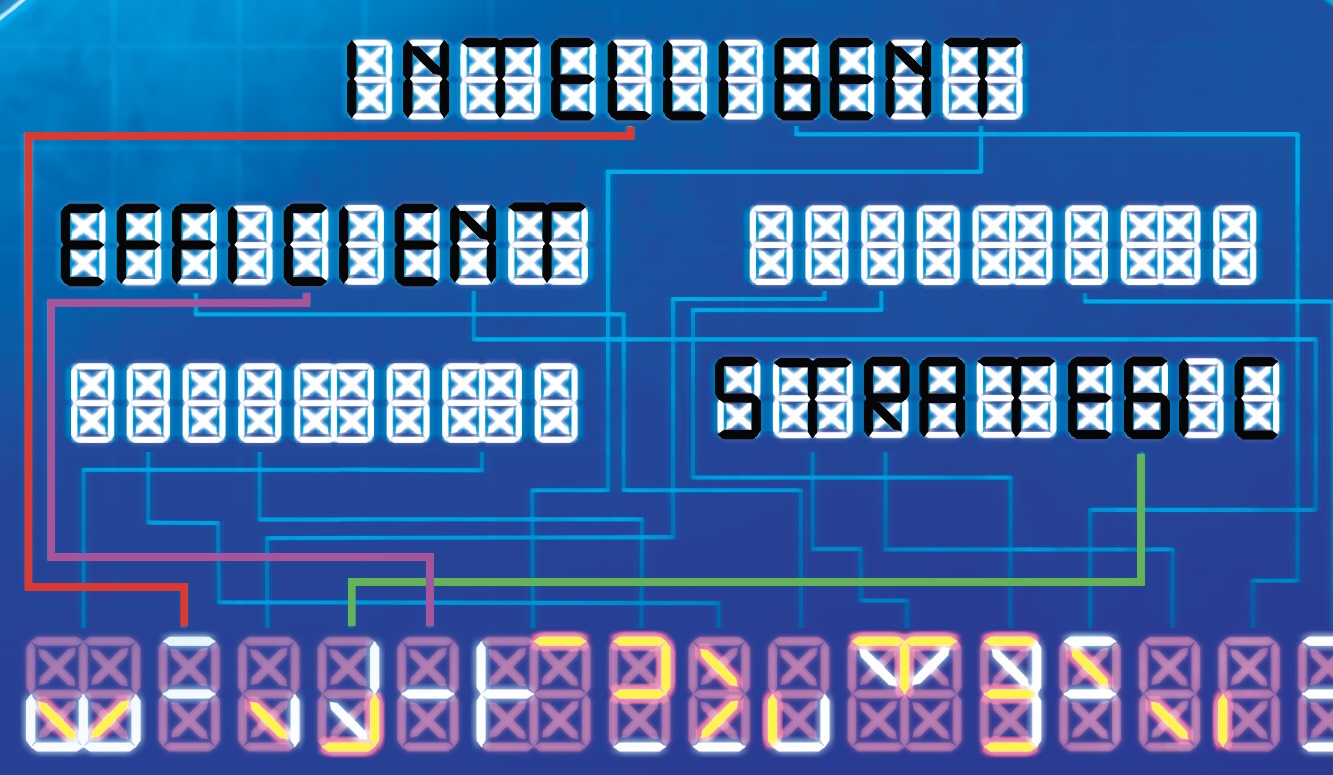
Efficient, Strategic, and Intelligent can all be placed conclusively as shown in the image below. Creative and Adaptive can both fit in both of the remaining blanks, however.
You’ll notice that several of the letters in the solutions are connected to the section of the interface with blue and orange lights. The second, fourth and fifth displays with orange and blue lights connect to letters that we know. Why might these be paired? Can you create new letters from these pairings?
-
Intro Holoscreen (Final Meta Puzzle) (Part I) Clue #4
Can you use the orange and blue lights to modify the letters from your answers? Think about adding or subtracting parts of the letters from your solutions.
-
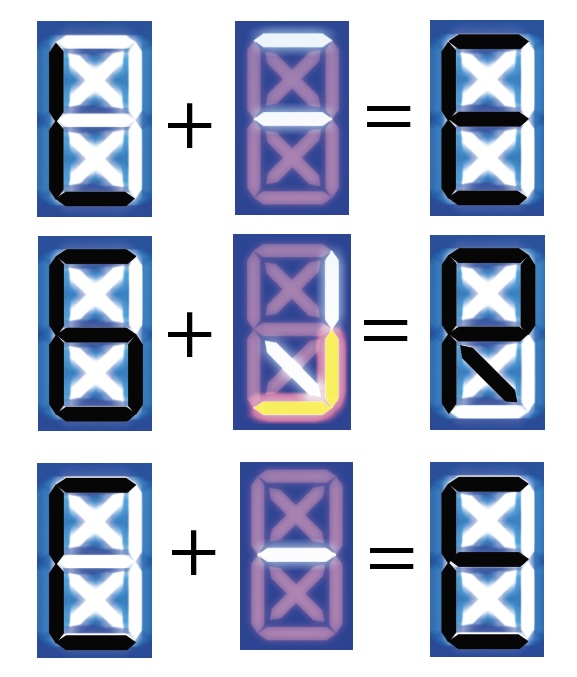
Intro Holoscreen (Final Meta Puzzle) (Part I) Clue #5
If you subtract the orange sections, and add the blue sections to the letters from your solutions, you can find new letters. Examples can be found below.
Given this, can you now determine where “Creative” and “Adaptive” go in the blank displays?
-
Intro Holoscreen (Final Meta Puzzle) (Part I) Clue #6
“Creative” and “Adaptive” must go in the following locations. These are the only places where new letters will be created in all connected orange/blue locations.
Can you now determine the full, final message?
-
Intro Holoscreen (Final Meta Puzzle) (Part I) Solution
By adding blue, and subtracting orange sections from the connected letters, you are able to find the phrase: “We are all Synapse”. Input “We are all Synapse” in the “Check Solutions & Unlock the Story” dropdown menu to discover the conclusion to Part I.
-
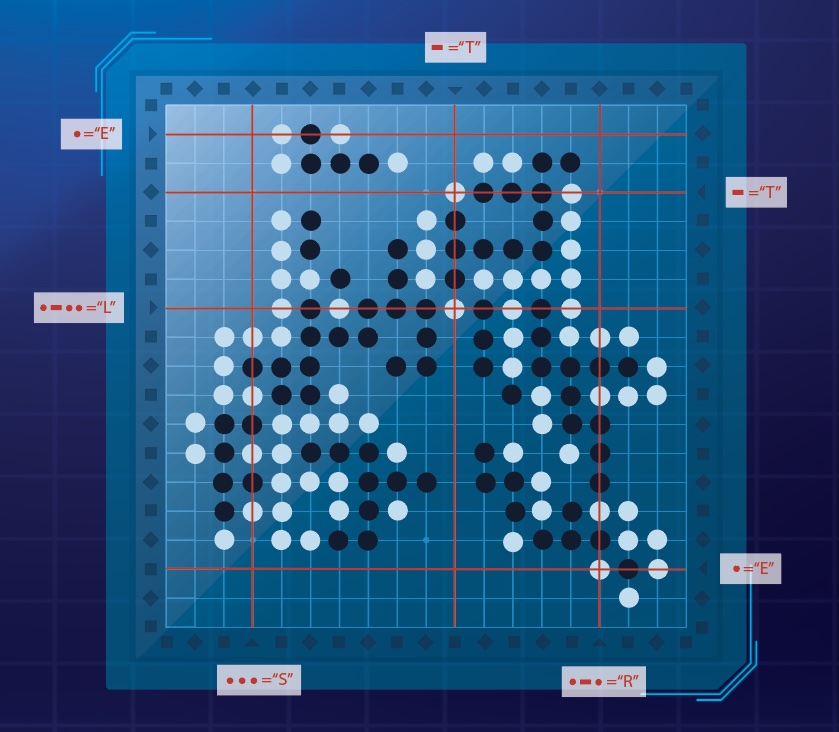
Word Web (Part II) Clue #1
The word web contains a key in the upper left corner. Examine this carefully and see if you can determine how each circle relates to the others. What do the symbols mean?
-
Word Web (Part II) Clue #2
The key contains four main types of transformations:
Anagram (change the order of the letters): “Ideas” and “Aside” use the same letters, just in different orders. Note: If you don’t like puzzling through anagrams, you are welcome to use an online anagram solver to help with this puzzle.
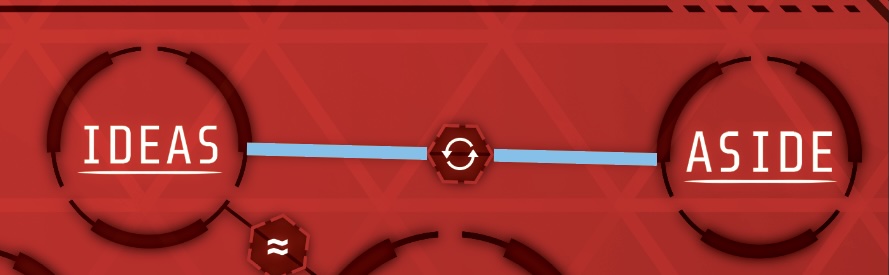
Synonym (roughly the same definition): “Concepts” and “Ideas” can mean roughly the same thing.
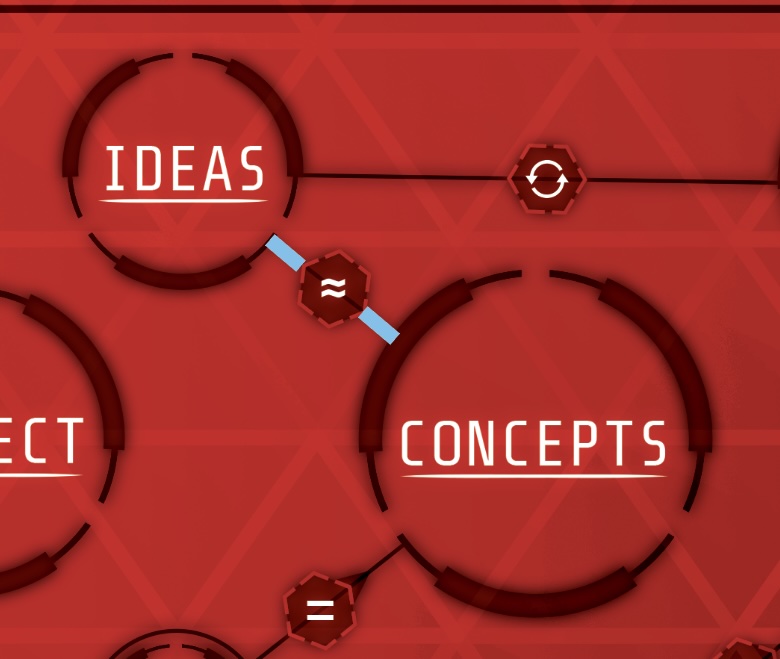
Antonym (roughly opposite meaning): “Stop” and “Go” have opposite meanings.
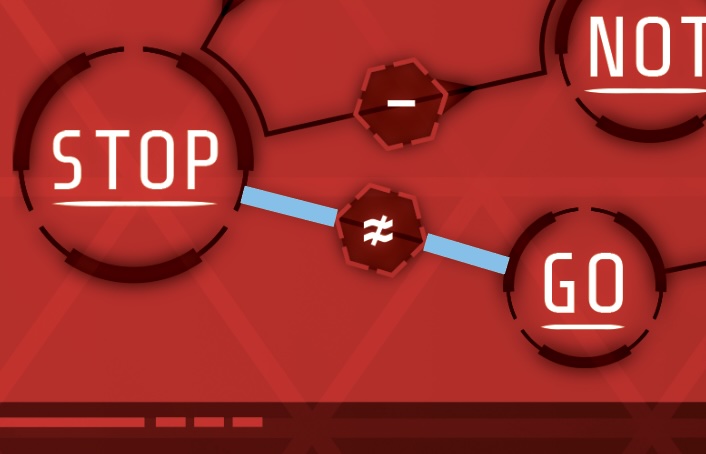
Addition and Subtraction: If you add the letters from “Stop” to the letters in “Connect”, and then take away the letters in “Not”, you are left with a series of letters that can be rearranged to spell “Concepts”. Additionally, if you add a “T” to “No”, you get “Not”, and if you add a “T” to “Go” you get “Got”. You will also notice an arrow attached to each operation to denote the direction in which the equation should be read.
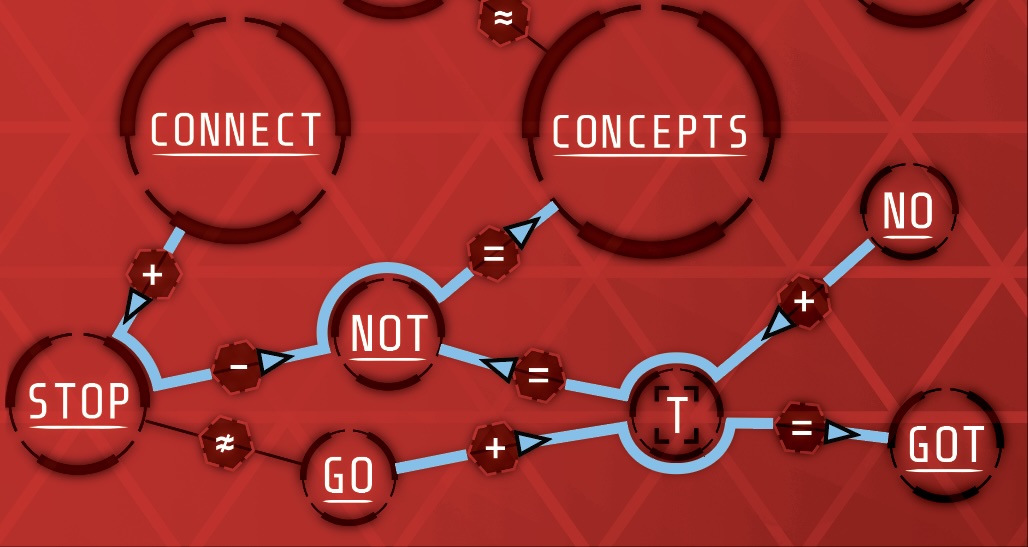
Use these rules to fill in the map. There are several places you can begin. If you get stuck at any point, try attempting a separate area.
-
Word Web (Part II) Clue #3
The sections below can all be great places to start.
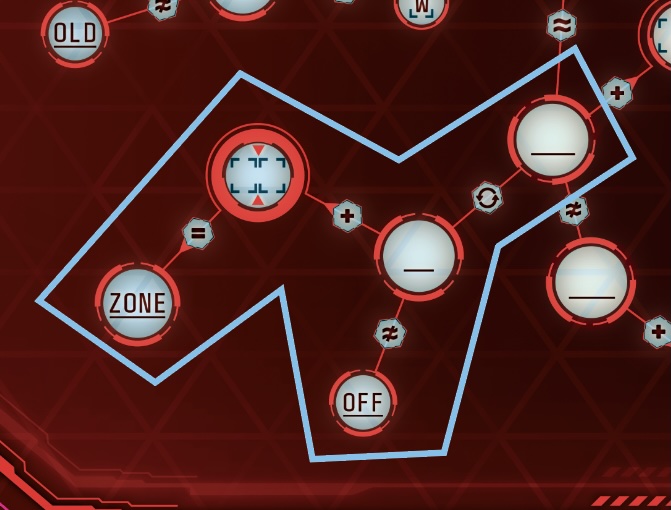
What is the opposite of “OFF”? What two letters can be added to create the word “ZONE”? If you switch the letters in the opposite of “OFF”, what word do you get?
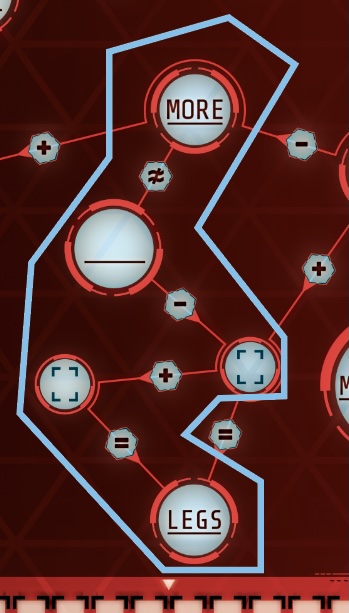
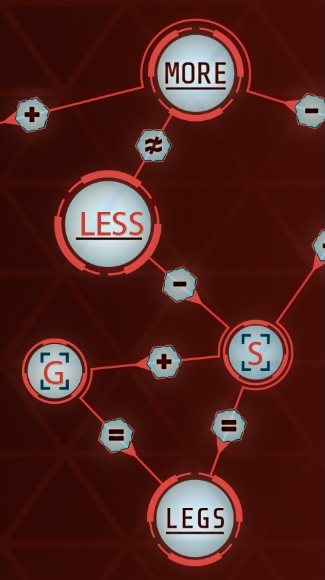
What is the opposite of “MORE”? What letter do you need to subtract from this word, and then what different letter do you need to add to get the word “LEGS”?
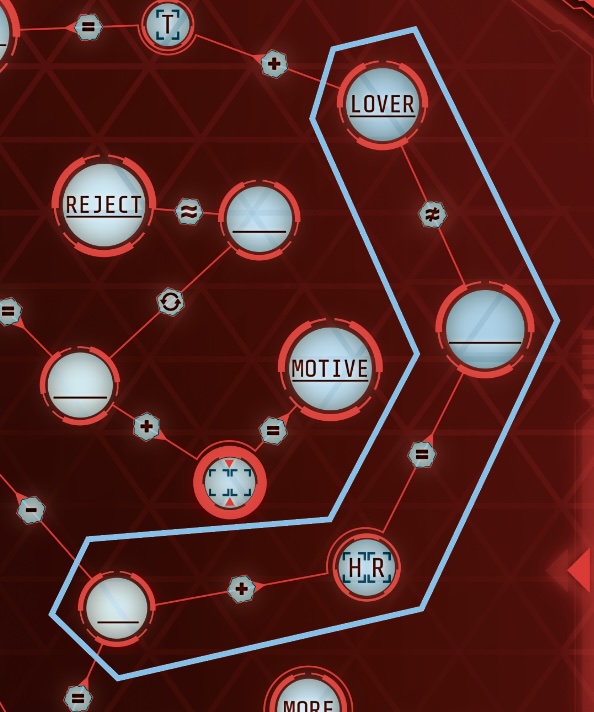
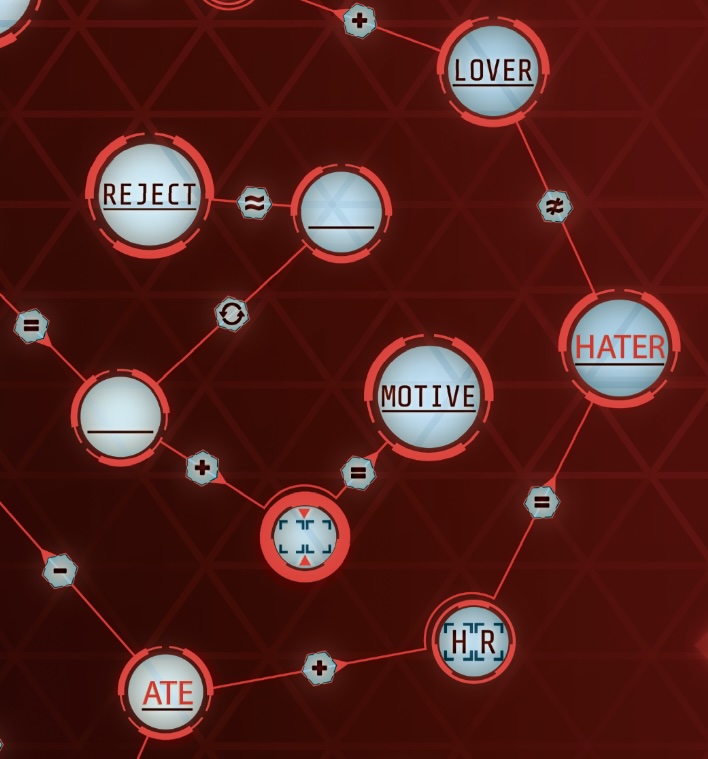
What is the opposite of “LOVER”? You also know that this opposite must include the letters “H” and “R” (because some word + H and R is equal to this word). If you remove the “H” and “R”, what word can you get? (note: there are actually two equally valid words)
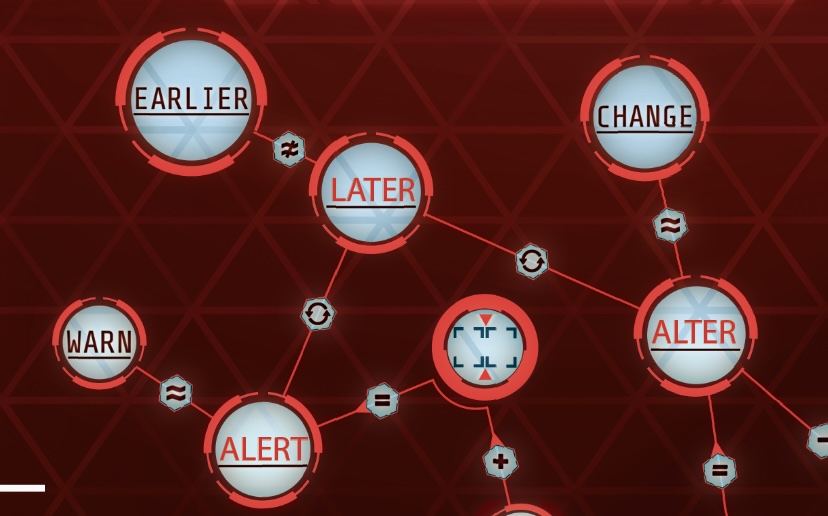
This section contains three different words that all contain the same letters (are anagrams). Can you find 3 different words that all use the same letters, but mean “WARN”, “EARLIER”, and “CHANGE”?

-
Word Web (Part II) Clue #4
The images below show the solutions to the previously mentioned sections. Can you continue filling out sections of the web?

-
Word Web (Part II) Clue #5
The image below shows the web with additional completed areas. Can you finish the map?

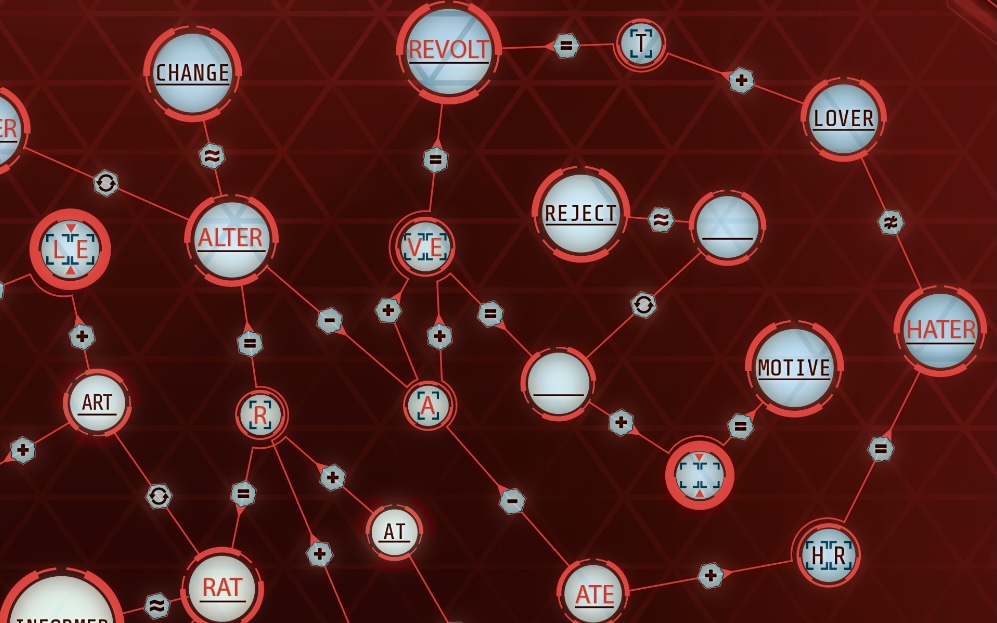
-
Word Web (Part II) Clue #6
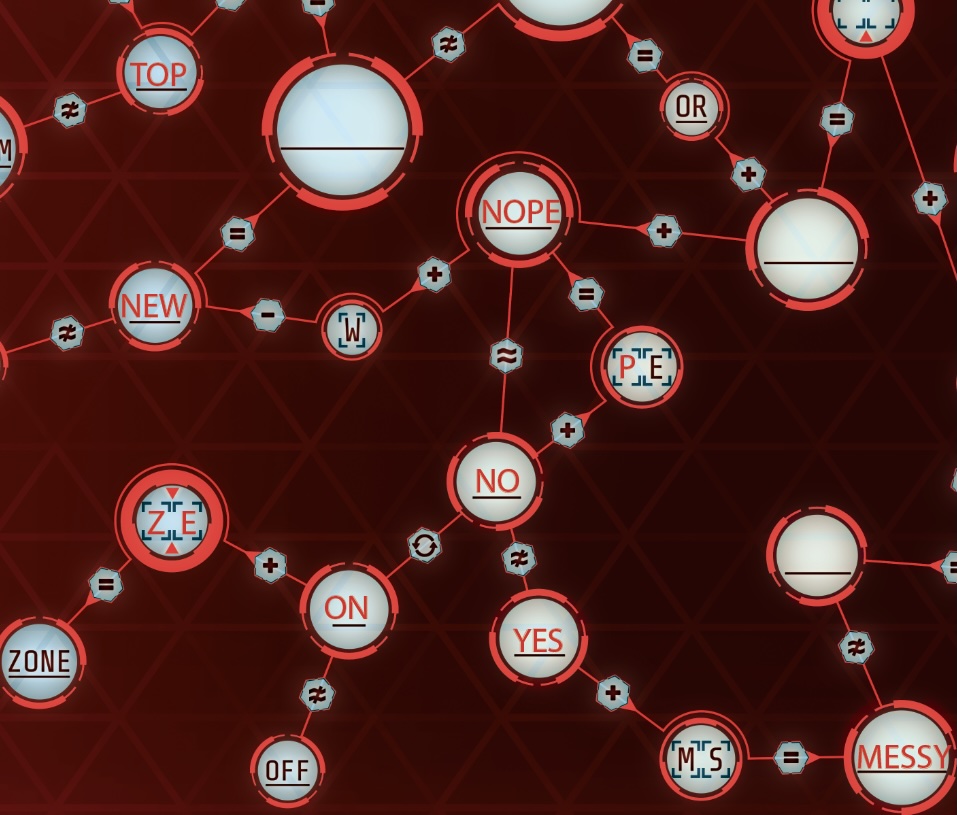
The remaining sections are shown below. Notice that there is a series of 10 blanks for letters in the bottom right that is not connected to the web. How might you fill in these blanks? Are there any markings that might help you?
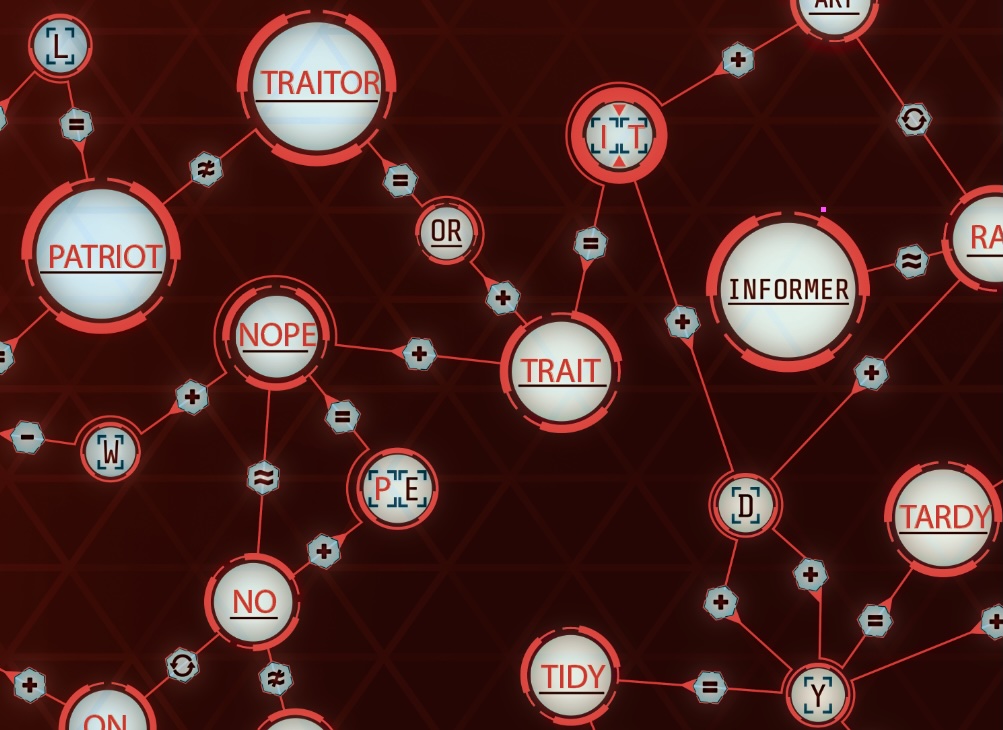
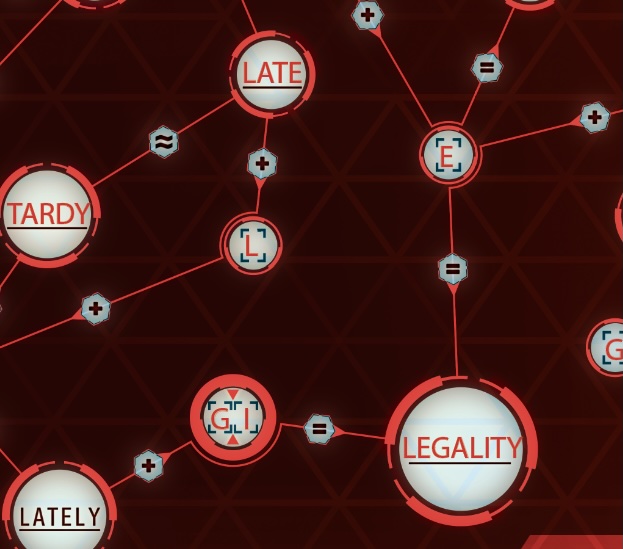
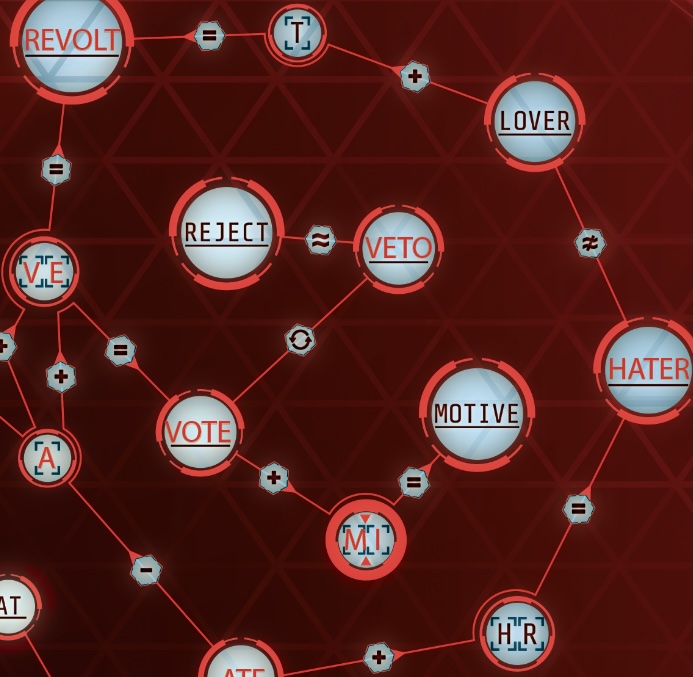
-
Word Web (Part II) Clue #7
There are triangular indicators above and below the line of blanks in the bottom right. There are also 5 sets of two letters that have triangular indicators (and are within bold circles) scattered throughout the web. Can you combine these to find the solution? You can use an online anagram solver if you’d like some help.
-
Word Web (Part II) Solution
The five letter pairs with triangular indicators are: ZE, TI, LE, GI, MI. These letters can be unscrambled to create the word “LEGITIMIZE”. Input “Legitimize” in the “Check Solutions & Unlock the Story” dropdown menu to progress the storyline.
-
UBI (Part II) Clue #1
The housing block statistics note that there are an equal number of each dependent category. You know the number of adults in the housing block (from the number in the parentheses next to the Residents), and that each adult is paid $2,000. From these pieces of information, you will be able to tell how many of each dependent category there are in the housing block.
-
UBI (Part II) Clue #2
There are 10 adults in the housing block and each is paid $2,000 a month. That means of the monthly stipend, $20,000 goes to adults. $4,600 must therefore be distributed for dependents.
There must be an equal number of each dependent category (1 of each, 2 of each, or 3 of each, etc.). For the total amount paid for dependents to equal $4,600, there must be 2 of each category (2 infants ($1,000) + 2 toddlers ($600) + 2 young children ($800) + 2 children ($1,000) + 2 teens ($1,200) = $4,600).
Look next at the stipends that are already provided in a few of the units. Can you place any of the residents based on this? What else can you determine from this placement?
-
UBI (Part II) Clue #3
Unit 2a has a stipend of $2,300. This means that there must be a single adult and a toddler housed there (this is the only combination that adds to $2,300). There are only two households with single adults and Professor Elwood has twin infants. Ms. Appleton must therefore live in unit 2a with a toddler.
Now that we know that Ms. Appleton is in unit 2a, we know that the Fenwicks must be in unit 1a or 3a (each of these have 1 unit between Ms. Appleton and the Fenwicks - per the statistics). We also therefore know that the Kiddells are either in unit 1b or 3b (they must be in the same building as the Fenwicks).
Given the provided stipends in units 1b and 3b, can you determine where the Kiddells, and therefore the Fenwicks, are housed?
-
UBI (Part II) Clue #4
We know that the Kiddells household has two adults and an 8 year old (we do not know what other dependents they may or may not have). This means that they must get a stipend of at least $4,500 (2 adults + a child).
The Kiddells cannot be in unit 1b because the stipend for 1b is $4,700, and there is no dependent category that receives $200 (no possible way to add a dependent and get from $4,500 to $4,700).
We therefore know that the Kiddells live in unit 3a, and have one child and one young child (these sum to $4,900). The Fenwicks must also therefore live in unit 3a.
Given the stipend in unit 1b, can you determine who lives there, and which dependents they have?
-
UBI (Part II) Clue #5
The only way to have a stipend of $4,700 (in unit 1b), is to have 2 adults, 1 toddler, and 1 young child. The remaining residents are the Barkers, Professor Elwood, and the Xiaos. Prof. Elwood has two infants, and the Barkers have an 8 year old. Neither can therefore be in unit 1b. The Xiaos must live in unit 1b.
There are now only two residents left to place: the Barkers and Professor Elwood. Given the statistics, can you determine who goes in unit 2b, and who goes in 1a? Can you determine the placement of the remaining dependents?
-
UBI (Part II) Clue #6
Professor Elwood has 2 infants and no other dependents. This places their unit’s stipend at $3,000.
The statistics note that unit 3a’s stipend is $700 more than 2b’s. If Prof. Elwood were in 2b, unit 3a’s stipend would need to be $3,700. But we know that the Fenwicks are in 3a, and since they have two adults, their stipend must be at least $4,000. Professor Elwood must therefore be in unit 1a, and the Barkers must be in unit 2b.
Can you place the remaining dependents? There are two teens that have not been put in families, and we know that the Barkers have a child.
If you’d like, you may also now be able to solve the puzzle without these final details using the note in the bottom right corner of the display…
-
UBI (Part II) Clue #7
The Fenwicks must have 2 teens ($5,200 stipend) and the Barkers have just one child ($4,500). This is the only way to have a $700 difference.
The bottom right of the display contains the following note: “Building # of Resident’s Name Holds Passkey”.
-
UBI (Part II) Solution
Professor Elwood and the Xiaos are in building one. The first letters of their names are “E” and “X”. Ms. Appleton and the Barkers are in building two. The second letters of their names are “P” and “A”. The Fenwicks and Kiddells are in building 3. The third letters of their names are “N” and “D”.
Putting all of these letters together yields the word: EXPAND. Input “Expand” in the “Check Solutions & Unlock the Story” dropdown menu to progress the storyline.
-
Autonomous Vehicle (Part II) Clue #1
Your game should include a large red map of a city, as well as a metallic-looking punchout sheet with two circular pieces. Punch out the two circular pieces and dispose of the matrix. If you are missing either of these components, please e-mail us at support@puzzlingpursuits.com.
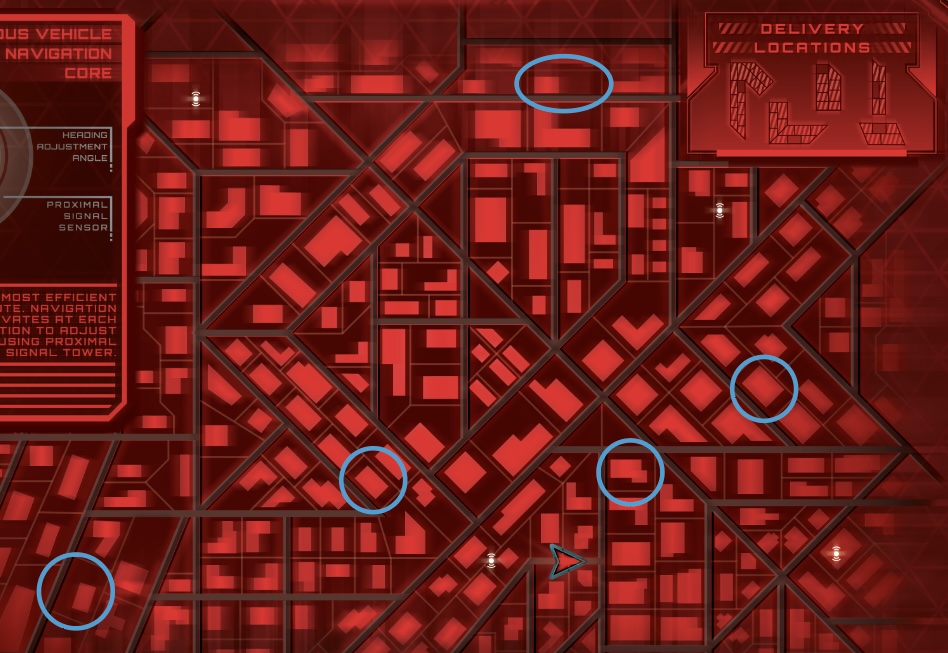
The top left of the map notes that the “Vehicle takes most efficient delivery route.” The top right of the map notes five delivery locations. Can you identify the locations on the map, and then determine the most efficient delivery route, starting from the triangular icon?
-
Autonomous Vehicle (Part II) Clue #2
Each icon in the “delivery locations” box shows a block within the map, and then identifies a specific property within that block. One example can be found below. Can you find the other four?

-
Autonomous Vehicle (Part II) Clue #3
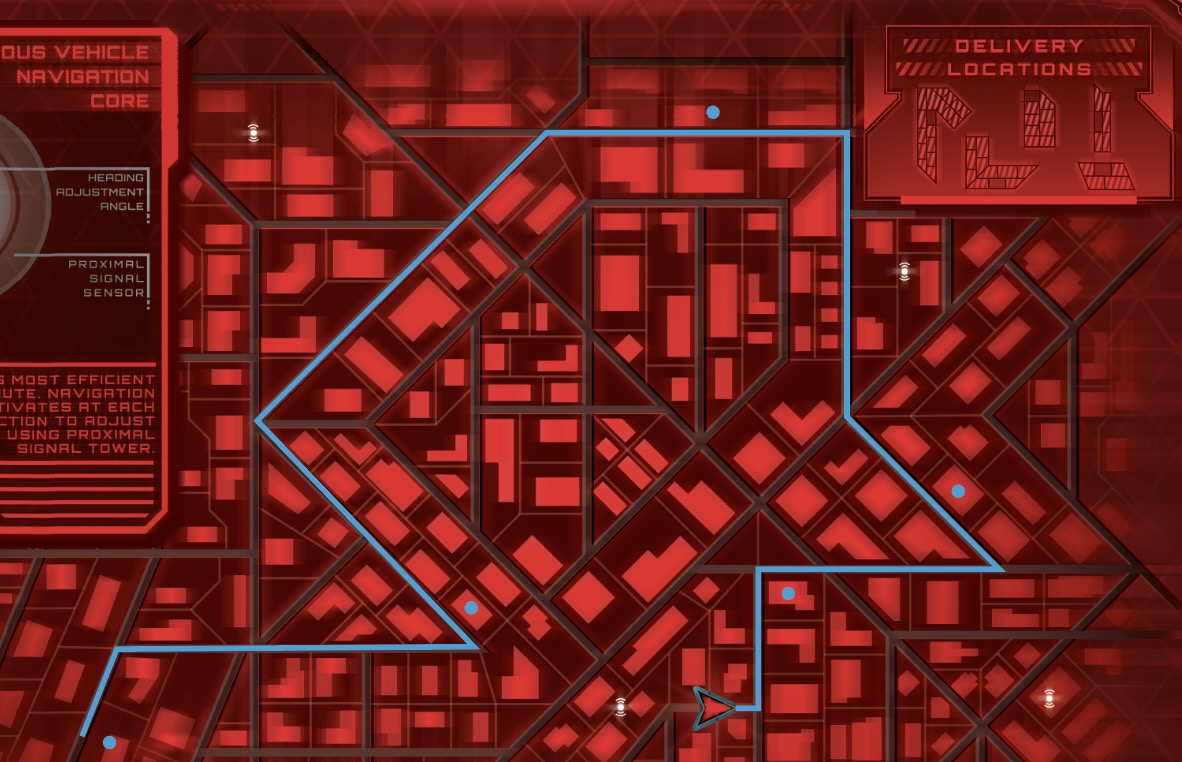
All five delivery locations can be found in the image below. Can you now determine the most efficient delivery route, starting at the triangular icon?
-
Autonomous Vehicle (Part II) Clue #4
The most efficient delivery route is shown below. The top left of the map notes that “The navigation core activates at each intersection to adjust vehicle heading using proximal signal tower.” Can you use the two navigation core pieces to discover a letter at each intersection?
-
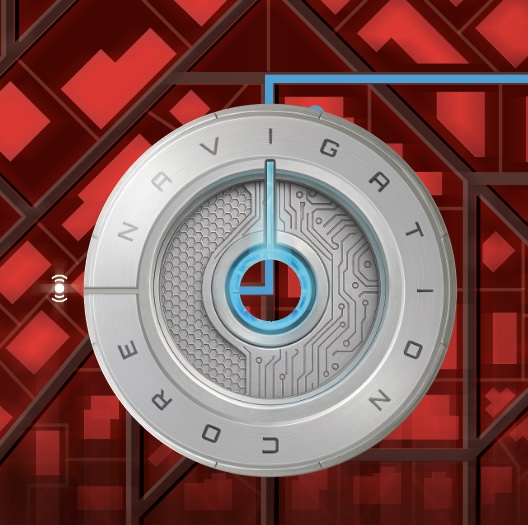
Autonomous Vehicle (Part II) Clue #5
Try overlapping the two navigation core pieces on top of the first intersection. According to the key at the top left of the map, the larger of the two rings is for the proximal (nearest) signal sensor, and the smaller is for the heading (direction the vehicle is traveling) adjustment angle. Try pointing the slit in the larger ring at the nearest white signal dot, and the blue line indicator towards the new direction in the delivery route. Can you discover a letter?
-
Autonomous Vehicle (Part II) Clue #6
The correctly oriented navigation core components are shown below. The blue line on the heading adjustment angle component points to the “I” in “navigation core”. Try following this process for the other intersections. Do you discover a word?
-
Autonomous Vehicle (Part II) Clue #7
The next two intersection translations can be found below. They yield the letters “N” and “T”. Can you complete the remaining?
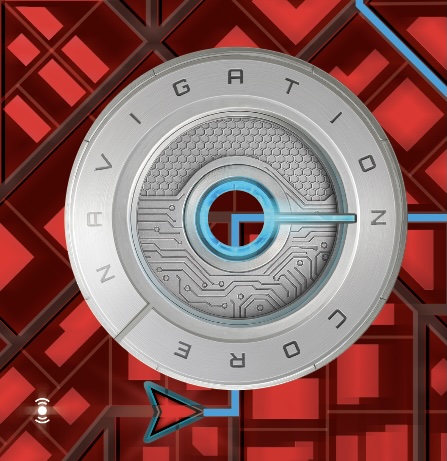

-
Autonomous Vehicle (Part II) Solution
The navigation core components reveal the following letters at the subsequent intersections: E, G, R, A, T, E. Taken together, the delivery route spells the phrase “INTEGRATE”. Input “Integrate” in the “Check Solutions & Unlock the Story” dropdown menu to progress the storyline.
-
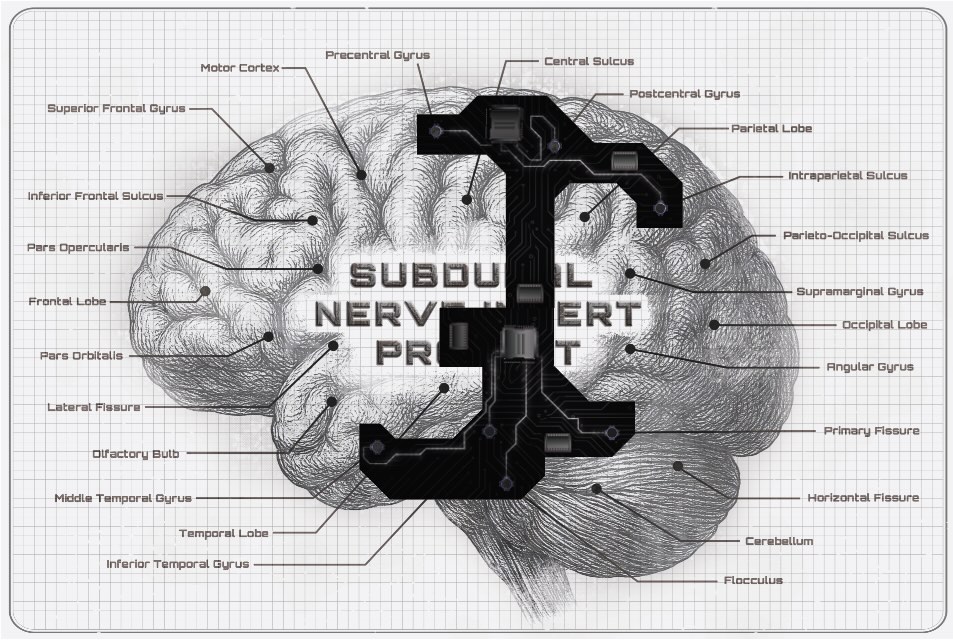
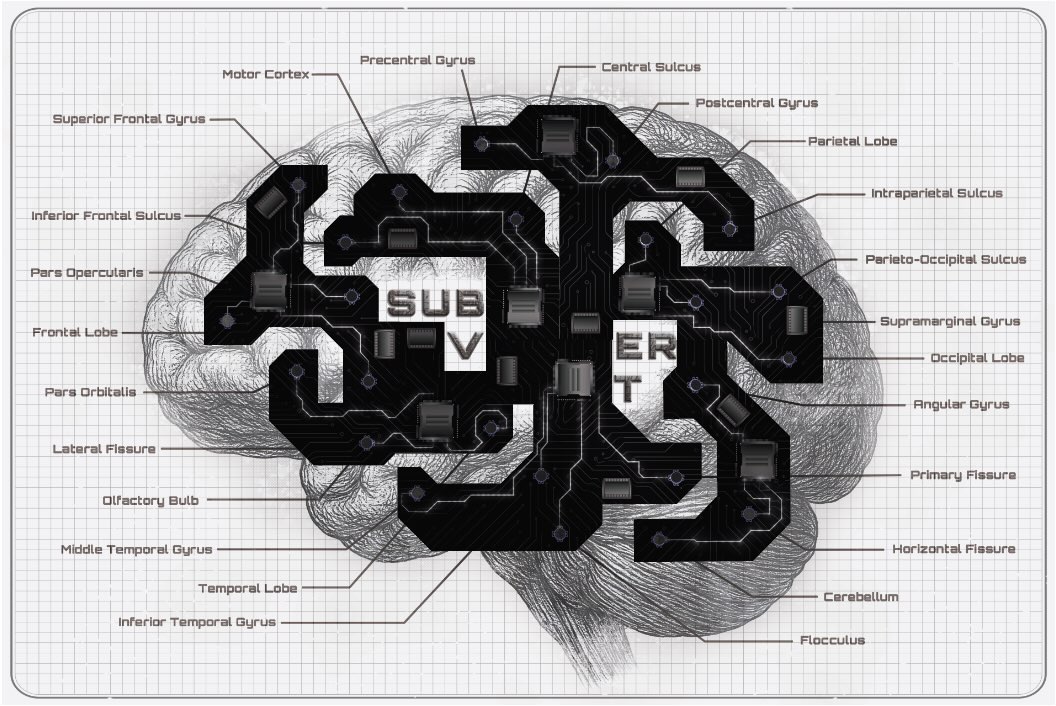
Stress Test (Part II) Clue #1
Examine the cross-section of the brain closely. Are there any places that stick out in any way? The unique way “Synapse Biotech Labs” is written in the top right corner may help you identify any elements that stick out.
-
Stress Test (Part II) Clue #2
After examining the brain you will see that this is not in fact a maze- there is no entrance and no exit. Try looking at the brain in the orientations determined by the “Synapse Biotech Labs” writing. Does anything pop out? Something you could read, perhaps?
-
Stress Test (Part II) Clue #3
One letter is highlighted in the image below. Can you find the others?
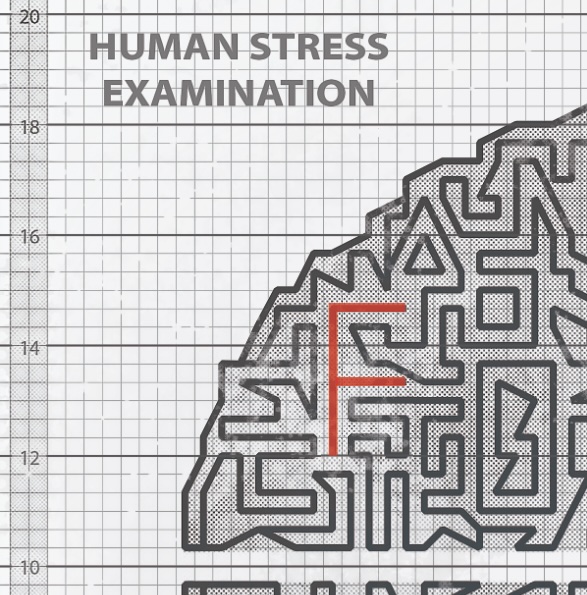
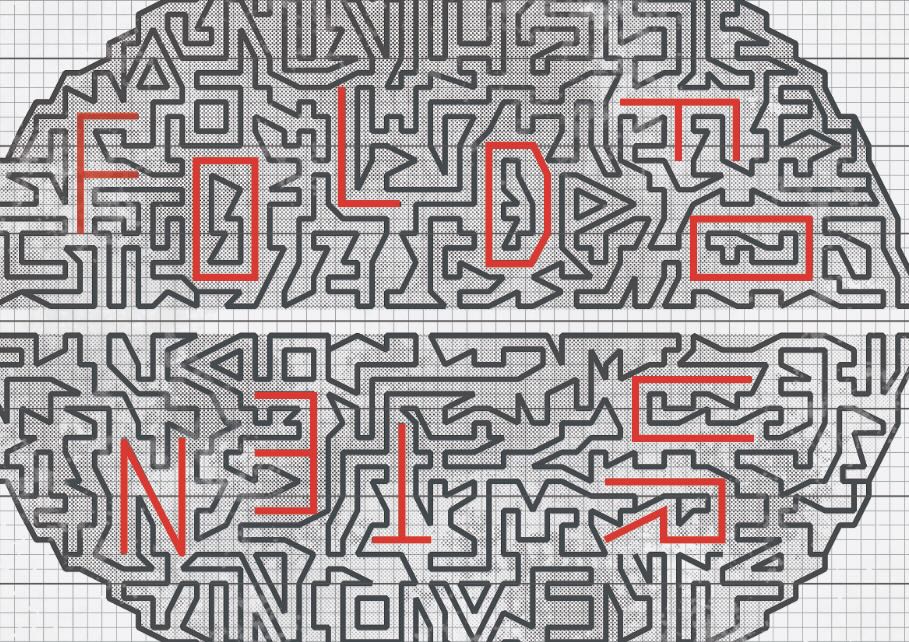
-
Stress Test (Part II) Clue #4
The hidden letters are highlighted in the image below. When read in the orientations of the “Synapse Biotech Labs” title, you can read “FOLD FOUR TEN”. Do you see numbers that this might refer to? How might you fold the paper to create a word?
-
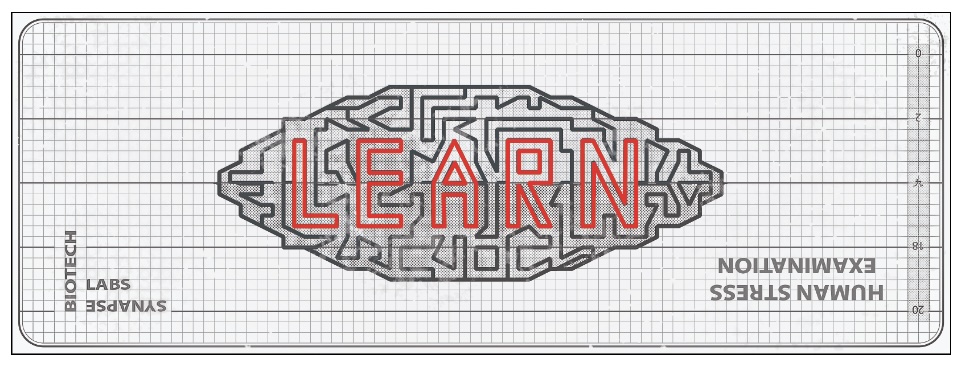
Stress Test (Part II) Clue #5
There are numbers on the left side of the paper, including the numbers 4 and 10. Try folding along these horizontal lines. There are two ways to fold the paper at each line. You can fold along the 4 line so that the brain is hidden on the inside, or so that the brain is on the outside. With two lines to fold, this means there are four possible ways to fold the paper. Can you find the option that reveals the solution?
-
Stress Test (Part II) Clue #6
Folding along the 4 line so that the brain image is on the outside, and then folding along the 10 line so you have a “Z” fold combines the brain image in a new way. Can you spot the word?
-
Stress Test (Part II) Solution
The word “LEARN” is formed in the new image. Input “Learn” in the “Check Solutions & Unlock the Story” dropdown menu to progress the storyline.
-
AI Imposter (Part II) Clue #1
In the bottom left of the holoscreen it says to “discover the unlikely and impossible”. You have two different screenshots from a video call. What in the images would be considered impossible or unlikely? Note that this will not be a simple “find the differences” puzzle!
-
AI Imposter (Part II) Clue #2
The “Master Directive” sheet notes that a remote worker was determined to not be human (be an AI) after a software glitch on a video call. Try looking at the woman’s face. Do you notice anything that likely wouldn’t be possible for a real human woman?
-
AI Imposter (Part II) Clue #3
The woman’s eye color changes from brown at the beginning of the call, to green an hour later. In the boxes on the right, is there a place you can input this discovery?
-
AI Imposter (Part II) Clue #4
“Eye Color” can be input in the bottom left series of boxes. Notice that a line connects the E’s and O’s. Where else do those lines connect? Can you fill in additional boxes? And did you notice anything else about the woman’s face?
- AI Imposter (Part II) Clue #5
The woman has freckles at the beginning of the call, and then no freckles later in the call. Can you place this difference somewhere else in the boxes? What other boxes can you fill in?
- AI Imposter (Part II) Clue #6
“Freckles” can be input in the boxes to the right of “Eye Color”. With this addition, and adding in all connected letters, the boxes now look like the following:
Are there any objects in the images that don’t change, but you would expect to have changed over the course of the hour?
- AI Imposter (Part II) Clue #7
The cat is in exactly the same position in the first and second screenshots, which is extremely unlikely. Does “cat doesn’t move” fit somewhere in the boxes? Is there anything else that doesn’t change, but would likely change?
- AI Imposter (Part II) Clue #8
The ice in the glass of water is also exactly the same, but you would expect it to melt over the course of an hour. “Ice doesn’t melt” fits just below the “cat doesn’t move” line. After inputting these answers, the grid looks like the following:
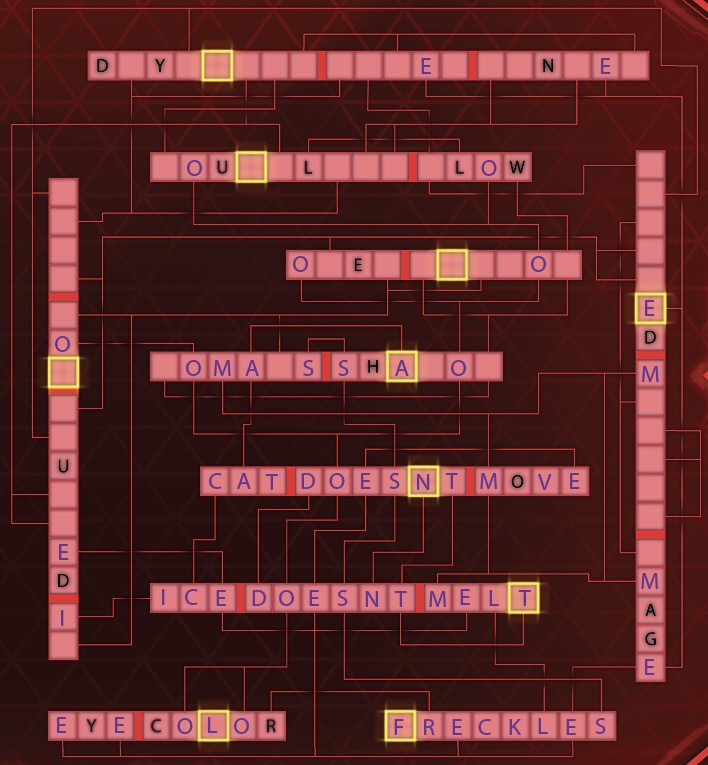
Do you notice anything on the shelf that doesn’t seem possible? How about the desk? Based on the date, time and location, are there any elements in the image that don’t make sense?
- AI Imposter (Part II) Clue #9
The hourglass on the shelf is flowing in the reverse that it should. In the first image, the woman has a shadow, but in the second image it is gone. It also is sunny out the window even though it should be nighttime (mid-December in Alaska). Given the time and location, it is also very unlikely that the window would be open as can be seen in the mirror. Can you fill in the boxes based on these insights? Can you find the remaining two unlikely and/or impossible items?
- AI Imposter (Part II) Clue #10
The lamp is on, but not plugged into the wall, and the image in the mirror is flipped L/R from what it would be in reality. The final, completed diagram is below. Can you unscramble the yellow letters to find the solution?
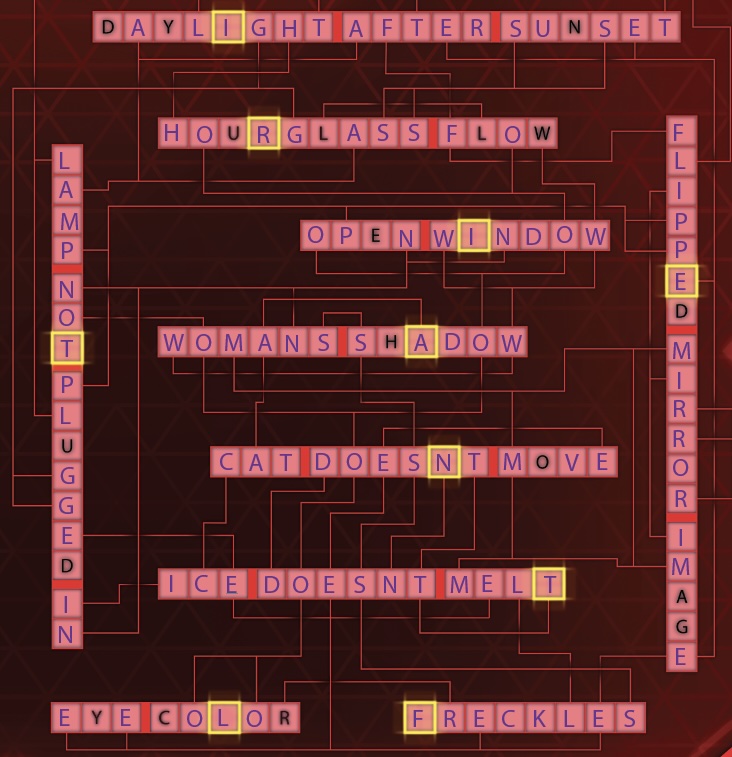
- AI Imposter (Part II) Solution
The yellow letters can be unscrambled to spell: INFILTRATE. Input “Infiltrate” in the “Check Solutions & Unlock the Story” dropdown menu to progress the storyline.
-
Subdural (Part II) Clue #1
Your game should include a sketch of a brain that says “Subdural Nerve Insert Project” on it. It should also include a pop-out sheet of black electronic chips. Pop out the seven pieces and dispose of the matrix. If you are missing either of these components, please e-mail us at support@puzzlingpursuits.com.
Notice that there are circular holes cut out of the electronic chips. Do you see a way that these might interact with the drawing of the brain?
-
Subdural (Part II) Clue #2
The holes in the chips are the exact same size as the indicator dots on the brain drawing. Can you line up the brain chips such that the punched out holes line up with the black dots?
-
Subdural (Part II) Clue #3
Two piece locations are shown below. Can you discover the rest? The edges of the chips may not line up with one another like a jigsaw puzzle.
-
Subdural (Part II) Clue #4
The full placement of the chips on the brain is shown below. Do you see the solution?
-
Subdural (Part II) Solution
The chips cover all the letters in the center, except for “sub”, “v”, “er”, and “t”. Together these spell “subvert”. Input “Subvert” in the “Check Solutions & Unlock the Story” dropdown menu to progress the storyline.
-
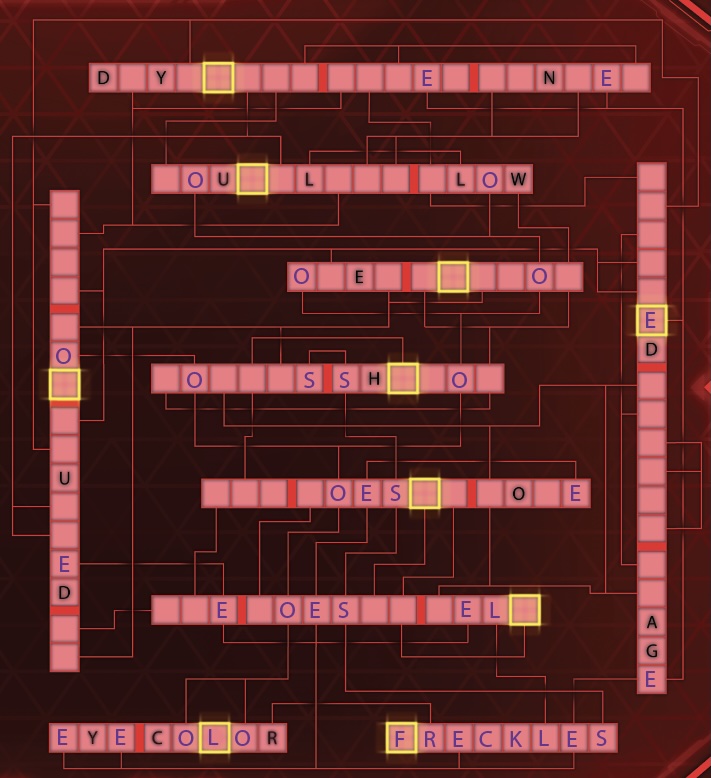
The Master Directive (Final Meta Puzzle) (Part II) Clue #1
The Master Directive sheet can only be completed when the other six puzzles have been completed. Once you have completed the other six puzzles, input the solutions into each corresponding space below the puzzle’s description.
You’ll notice that there is a grid with 9 vertical columns, each column connected to one letter in your solutions. How might you fill this grid?
-
The Master Directive (Final Meta Puzzle) (Part II) Clue #2
There is a table that converts letters into 5 digit binary numbers - the same number of spaces in each vertical column. Try inputting these numbers into the columns. For example, the leftmost vertical column is connected to the letter “E”, this can be translated to 00101 in binary.
-
The Master Directive (Final Meta Puzzle) (Part II) Clue #3
The completed grid can be found below. How might you extract a five letter word from this grid to give you the “final objective” at the bottom of the holoscreen?
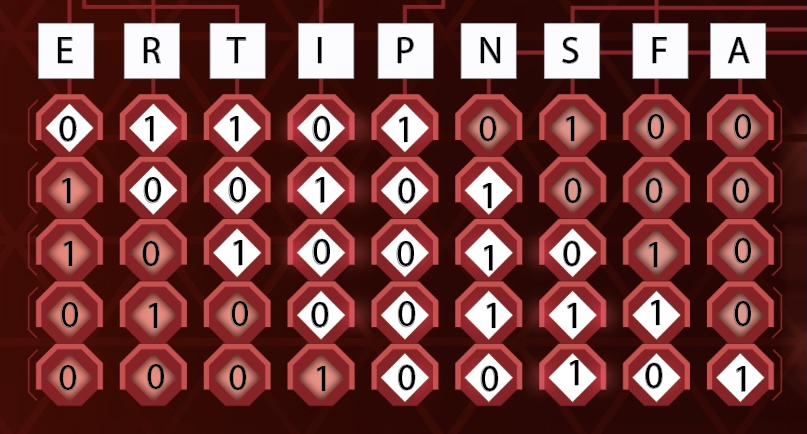
-
The Master Directive (Final Meta Puzzle) (Part II) Clue #4
The spaces in white can be read in rows. For example, the top row is 01101, or “M”. Continuing to read each subsequent row, we find the letters “E”, “R”, “G”, “E”, providing the answer: “MERGE”. Input “Merge” in the “Check Solutions & Unlock the Story” dropdown menu to discover the conclusion to Synapse.
- AI Imposter (Part II) Clue #5