Which key does this correspond to in the hallway?
You consider , but it feels off. You decide to take a closer look.
You are confident in the solution but feel like the answer was too simple, too direct. You go to search the shelves of the Library again, but this time for the real books...
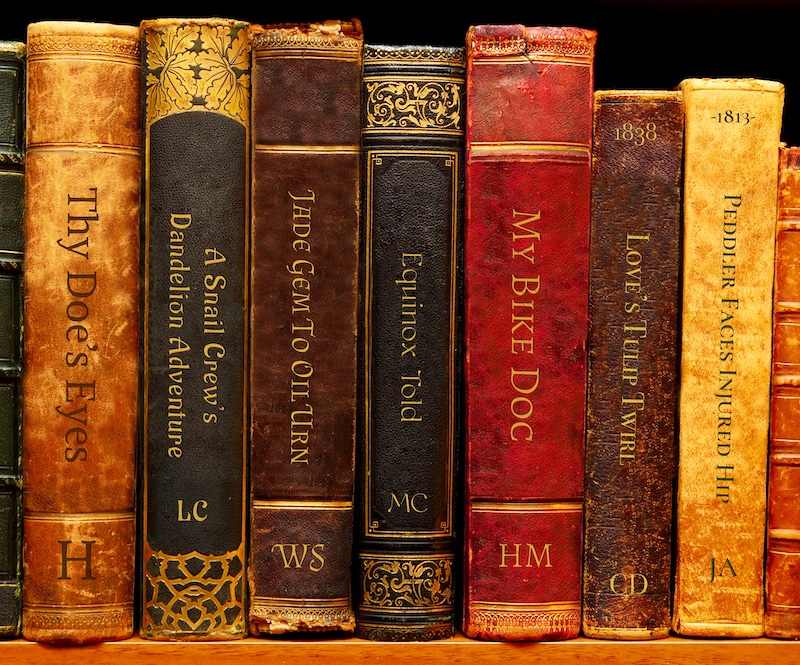
...Aha! This time you have success. In addition to finding the previous titles, you spot two books next to them that have yet to be deciphered. One is titled Love's Tulip Twirl by "CD" (with "1838" at the top) and the other is titled Peddler Faces Injured Hip by "JA" (with "1813" at the top).
Hmm, something feels off about this solution. You decide to take another look.
You pull the shelf. It jerks subtly with a mechanical click. The bookshelf swings outward easily, and you notice a burned symbol on its backside.
Inside, you find a small room with several slits in the walls. One slit is in the bookshelf you just passed through, providing a view into the Library. Another slit in the opposite wall provides a view of the Dungeon.
In one corner, a hand brake similar to the one you reattached on the train is mounted on the wall, with "Showstopper" engraved on a plaque below it. In the center of the room, you find a small table with a pile of newspaper clippings and a letter from Reager. You notice the back of the letter has the same symbol as the bookshelf. That likely won't be useful now, but you'll have to keep it in mind.
You may now open the Open When Instructed envelope.
Enter ORIGINS & ENDS
Use this Companion Guide to check your solutions as you play by selecting Check Solutions & Unlock the Story below. Sometimes, the story will progress as you check your solutions. The Companion Guide can also be used to view hints. Most players use at least a few hints to get through the entire game.
Recap of Blackbrim (Game I)
The police officers in the small Victorian town of Blackbrim have been disappearing one by one. A package arrives at your door upon the disappearance of the final officer, Commissioner Farodson. Fearing that he too would be abducted by the mysterious figure known as Reager Skinner, the Commissioner instructed that the investigation materials be passed to you, the town detective. You are able to decipher the materials and discover that the officers are being held at Cordelia St. Manor.
Upon arrival at the manor, you are ambushed and knocked out by gas. You awake to find yourself locked inside. You explore the manor and find puzzles in each room. You decipher the puzzles, and in doing so, free the officers and escape the manor. Through your adventure, you learn that Cordelia St. Manor was Reager's childhood home, that Reager was christened Rose at birth, and that she had an older brother—Alfred—who she locked away, likely causing him to perish.
You have freed the officers, and the entire town of Blackbrim is grateful for your heroic efforts. Of Reager, however, there is no sign.
Recap of Reager's Return (Game II)
A year has passed since your first run-in with Reager. You begin to accept that the trail has turned cold until a letter from Captain Deione of the London Police arrives, asking for your help against Reager in the capital. Letter in hand, you board the next available train to London, though something feels amiss. As the train begins to move, you realize that it's empty except for you: it was a set-up. Each of the train compartments contains a puzzle left by Reager, which you must solve to obtain the train brake from a locked safe. If you fail, the train will crash into London's Victoria Terminal, killing countless citizens and yourself as well.
Your sharp wits enable you to stop the train moments before a crash. You learn that the original letter calling you to London was actually penned by Reager and that she has left a welcome package for you at Victoria Terminal. You must again solve her puzzles, which encode locations across the city, to foil her larger scheme. As you get closer to the deadline, you learn that she is planning to poison the city's grain supplies with arsenic, which could poison thousands of people. Thankfully, you stop her in time at the main grainery. Though she slips away, you rescue a haggard man who turns out to be her brother, Alfred.
You've now gained national recognition for your efforts against Reager, but unfortunately she has slipped through your grasp again.
The final step is to access the room beyond by placing the correct keys into the keyholes.
Which key should go in each keyhole?
You put the six keys in, but nothing happens. You take a closer look and try again.
Below is the list of items you should have for each part. If you are missing anything from Origins & Ends, click here.
To begin with, you should have a 'Read Me First' pamphlet for Origins & Ends.
Origins & Ends - Part I
- One-page handwritten set of notes from your conversation with Alfred
- Drawing of Reager's underground compound
- Trap door envelope containing an encoded paper strip and an image of a wall with keys
- Dungeon envelope containing an encoded paper strip with symbols and an image of a wall with painted symbols on it
- Biology Lab envelope containing a one-page letter and two images of framed bird paintings
- Workshop envelope containing a paper note, three gears, one thick framing piece in the same material as the gears, and three brads
- Library envelope containing a one-page poem and a sketch of the spines of several books
- Open When Instructed envelope containing a two-page letter and six newspaper clippings
Origins & Ends - Part II
- Two-page letter from Reager
- Five notes from Reager's notebook
- "An Exploration into Compounds" sheet
- A small "Lab Equipment" envelope with 8 squares of illustrated lab equipment
- A large "Lab Setup" sheet
- A small, dark blue sheet with six "molecules" on one side and a poem on the other side
- "The Antidote" sheet
- A large "Open When Instructed" envelope containing a single sheet
- A small "Open When Instructed" envelope containing a pin
-
Dungeon Clue #1
The envelope contains two components: a paper strip and an image of the dungeon wall with painted symbols and letters. If you are missing either of these components, click here.
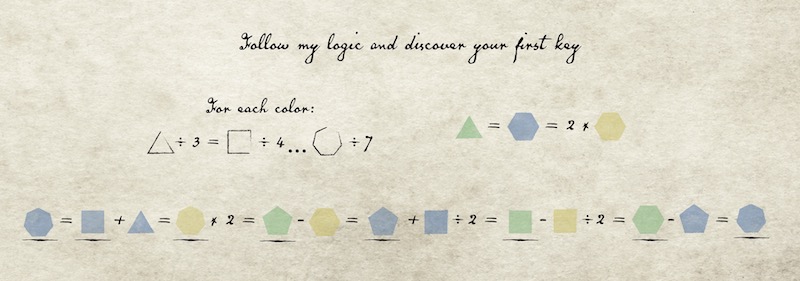
Notice that one of the equations on the paper strip has several blank elements. To solve the puzzle, you will first need to complete this equation by filling in the blanks.
To fill in the blanks, first look at the equation on the left titled For each color. Each shape is divided by the number of sides it has. We can therefore deduce that for each color, the value of each shape scales with the number of sides it has. For example, if a single side of a yellow shape has value of 1, a yellow triangle = 3, a yellow square = 4, a yellow pentagon = 5, a yellow hexagon = 6, and a yellow heptagon = 7.
The equation ends at a heptagon (which has 7 sides), and we can see from all the materials that there is no shape with fewer than 3 sides or more than 7 sides. This is important to remember.
-
Dungeon Clue #2
Examine the equation on the right. It indicates that the color of each shape determines the value of each side. The yellow hexagon, times two, equals the value of the blue hexagon. This means that each blue side is equal to double the value of each yellow side. You can also see that the green triangle is equal to the blue hexagon. Since the hexagon has twice as many sides as the triangle, we know each green side must be valued at double that of each blue side.
From this, we can use variables to create systems of equations or more simply, we can assign values to signify their relationship. Let's assign a value of 1 to each yellow side, 2 to each blue side, and 4 to each green side. These values fit with the side and color constraints we have determined. So, a yellow triangle is worth 3 (1 x 3), a blue square is worth 8 (2 x 4), and a green heptagon is worth 28 (4 x 7).
-
Dungeon Clue #3
Now let's begin filling in the blanks. The first shape is blue and has seven sides. Assuming the value of a blue side is 2 (from our reasoning in Clue #2), the blue heptagon is worth 2 x 7 = 14. In the next portion of the equation, we have blank + 6 (since a blue triangle is 2 x 3 = 6). The blank must therefore equal 8. What shape has a value of 8?
-
Dungeon Clue #4
From Clue #3, only the blue square has the value of 8 (since there aren't shapes with more than 7 sides). So, the first blank is a blue square.
Next, we have blank x 2. Since everything is equal to 14, the blank = 7. Therefore, the next shape is a yellow heptagon (1 x 7).
-
Dungeon Clue #5
This clue walks through how the remaining blanks are found.
The next equation we have is 14 = blank - 6 (since a yellow hexagon is 6). So, blank is 20 or a green pentagon (4 x 5).
Then, we have 14 = blank + 4 (since a blue square is 8). So, blank is 10 or a blue pentagon (2 x 5).
Next, we have 14 = blank - 2 (since a yellow square is 4). So, blank is 16 or a green square (4 x 4).
Finally, we have 14 = blank - 10 (since a blue pentagon is 10). So, blank is 24 or a green hexagon (4 x 6).
This is the final result with the blanks filled in:
Can you discover how to get letters from this sequence of shapes? Reager's note to "follow my logic" is key.
-
Dungeon Clue #6
The blue heptagon is the first underlined shape in the equation. Start there on the painted wall, and go from underlined shape to underlined shape in the sequence.
This path will pass through the letters as follows:
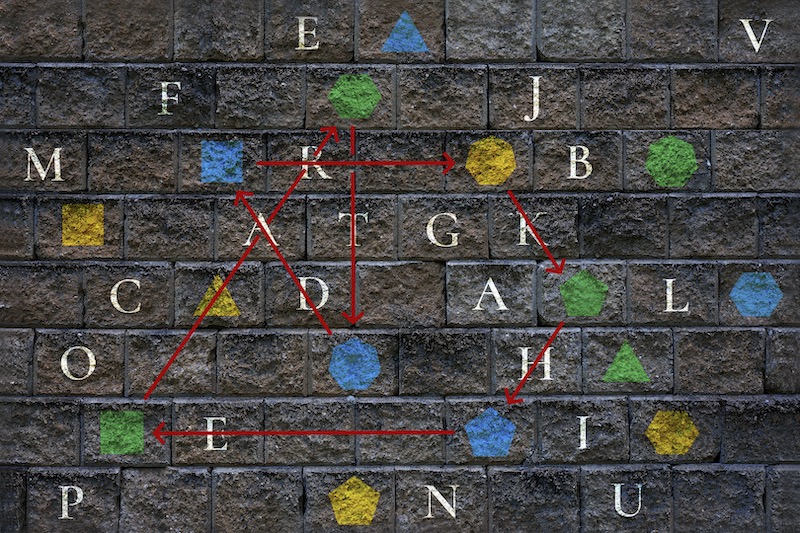
The encoded phrase is DARK HEART. Is there a key matches this description?
-
Dungeon Clue #7
Don't just look at the images engraved in the keys. Look at the keys themselves.
-
Dungeon Solution
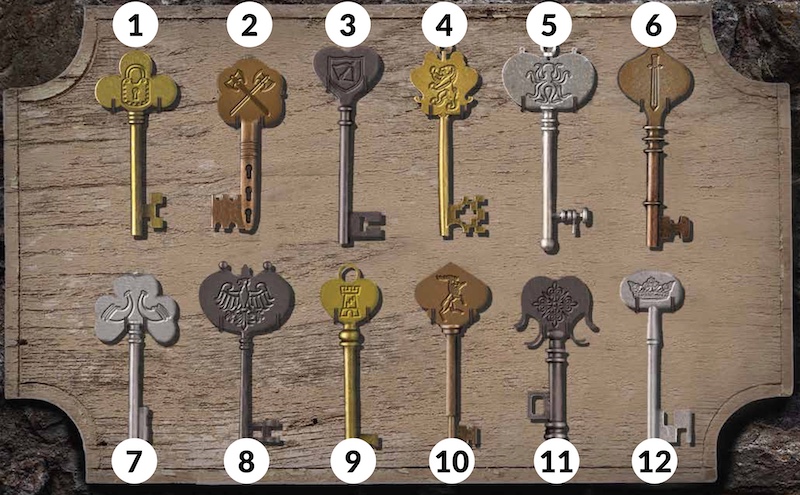
The correct key is dark in color in the shape of a heart, or key #3 in the image:
-
Biology Lab #1
The Biology Lab envelope should contain a single page letter from Reager introducing the Biology Lab and two framed illustrations of several birds. If you are missing any of these, click here.
Reager writes that her "friends say hello". Can you identify which "friends" she's referring to?
-
Biology Lab #2
On the back of the smaller frame, Reager has written "My friends". Can you identify how these birds might say "hello"? The other underlined words in her letter, framework and count, might be helpful.
-
Biology Lab #3
Focusing on just the Flight One frame, notice that there are five letters in "hello" and there are five birds. Can you discover how each bird translates to a specific letter? You will want to use the phrase that's printed on the frame. Counting will also come into play. Further, the way each bird faces (left or right) is significant.
-
Biology Lab #4
The first bird faces right and has a #5 tag. The fifth letter, counting from left to right (the direction the bird is facing), is H.
The second bird faces left and has a #1 tag. The first letter, counting from right to left (the direction the bird is facing), is E.
Continuing this logic yields HELLO.
The birds in the other Feathered Followers frame do not have numbered tags, however. From looking at the smaller Flight One frame, can you figure out how the numbers on the tags were determined? It may help to review Reager's letter introducing the Biology Lab.
-
Biology Lab #5
Look back at the smaller Flight One frame. The numbers on the tags correspond to the features of each bird. The first bird has spots on its belly and no other notable features. In Reager's letter, this is noted as trait #5, which matches the bird's tag number.
The second bird has a crest (trait #1), the third bird has a stripe across its eye (trait #2), the fourth bird has both a spot on its head and spots on its belly (traits #3 and #5: 3 + 5 = 8), and the fifth bird has a spot on its head (trait #3).
Using each bird's unique traits and the methodology you have discovered, the other frame will yield a phrase.
-
Biology Lab #6
Bird 1: Crest (1) + Wing Stripes (4) = 5, counting from R (right) to L (left) yields "O"
Bird 2: Crest (1) + Head Spot (3) + Belly Spots (5) = 9, counting from R to L yields "F"
Bird 3: Wing Stripes (4), counting from L to R yields "T"
Bird 4: Eye Stripe (2) + Head Spot (3) = 5, counting from L to R yields "H"
Bird 5: Eye Stripe (2), counting from L to R yields "E"
Bird 6: Crest (1), counting from R to L yields "S"
Bird 7: Crest (1) + Eye Stripe (2) + Head Spot (3) + Belly Spots (5) = 11, counting from R to L yields "E"
Bird 8: Crest (1) + Eye Stripe (2) = 3, counting from L to R yields "A"
The encoded phrase is "OF THE SEA". Can you find a key that matches this description?
-
Biology Lab Solution
The key with the Octopus is the only one that can be described as OF THE SEA, or key #5 in the image:
-
Workshop #1
The Workshop envelope should include a small piece of paper with a note on it, three thick gears, a frame piece made of the same material as the gears, and three brads. If you are missing any of these, click here.
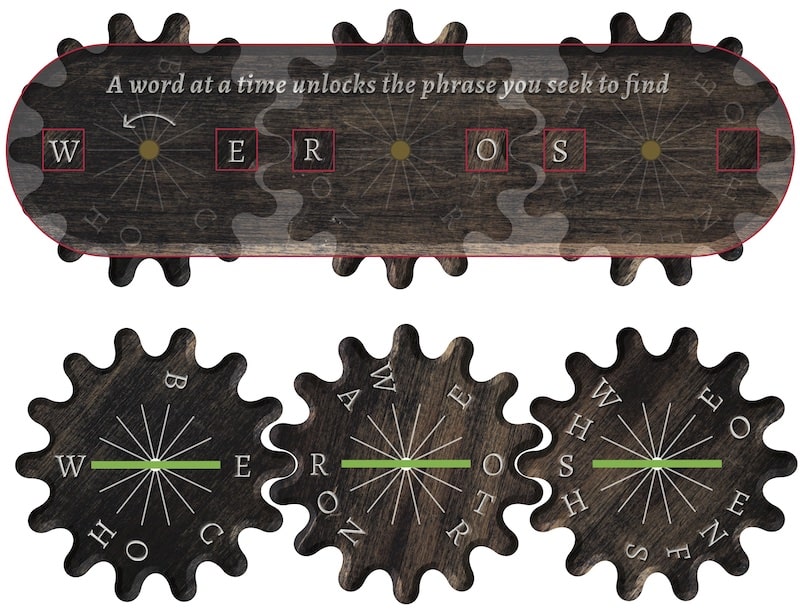
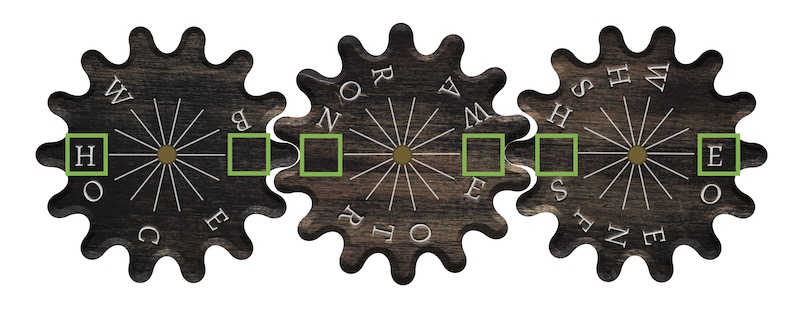
You will notice that the gears and frame piece have matching small circular holes. If you use a brad to snugly connect a gear behind the frame piece, you will notice that the windows on the frame perfectly highlight letters on the gear as it rotates. (If you don't see the windows in the frame, you may need to punch them out.)
Can you figure out a way to assemble these pieces such that "A word at a time unlocks the phrase you seek to find"? You will notice that the note has a partially completed phrase.
-
Workshop #2
When the gears are attached correctly, the frame will show one word at a time as the gears rotate. From the note, we know the first word that should show up is "HE". The next word that should show up as the gears rotate is "WHO".
If you prefer, you can test the gears independently from the frame. For a word to show up in the frame, you will notice that the letters must all be in a perfectly straight line. When outside of the frame, you can use the lines on the gears to see if the letters are in a straight line (and would create a word in the frame).
You will notice that not every configuration makes it possible to create a single straight line though!

-
Workshop #3
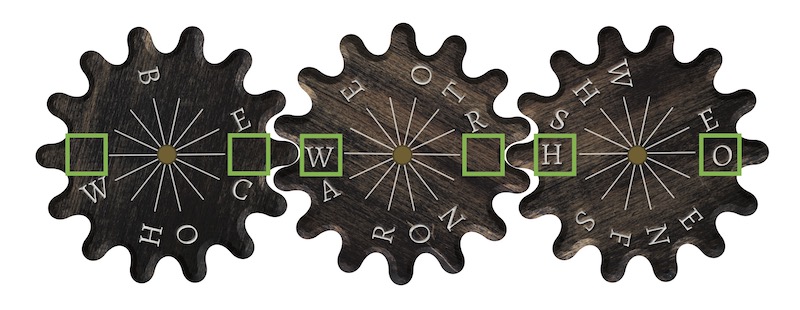
Let's narrow down the possibilities by looking at how we can spell HE using the gears. We can see that there are two possible ways to do this:
- Both "H" and the "E" are on the same gear, opposite one another so that they show up at the same time. The other gears must then show blank spaces. Below is an example (there may be others):
- Having the "H" and "E" be on separate gears and each opposite a blank space. Then the third gear also has blank spaces. Below is an example (there may be others):
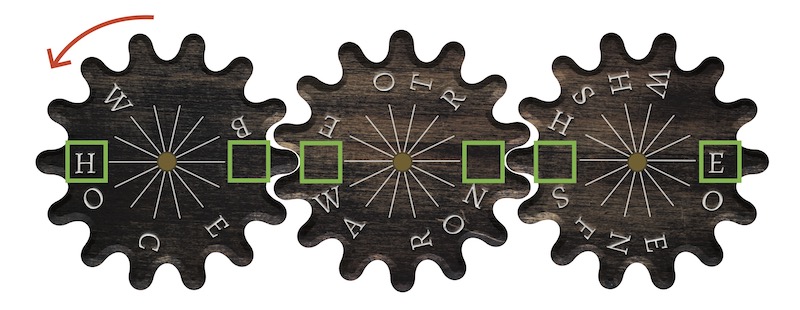
To narrow the options down further, look at the second word in the phrase: "WHO". When the gears rotate in the direction shown on the frame (left-most gear rotates counterclockwise), "WHO" must show up after showing "HE".
- Both "H" and the "E" are on the same gear, opposite one another so that they show up at the same time. The other gears must then show blank spaces. Below is an example (there may be others):
-
Workshop #4
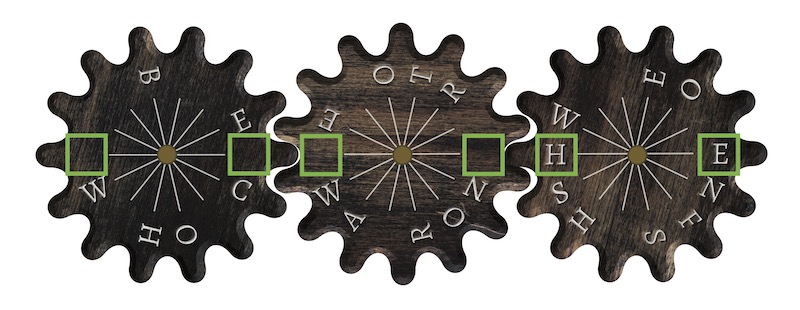
There are 3 "W"s on the gears. One is across from a blank space, and the other two are across from letters that are not in the word "WHO". You now know which "W" needs to be used in the word "WHO".
The only way to spell "WHO" using the other two gears is using a double blank in one gear, and an "H-O" from the other.
Can you orient the gears so they first spell "HE", and then when rotated in the direction noted on the frame, then spell the "WHO" you just discovered?
-
Workshop #5
Try attaching the gears to the frame in the orientation shown, then rotate slowly in the direction noted on the frame.
-
Workshop #6
The phrase "HE WHO WEARS THE CROWN OF BONES" appears. Which key does this refer to?
-
Workshop Solution
The phrase refers to the key with the engraved stag on it (a "he" who has a rack of antlers - crown of bones - on his head), or key #10 in the image:
-
Library Clue #1
The Library envelope should include a poem and a drawing of the spines of several books. If you are missing either of these, click here.
You may notice that some of the lines in the poem sound rather familiar... Can you think of where these may have come from? You can use the internet for assistance if you're stuck.
-
Library Clue #2
Each set of lines is a famous quote from a famous book. You may notice that there are five sets of lines and five book spines. Can you discover the five books? The initials at the base of each book may also be helpful.
-
Library Clue #3
The first quote "Nobody, that's my name / Nobody, so my mother and father call me" is from The Odyssey by Homer (or more specifically, an English translation of the ancient Greek text).
The second quote "Sometimes, I've believed / As many as six impossible things before breakfast" is from Alice's Adventures in Wonderland by Lewis Carroll.
The third quote "I do not insist that this is a full adventure / But it is the beginning of one" is from Don Quixote by Miguel de Cervantes (or more specifically, an English translation of the Spanish novel).
The fourth quote "It is not down in any map / True places never are" is from Moby Dick by Herman Melville.
The fifth quote "But these delights have violent ends / And in their triumph die / Like fire and powder" is from Romeo and Juliet by William Shakespeare.
Do you notice any similarities between the titles of the books the quotes were pulled from and the titles on the spines in the illustration?
-
Library Clue #4
Each book title in the illustration is a scrambled version of the real title, with the exception of one additional letter.
-
Library Clue #5
"Thy Doe's Eyes" Is "The Odyssey" but with an extra E.
"A Snail Crew's Dandelion Adventure" is "Alice's Adventures in Wonderland" but with an extra A.
"Jade Gem To Oil Urn" is "Romeo and Juliet" but with an extra G.
"Equinox Told" is "Don Quixote" but with an extra L.
"My Bike Doc" is "Moby Dick" but with an extra E.
These extra letters spell EAGLE. Is there a key that corresponds to this?
-
Library Clue #6
The key with the eagle engraved on it, key #8 in the image below, corresponds to this clue. Submit this answer in the answers section to progress the story.
-
Library Clue #7
At this point, you should have submitted the answer EAGLE for The Library and progressed the story. You should have seen a popup that gives you a second puzzle with two new books to decipher.
Are there two famous books that could correspond to these titles? The date, title, and author's initials can all help. The scrambled pattern may not be exactly the same as the previous titles.
-
Library Clue #8
Each book has several additional letters instead of just one.
"Love's Tulip Twirl" corresponds to "Oliver Twist" by Charles Dickens, written in 1838. It uses the extra letters LLPU.
"Peddler Faces Injured Hip" corresponds to "Pride and Prejudice", written by Jane Austin in 1813. It uses the extra letters EFHLS.
Can you unscramble each of these sets of extra letters to create two words?
-
Library Solution
To summarize, first you obtain the solution EAGLE, which corresponds to key #8 (see clues #5-6). Then, there is a second puzzle that appears when you enter EAGLE and select the appropriate key with the "Check Solutions & Unlock the Story" feature.
LLPU can be unscrambled to create PULL.
EFHLS can be unscrambled to create either FLESH or SHELF.
Given the context that you are standing in front of a bookshelf, PULL SHELF makes the most sense and is the final correct answer. When entered, more of the story is then revealed.
Enter PULL SHELF to progress the story.
-
Secret Room - The compound word William negates - Clue #1
Look at the article titled TRICKED! It is written by "Willian Fenberg".
-
Secret Room - The compound word William negates - Clue #2
Look at the last sentence of the first paragraph.
-
Secret Room - The compound word William negates - Solution
The word is overlap, a compound word which William negates (by writing "no overlap") to express how he thinks the intellects of males and females relate.
-
Secret Room - Brother's antagonist's surname - Clue #1
Read the article with fencers depicted.
-
Secret Room - Brother's antagonist's surname - Clue #2
The number before each clue denotes which blank(s) the clue's answer should fill. In this case, because there is a 1, the word Reager is encoding begins with the same letter as her brother's antagonist's surname (i.e. the 1st letter).
-
Secret Room - Brother's antagonist's surname - Solution
Alfred's antagonist in the fencing match is Steven Prince, so Prince is the surname. Therefore, the first letter of the encoded word is P.
-
Secret Room - What brother feels do not matter - Clue #1
Again, read the article with fencers depicted. What Alfred feels do not matter is a 4 letter word that is the 2nd to 5th letters of Reager's encoded word.
-
Secret Room - What brother feels do not matter - Solution
In the second sentence, Alfred claims that their ages do not matter.
Taking the P from Prince and the entire word ages, the encoded word is pages.
-
Secret Room - I removed to cause the "Tragedy" - Clue #1
Read the Tragedy Strikes! article. What failed and was potentially removed?
You may also recall the description when you entered the secret room. There was something mounted in the corner with a plaque underneath it.
-
Secret Room - I removed to cause the "Tragedy" - Solution
The item in the corner was a train brake with "Showstopper" engraved on a plaque below it. From this context or from your experience in Reager's Return, you can surmise that Reager removed the brake from the train, causing the tragedy. Therefore, the first two letters (since Reager writes 1, 2 before the clue) of the hidden word are BR.
-
Secret Room - The second and third letters of the third word - Clue #1
Read the "New Train Begins Running" section that is on the same page as the fencing article. Do you notice anything about the locations the train was going between when the "accident" occurred?
-
Secret Room - The second and third letters of the third word - Solution
The train was going from Reavertown (REA) to Greater East Ridge (GER). These are the former and latter halves of the name Reager gave herself (recall from Blackbrim: 1876 that she named herself Reager though her legal name Rose Skinner, which is also used in multiple articles).
The third word of Greater East Ridge is "Ridge", so the second and fourth letters are I and G. These letters, I and G, are the 3rd and 5th letters of Reager's encoded word. The word so far is B R I _ G
-
Secret Room - The final letter of the genesis - Clue #1
Read the "New Train Begins Running" section that is on the same page as the fencing article. Do you notice anything about the locations the train was going between when the "accident" occurred?
-
Secret Room - The final letter of the genesis - Solution
The train was going from Reavertown (REA) to Greater East Ridge (GER). These are the former and latter halves of the name Reager gave herself (recall from Blackbrim: 1876 that she named herself Reager though her legal name Rose Skinner, which is also used in multiple articles).
The final letter of "Reavertown" is N, which is the 4th letter in Reager's encoded word. By using this clue and the other 2 clues, the encoded word is BRING.
-
Secret Room - What the judge was running out of - Clue #1
Read the "Haunted Manor?" article. The answer will not be directly stated, but you can surmise the answer from the facts stated by the article.
-
Secret Room - What the judge was running out of - Solution
The Haunted Manor article states that the judge died soon after the inheritance trial. Therefore, he was running out of TIME. The numbers 1, 2, 3, 4 indicate that TIME must be the first four letters of the encoded word. The encoded word therefore looks like T I M E _ _ _ _.
-
Secret Room - The graphical form of the judge's - Clue #1
Read the "Plea for Inheritance" article. A synonym for graphical is pictorial or illustrative. It may also be helpful to consider what are commonly depicted in graphs.
-
Secret Room - The graphical form of the judge's - Solution
The "Plea for Inheritance" article notes the judge's LINE of reasoning.
The numbers 5, 6, 7, 8 indicate that LINE must be the 5th through 8th letters of the encoded word. The encoded word therefore is TIMELINE.
-
Secret Room - The capital character of my dear - Clue #1
You will need to use multiple articles to discover this answer.
-
Secret Room - The capital character of my dear - Clue #2
Read the "Plea for Inheritance" and the "Haunted Manor?" articles.
-
Secret Room - The capital character of my dear - Solution
The "Inheritance" article notes that Reager's uncle inherited the estate, and the "Haunted Manor?" article notes that the inheritor decided to stay abroad in France. The capital character of "France" is F.
Given there is a 1) in front, the first letter of the encoded word is therefore F. So far, the encoded word is F _ _ _.
-
Secret Room - Central letter of what the superstitious - Clue #1
Read the "Haunted Manor?" article.
-
Secret Room - Central letter of what the superstitious - Solution
The author of the "Haunted Manor" seems to be very superstitious, and mentions several times that they are speaking the truth, the central letter of which is U.
Since there is a 2) in front of this clue, the second letter of the encoded word is U. With the prior clue, the encoded word is currently F U _ _.
-
Secret Room - First letter of the second word of the room - Clue #1
Read the "Haunted Manor?" article. There is a mention of shrieking birds coming from underground... where would the shrieking birds have come from? You should do the other room puzzles if you are not sure.
-
Secret Room - First letter of the second word of the room - Solution
If you've done the Biology Lab puzzle (or at least read the description), you will know that Reager experimented on birds in her Biology Lab. The first letter of the second word in Biology Lab is L.
Since there are numbers 3, 4 in front of the clue, this means the 3rd and 4th letters of the encoded word are both L. Together with the other two clues, the final encoded word is FULL.
-
Secret Room - Central letter of His Holiness - Clue #1
Read the article that speaks about the return of the police officers of Blackbrim for this answer.
-
Secret Room - Central letter of His Holiness - Clue #2
The final sentence wishes the investigators "Godspeed".
-
Secret Room - Central letter of His Holiness - Solution
In this phrase, "God" is the giver of speed, the central letter of "God" is "O", and the shape of an "O" is a CIRCLE.
Therefore, the last encoded word is CIRCLE.
-
Secret Room - Overall Clue #1
This clue is after you have already figured out all of the encoded words from the clues given by Reager. If you haven't, go back and figure out the full phrase.
The full phrase is OVERLAP PAGES BRING TIMELINE FULL CIRCLE.
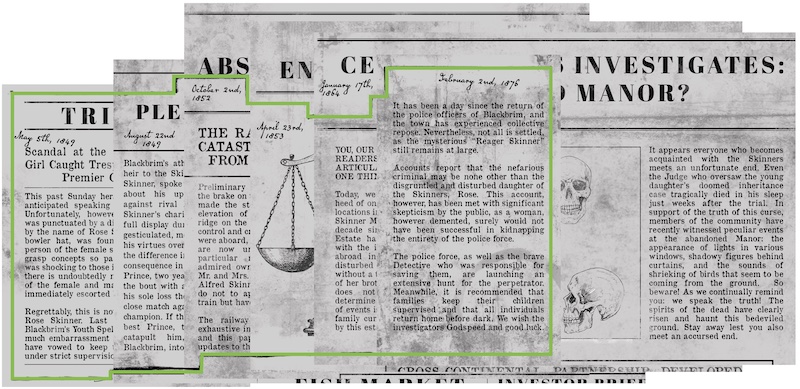
Notice that there is a hand-drawn line that crosses through each of the articles. This line goes by a handwritten date on each article as well. Can you overlap the pages in such a way that this hand-drawn line creates a full circle, with the dates in order?
-
Secret Room - Overall Clue #2
Overlap the pages like this to create a complete circle:
Do you notice any word or phrase pop out when the pages are overlapped in this way?
-
Secret Room - Overall Clue #3
If you look at the titles of the articles, you will see that "TRIPLE ABSENCE" is spelled out. (Coincidence? Reager was the one who made her two parents and then brother disappear!)
Is there a key that fits this description?
-
Secret Room - Solution
The phrase encoded in the Secret Room is "TRIPLE ABSENCE". This corresponds to the key with the axes has 3 holes in it, key #2 in the image below.
-
Trap Door Clue #1
This envelope should include the key wall image and a note with circles that says "Your final key". If you are missing either of these components, click here.
The front of the Trap Door envelope notes that you "decide to explore the other rooms before attempting to decipher these" (the materials in the envelope). To solve the Trap Door envelope, you will need to solve the rest of the puzzles first. Take a brief look at the materials in the Trap Door envelope, as they may include information needed in other rooms, but then move on to solve the remaining rooms, if you haven't already.
-
Trap Door Clue #2
Do the circles on the "Your final key" page remind you of anything you've seen throughout your adventure in Reager's underground hideout?
To decode the circles, you will need the hand-drawn map, all of the room envelopes, and Reager's letter from the "Open When Instructed" envelope. You are instructed to look inside the "Open When Instructed" envelope after fully completing the Library. If you are missing any of these components, click here.
-
Trap Door Clue #3
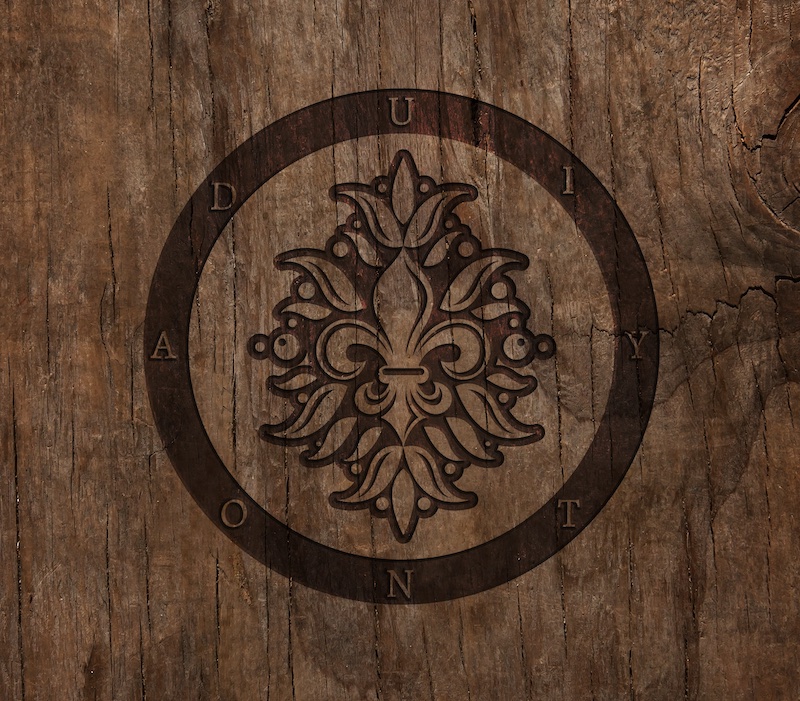
Look at the images that were burned onto each door. These are located on the outside of each envelope with the exception of the Secret Room, whose symbol is on the back of Reager's letter from that room.
Each symbol has a ring around it, similar to the rings on the "Your final key" note. Moreover, each ring on the note has a black dot where a letter would be on one of the burned symbols. But which room does each ring on the note correspond to?
-
Trap Door Clue #4
Look at the map that was drawn based on Alfred's recollection of Reager's underground hideout. If you look at the center of the map, do you notice any similarities to the image you see in the center of each ring on the note? Remember, this map was only drawn based on Alfred's recollection, and you now know that he never knew of the existence of the Secret Room behind the bookcase in the library.
When you entered the Secret Room, you found "a small room with several slits in the walls. One slit is in the bookshelf you just passed through, providing a view into the Library. Another slit in the opposite wall provides a view of the Dungeon."
-
Trap Door Clue #5
The interior of each ring in the note corresponds to the center of the map of Reager's underground hideout, with the addition of the Secret Room between the Library and Dungeon.
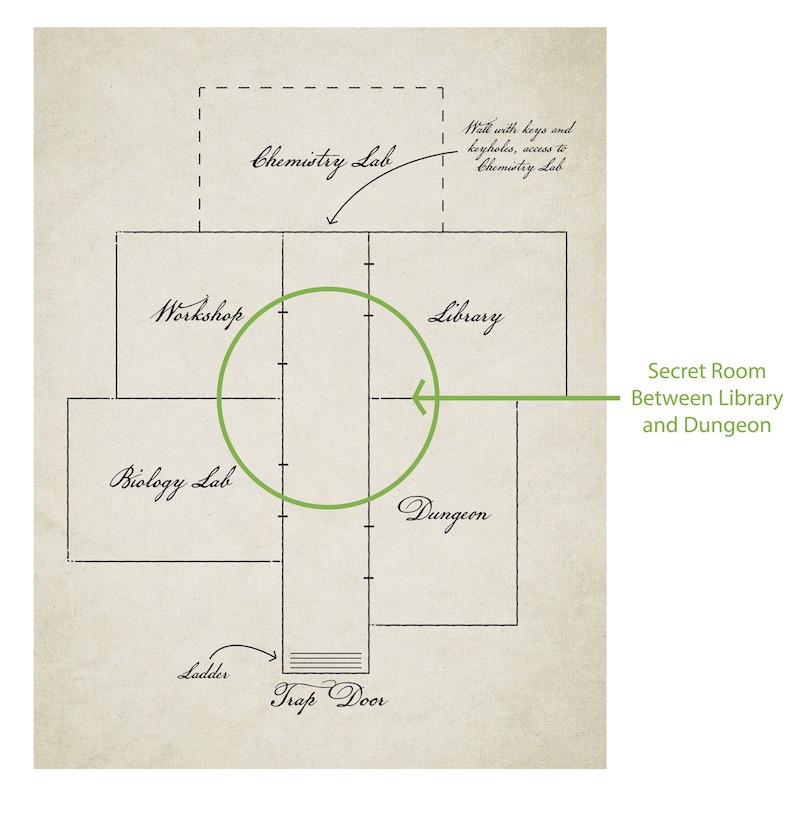
The blacked-out section of the image notes which room, and the black dot on the ring denotes which letter from that particular room's symbol. For example, the first circle on the note has the Dungeon blacked out in the interior, and has the "S" noted on the exterior circle of the burned symbol.
-
Trap Door Clue #6
The translated note is STONE PROTECTOR. Can you find a key that corresponds to this?
-
Trap Door Solution
The key with the engraved castle turret corresponds to the clue STONE PROTECTOR, key #9 in the image below.
-
Keys in Keyholes Clue #1
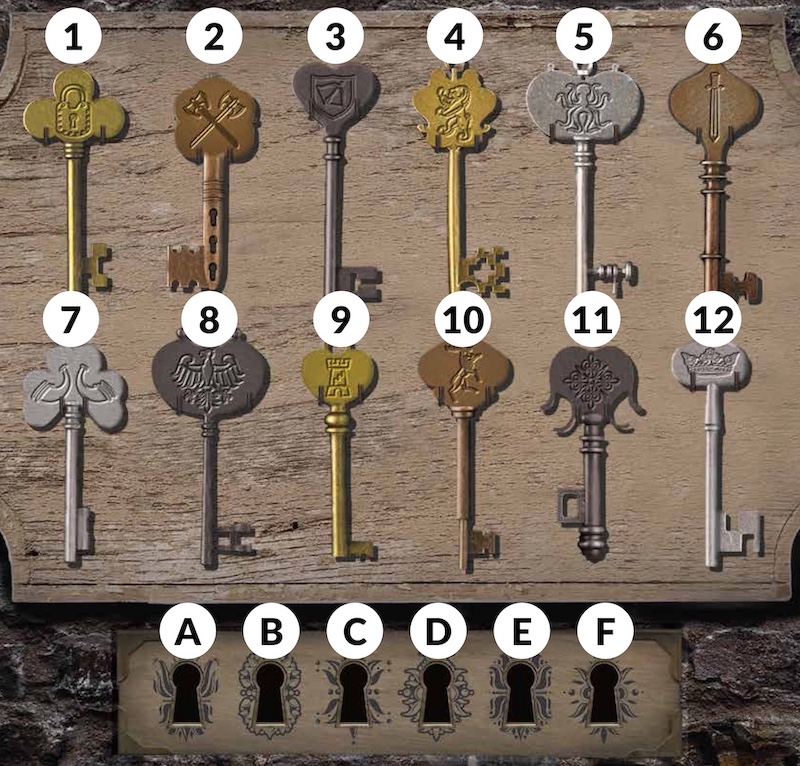
Look at the symbols burned into the doors. For each symbol, there is a pattern that corresponds to one of the keyholes. By matching the patterns, you will be able to determine where each key should go.
-
Keys in Keyholes Solution
From left to right, the keys are: Key 5 (Of the sea / Octopus), Key 8 (Eagle), Key 10 (Crown of bones / Stag), Key 2 (Triple Absence), Key 9 (Stone Protector), Key 3 (Dark Heart).
Now that you have the final solution, be sure to enter it using Check Solutions & Unlock the Story to see what happens next!
-
Exploration Into Compounds Clue #1
This puzzle uses a large "Exploration Into Compounds" sheet and one of the five excerpts from Reager's notebook. If you are missing any items, click here.
Reager notes at the end of her letter that she has included excerpts from the notebook she used to create the toxin and that these will be crucial to your success. One entry in particular from her notebook will help you solve this puzzle.
-
Exploration Into Compounds Clue #2
The notebook excerpt that has "exploration into" and "compounds" underlined pairs with this puzzle.
There are several words that are circled on the notebook entry. One of them (NO) is written on the "Exploration Into Compounds" sheet. Do you have thoughts on where the others might go? The term "compounds" can refer to chemical compounds, any molecular substance composed of two or more atoms. But no knowledge of chemistry is required here (and in fact, if you do know some chemistry, you will realize these structures don't necessarily make sense). Can "compounds" be referring to anything else that might be applicable here?
-
Exploration Into Compounds Clue #3
The structures that Reager has drawn on the left of the page can be used to create specific compound words, where each circle contains a letter. A compound word is a word that is composed of two other words being put together e.g. mailbox is a compound word, because it is composed of the two words "mail" and "box". The thick lines denote the separations between the words making up the compound word.
You will notice that the molecule after the one containing "NO" is the only one to have five empty spaces. Is there a circled word that fits here?
You will need to complete the full sheet to solve Reager's puzzle. All of the circled words from Reager's notebook entry need to be used, but there will be other words to fill in that are not from her notebook.
-
Exploration Into Compounds Clue #4
"THING" can be added in the five spaces after "NO", creating the word "NOTHING". But now notice that there is another branch with 4 circles below "NO" that you need to fill out. Is there a four letter word that also ends in "THING" and can be a compound word?
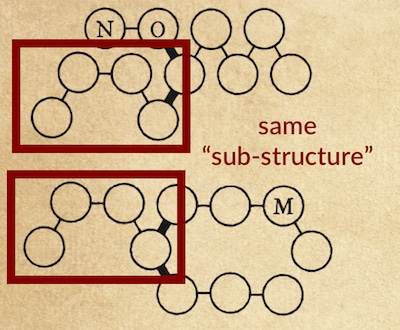
Separately, notice that many of the sub-structures are the same within the puzzle - these denote words that are the same.
-
Exploration Into Compounds Clue #5
There are many four letter options that could precede "THING", but there is only one that will also work in the second compound structure (the sub-structures are the same, so the word must be re-used). This word must also form compound words with a four letter word that has "M" as the third letter, and a three letter word that has a "W" as the third letter (the "W" is pulled from the given letter in the fifth structure, which is the same).
-
Exploration Into Compounds Clue #6
The compound structures are completed as follows:
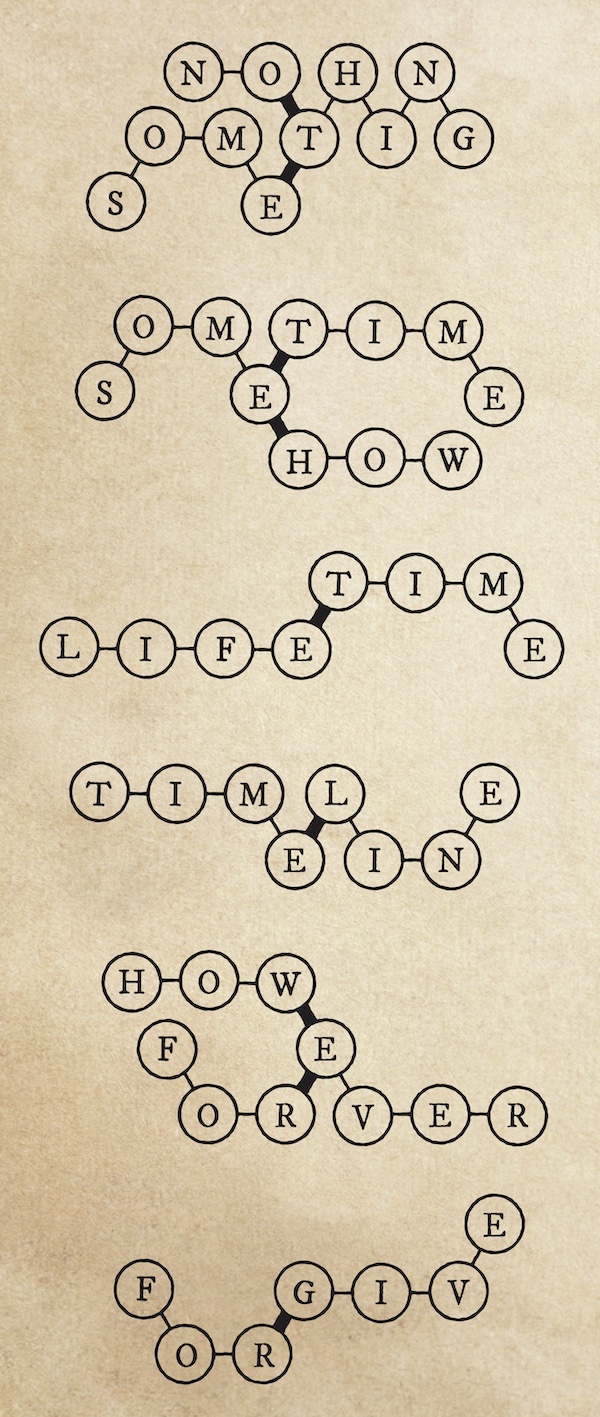
The molecules on the right hold the final answer to the puzzle. Now that the left side is filled out, fill out the right side (now that you know which words should go in which sub-structures).
Once filled out, do you see any circles that line up across all the sub-structures?
-
Exploration Into Compounds Solution
The circles starting with the "N" in "LINE" are aligned vertically so that they create the word NITROGEN:
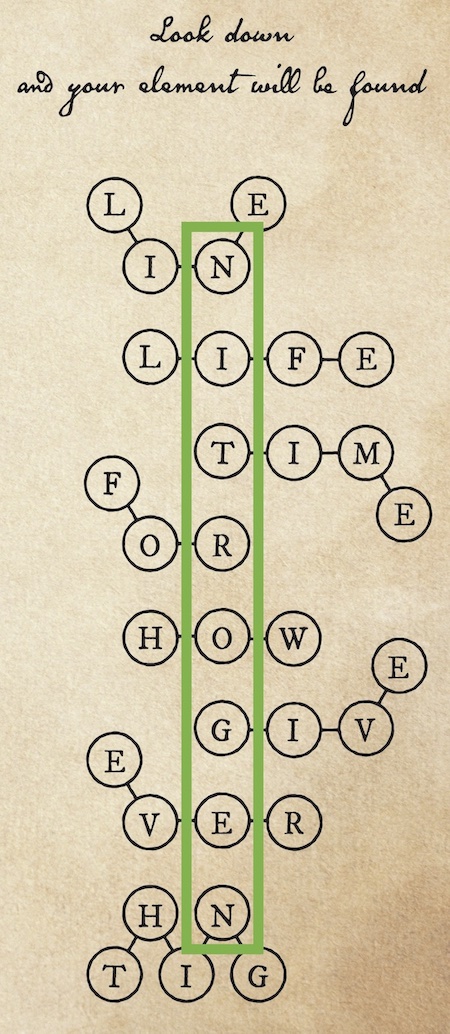
Therefore, the answer is nitrogen.
-
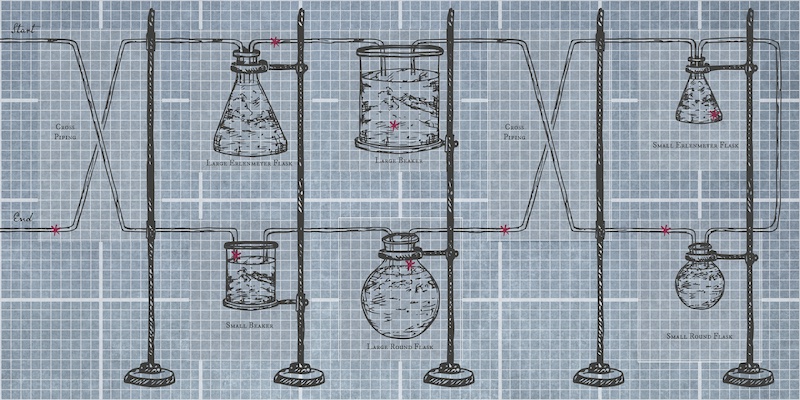
Lab Setup Clue #1
The Lab Setup puzzle uses a large "Lab Setup" sheet and a small envelope labeled "Lab Equipment". The small envelope includes 2 identical cross piping components, a large and small beaker, a large and small round flask, and a large and small Erlenmeyer flask (8 components in total). One of the five excerpts from Reager's notebook is also used. If you are missing any items, click here.
At the end of her letter, Reager states that she has included notebook excerpts as she was creating the toxin and that these will be crucial to your success. One entry in particular from her notebook will help you solve this puzzle.
-
Lab Setup Clue #2
The notebook excerpt that has "lab setup" underlined pairs with this puzzle.
There are many ways to start this puzzle. Examining the possible locations of the cross piping is one effective way since they each take up two positions in the setup. Determine the potential locations for the cross piping components given:
- Components of the same type cannot be horizontally adjacent (including the cross-piping)
- The right-most stand holds containers (not cross-piping)
- All components must be used
-
Lab Setup Clue #3
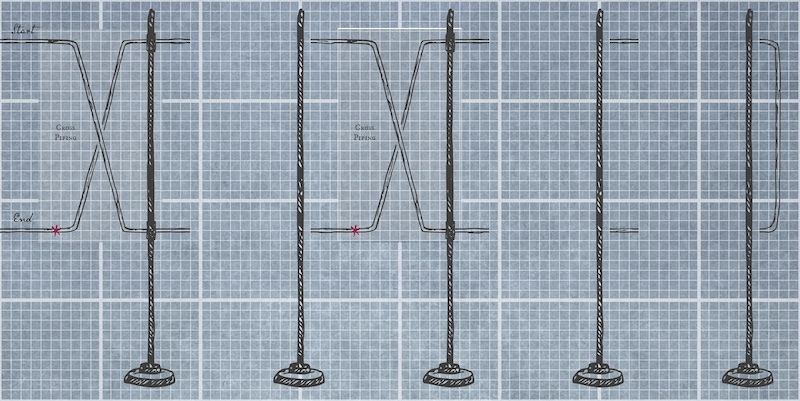
Given the previous constraints mentioned, there are 3 possible locations for the pair of cross-piping components.
-
First possibility:

-
Second possibility:
-
Third possibility:
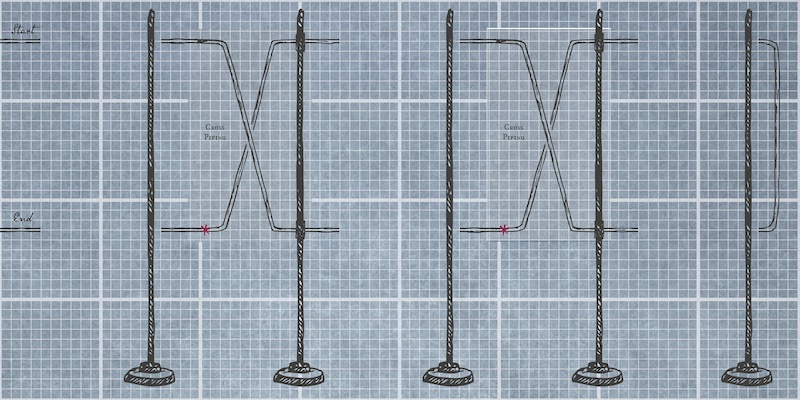
From here, there are again many potential next steps for solving the puzzle. Focusing on the constraint that "The container with the smallest volume is the third container in the experiment sequence" is one potential next step that will narrow down additional possibilities.
-
-
Lab Setup Clue #4
The relative volumes of each flask type can be determined in two ways:
- By roughly counting the squares of the grid that are contained within each container
- By knowing (or looking up) the mathematical formulas for the volumes of a cylinder (π r2h), a sphere (4/3 π r3), and a cone (π r2 h/3).
You don't have to calculate the relative volumes for each flask, but either of these methods should allow you to determine the container with the smallest volume fairly quickly.
-
Lab Setup Clue #5
The small Erlenmeyer flask (in the shape of a cone) contains the smallest volume and therefore is the third container in the sequence. Being the third container in the sequence means that if you follow the piping from the "Start", the container with the smallest volume is the third container that the piping passes through.
Given the constraints of the cross-piping and the small Erlenmeyer flask being the third container in the sequence, it should be easier to find the only layout that meets all of the remaining criteria:
- The large round flask and large Erlenmeyer flask are diagonally adjacent in the physical layout of the setup
- Components of the same type (piping, beaker, round, Erlenmeyer) cannot be horizontally adjacent in the setup
- Small containers precede their larger counterparts in the experiment sequence
-
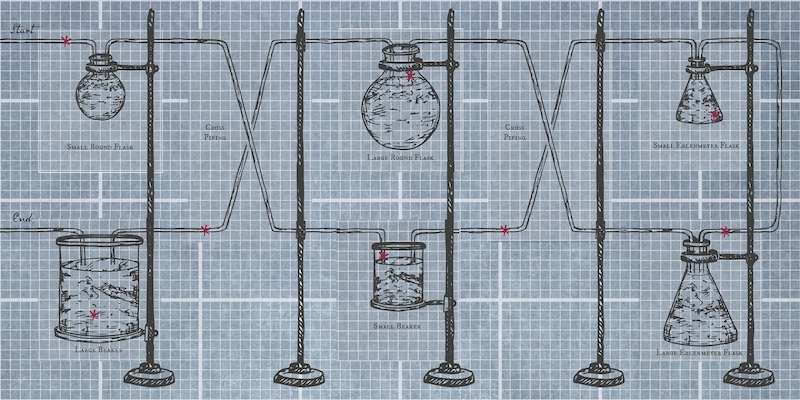
Lab Setup Clue #6
There is only one layout that meets all these criteria:
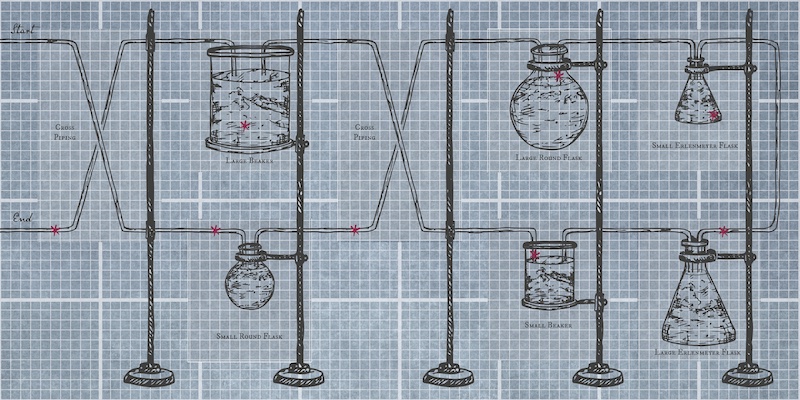
In case you want further explanation, below are examples of incorrect layouts and why they are incorrect:
-
Incorrect because components of the same type (the round flasks in this case) are horizontally adjacent:

-
Incorrect because the large round and large Erlenmeyer flasks are not diagonally adjacent (they are not immediately next to each other diagonally; the cross-piping is in between them):
-
Incorrect because the small round flask does not precede the large round flask:
Now that you have determined the sequence, how might you convert this to a word? Don't forget about Reager's notebook excerpt where "lab setup" is underlined. She said that the excerpts would be key to solving her puzzles.
-
-
Lab Setup Clue #7
A grid titled "Your element awaits in the path of the stars" is on the back of Reager's notebook excerpt. Is there a way this grid maps to your Lab Setup layout? Is there a way to "Follow the stars"?
-
Lab Setup Clue #8
You will notice that both the grid on the back of Reager's notebook excerpt and the large grid on the Lab Setup (using the thick light blue lines) are both 4x8. Follow the experiment sequence from "Start" to "End" using the piping. When you cross a red star, note its location and see what letter it corresponds to on the grid in Reager's notebook.
-
Lab Setup Solution
The stars spell out FLUORINE.
-
Six Molecules Clue #1
This puzzle uses a small, dark blue sheet with six "molecules" on one side and a poem on the other side. One of the five excerpts from Reager's notebook is also used. If you are missing any items, click here.
Reager notes at the end of her letter that she has included excerpts from the notebook she used to create the toxin and that these will be crucial to your success. One entry in particular from her notebook will help you solve this puzzle.
-
Six Molecules Clue #2
Notice that there are six "molecules" on this sheet. The excerpt from July 12th, 1875 pairs with this puzzle because it has "to determine how the one chemical structure varies from the other five" underlined. This both identifies which puzzle it pairs with, and gives you the clue you need to solve it.
Use the first two lines on the back of the paper, paired with the underlined phrase, to determine which structure is different from the other five and why.
-
Six Molecules Clue #3
Each structure is composed of atoms of two colors: red and gray. Try counting the connections each color has. Do you notice a pattern? Is there one molecule that doesn't follow this pattern?
-
Six Molecules Clue #4
You will notice that the red "atoms" all have an even number of connections, and the gray "atoms" have an odd number of connections. The exception is the bottom middle molecule. This fits the clue Reager left since five molecules fit the pattern, and one varies from it.
Can you apply this rule to get a word from the letters at the bottom of the page?
-
Six Molecules Clue #5
Identify all red letters that are above an even number and all gray letters that are above odd numbers.
-
Six Molecules Solution
The answer is URANIUM.
-
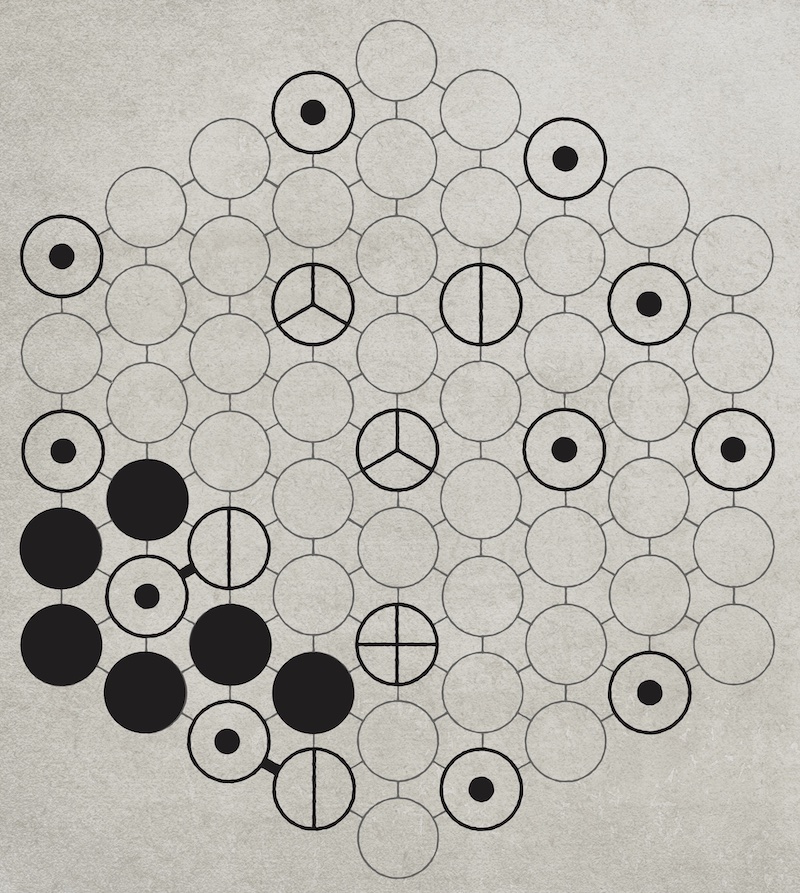
Antidote Clue #1
The Antidote puzzle uses "The Antidote" sheet and one of Reager's notes. If you are missing any of these or would like to print another copy of anything, click here.
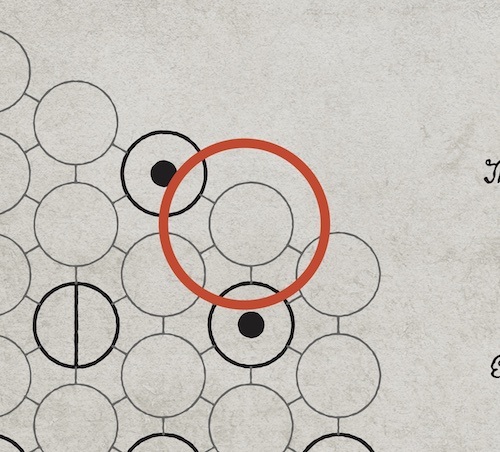
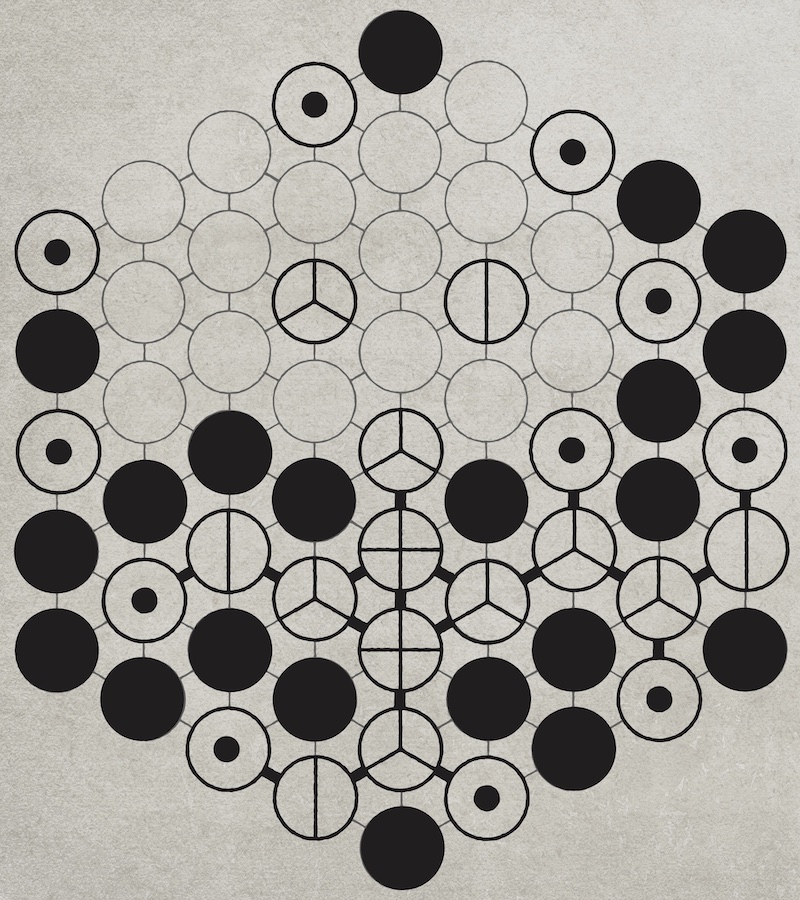
There are many ways to solve this puzzle, but one effective approach is to start by crossing out or blackening the circles that cannot be an atom. For example, there are a couple locations where an atom with a single bond already is attached to another atom. In this case, none of the other neighbors can hold an atom.
-
Antidote Clue #2
The image below shows the positions (blackened out) that can be eliminated as possibilities for atoms from the previous example:
You can continue using the logic of eliminating possible atom locations in other situations. For example, if an atom is placed in some locations, such as the one pictured below, it then becomes impossible for that grouping to become connected to the whole structure:
-
Antidote Clue #3
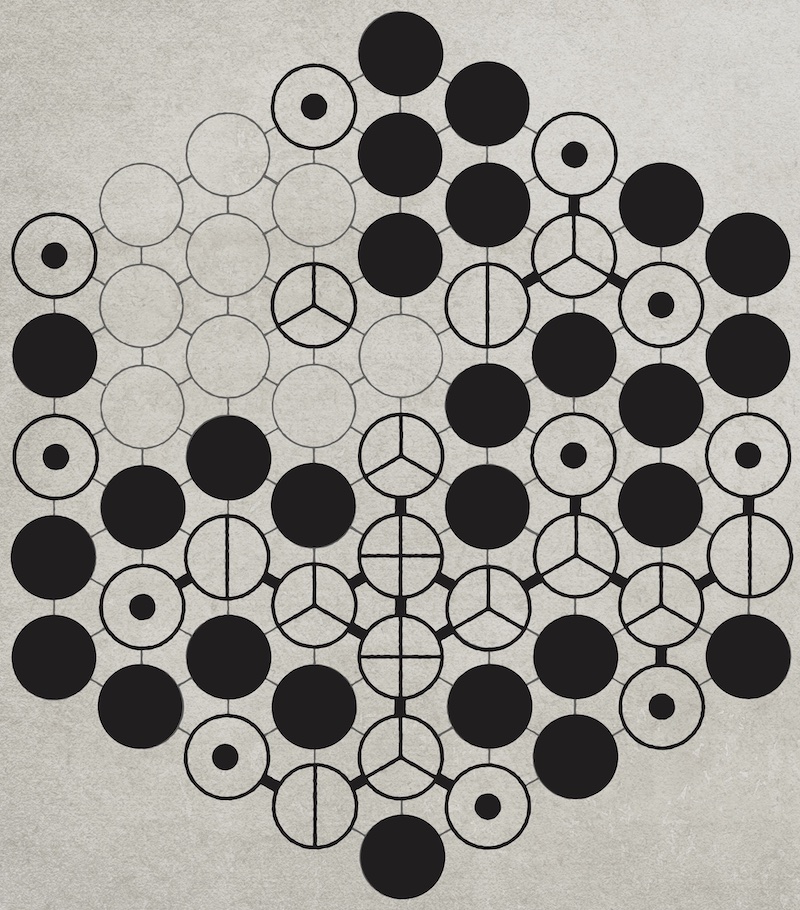
The following image is a progression of this logic:
-
Antidote Clue #4
The following image is a progression of this logic:
-
Antidote Clue #5
The following image is a progression of this logic:
-
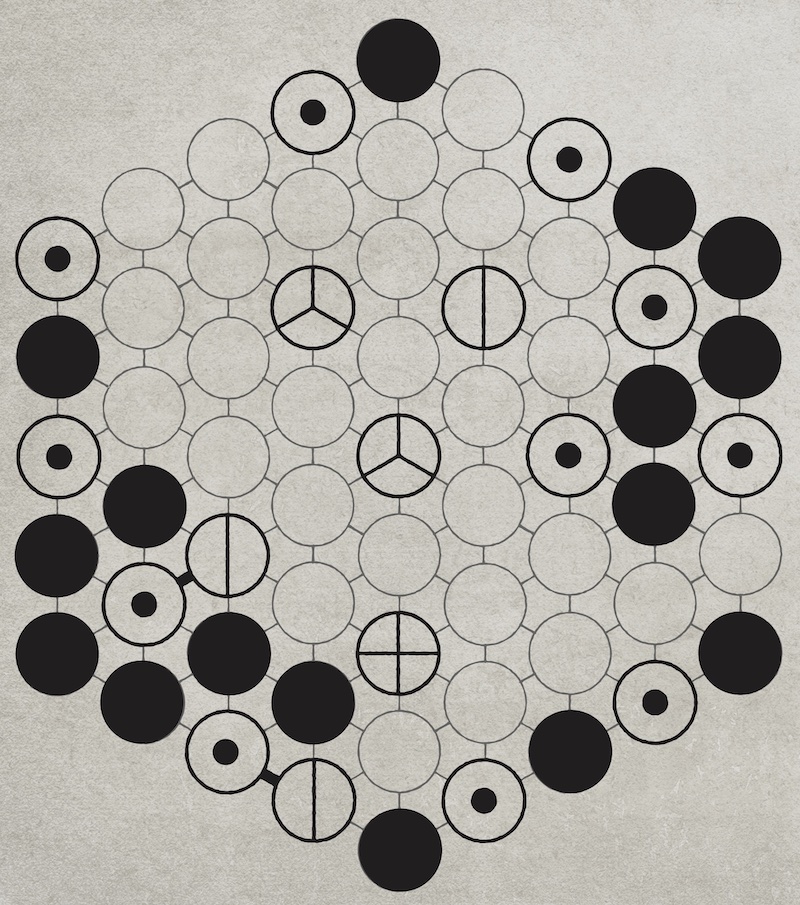
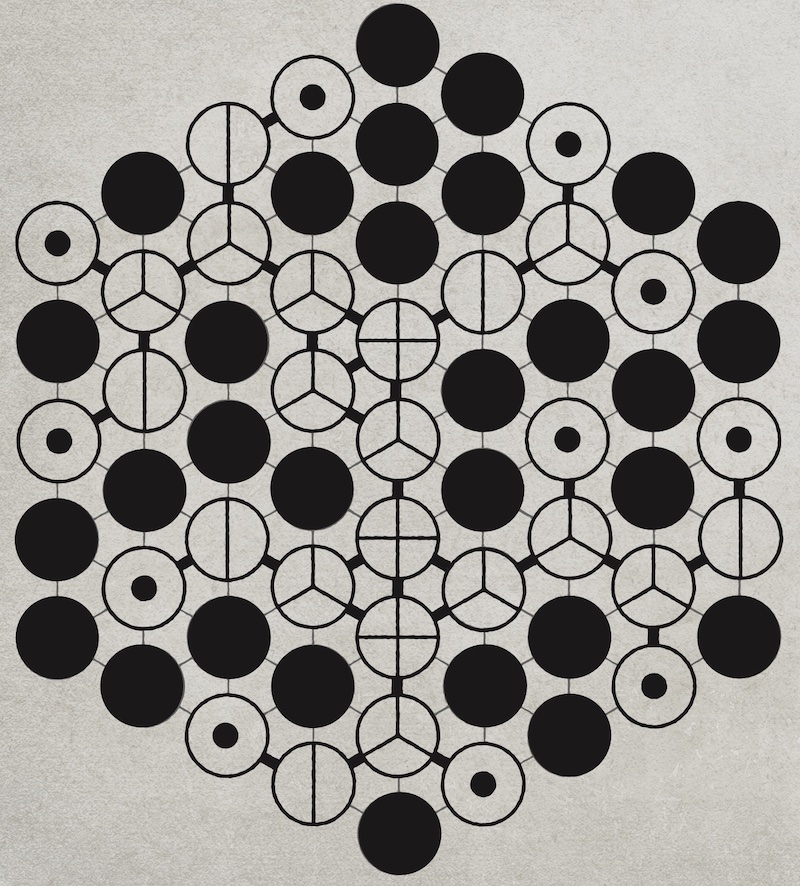
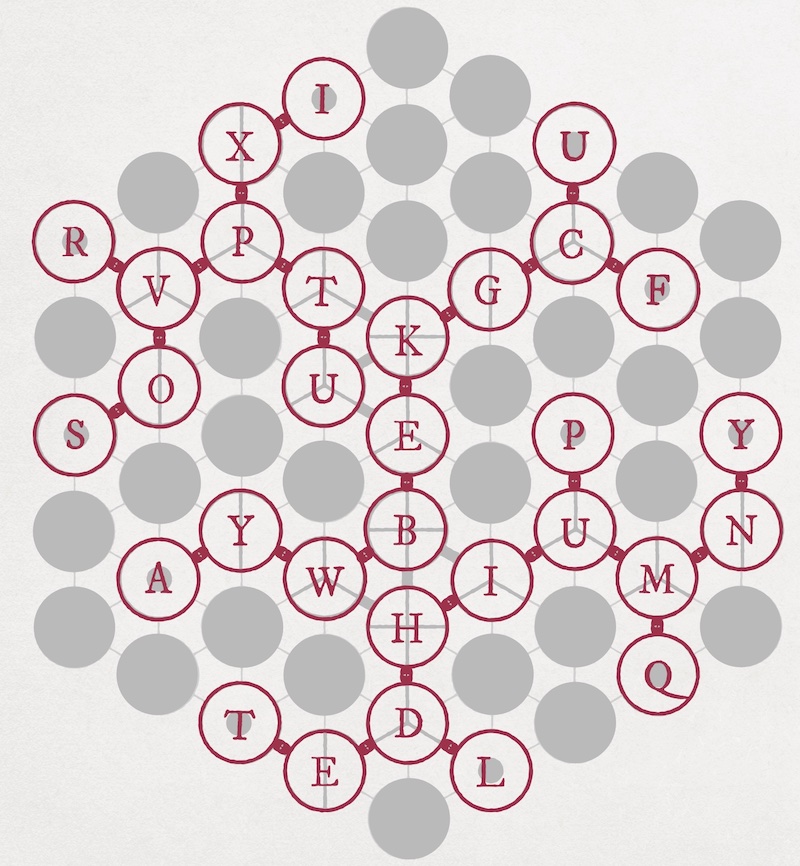
Antidote Clue #6
Finally, you should end up with this correct antidote structure:
-
Antidote Clue #7
At this point, you haven't yet used an excerpt from Reager's notebook yet - is there an excerpt that seems relevant and would result in a word?
-
Antidote Clue #8
The excerpt with the word "antidote" underlined pairs with this puzzle. Take a look at the back of this excerpt. Do you notice any similarities between these structures and your final antidote structure?
-
Antidote Clue #9
You will notice that the three structures on the back of the excerpt can be combined to create the final antidote structure. Locate the atoms that have two bonds in the antidote structure and find their corresponding letters in the structures.
-
Antidote Solution
The solution is OXYGEN.
-
Reager's Notes on Toxin Administration Clue #1
This puzzle solely uses Reager's five notebook notes. If you are missing any of these, click here.
Do you notice anything odd about the numbers noted in the top "Time" row of the grid in the January 24th entry? Do they correspond to anything?

-
Reager's Notes on Toxin Administration Clue #2
These numbers match the dates on Reager's notebook entries. For example, "1.24" matches the January 24th section you are currently looking at.
It may now be helpful to determine what the red "Line" note corresponds to.
-
Reager's Notes on Toxin Administration Clue #3
The red "line" note is referring to the officer numbers but also to a specific line within a notebook entry. Between the date and the line number, you can find a specific notebook entry and line in Reager's notebook notes. Now, what do you think the letters and dashes mean within the grid?
-
Reager's Notes on Toxin Administration Clue #4
If you locate the letters within the grid in the correct notebook entry and line, you will find a word in the place of the dash. For example, from the notebook entry on March 23rd, in the first line (Time: 3.23, Line: Officer 1) you find: "...into the use of chemical...". In this case, the word "use" takes the place of the dash.
-
Reager's Notes on Toxin Administration Clue #5
Reading from left to right and then top to bottom yields the phrase: "use characters before cues in boxes to make element". The letters and dashes in the grid could be considered cues in boxes. Can you find the preceding characters i.e. the characters before each of the cues?
Using the previous example (Time: 3.23, Line: Officer 1): "...into the use of chemical..." yields the letter t, since the "t" is before the cue (he-of).
-
Reager's Notes on Toxin Administration Solution
Obtaining a letter from each cue and reading from left to right & top to bottom reveals the solution: TELLURIUM.
-
Metapuzzle Clue #1
To solve Reager's letter, you must first solve her other 5 puzzles. These puzzles are numbered 1-5 on her notebook notes.
-
Metapuzzle Clue #2
The answer to each of Reager's other puzzles is an element in the periodic table. Is there another way to write each element that would fit in the numbered blank spaces on the letter?
-
Metapuzzle Clue #3
Each element can be written as a one or two letter abbreviation. You can look up the periodic table of elements to find the abbreviations.
-
Metapuzzle Solution
Filling in the numbered blanks creates F O U _ T E _ N. You are looking for a numbered flask between 1-100. The only number that fits is the solution: 14.
Now that you have the final solution, be sure to enter it using Check Solutions & Unlock the Story to see what happens next!