MISSION: ELFPOSSIBLE
Getting Started & Game Hints
- If you’d like to enhance your game experience, check out this curated list of holiday snack and drink recipes!
-
Watch the Prologue to Mission: Elfpossible, if you haven't already.
- If you’d like some music during the game, put on your holiday favorites, or play this curated holiday adventure playlist!
- For FAQs on how to play in a group and more, view the product page.
- You should have an email in your inbox from pip@elf.enterprises. Start the game by reading this email and clicking the included link. Make sure you have everyone in your group together before beginning the adventure! The game automatically saves your progress, so you won’t be able to go backwards.
- View hints for the game below.
Have fun! If you have additional questions or need assistance, email us at support@puzzlingpursuits.com.
View Hints
Type Something in the Response Window
-
Clue
Pip is looking for a specific response, not just any word or phrase. Try taking her phrase literally.
-
Answer
Type the word "something" and click Submit.
Who am I?
-
Clue
The character described comes from a famous Christmas song that was introduced in 1950. The song was then adapted into a Christmas special on TV named after the character.
-
Answer
The character is Frosty the Snowman.
What am I?
-
Clue
Think of an edible holiday "house" that often has gumdrops on the roof.
-
Answer
The answer is a gingerbread house.
How many golden rings?
-
Clue #1
The dates given are the twelve days of Christmas. The question is based off of the song, "The Twelve Days of Christmas."
-
Clue #2
On the fifth day of Christmas, the true love gifts five golden rings. The song then continues on through days six through day twelve, and on each day, the true love continues to gift five golden rings.
-
Answer
From the 5th to the 12th days of Christmas (8 days in total), the true love gives 5 rings on each day. The total is 8 x 5 = 40 golden rings.
Security Hub
-
Clue #1
To solve this puzzle, you must determine how many branches each of the main lines (A-D) has. There is only one solution given the constraints.
Start by looking at line B. After it enters from the left, it branches to 5 different locations. This means this line must be the Kitchen line.
-
Clue #2
Now try looking at line C. After it enters the old access panel, it can either exit via the top right line, which branches once and leads to the other access panel, or via the bottom line, which doesn't branch.
We know that each of the areas being monitored has at least 2 cameras, and that all branching happens in this section of the wall. That means that line C must exit from the top right line, or else it would only lead to 1 camera.
-
Clue #3
Since line C exits from the top line, we know that line D must exit from the bottom line. Line D branches once before the panel and doesn't branch afterwards, so it leads to a total of 2 cameras. Line D must therefore be the Sleigh Hangar line.
-
Clue #4
Try looking at line A. This line does not branch before the access panel and can either exit via the top right line, which goes to 2 cameras, or via the bottom right line, which goes to 4 cameras.
We know that line D already goes to 2 cameras, so line A must go to 4 cameras. Line A is the Toy Workshop.
-
Clue #5
We now know that line C must exit via the top right line of the first access panel, and then through the top right line again of the second panel. This means line C branches to 3 cameras and must be the Stables.
-
Answer
The answer is DCAB.
Sleigh Hangar: D
Stables: C
Toy Workshop: A
Kitchen: B
Kitchen
-
Clue #1
Start with the materials in the journal, the Christmas tree drawing with a message on it and the alphabet. The message is encoded by the drawing - can you figure out how?
-
Clue #2
Notice that the number of ornaments on the tree and the number of letters in the message are equal.
-
Clue #3
Pay attention to the color and shape of each ornament. Looking at how the alphabet is written out may also help you figure out a pattern.
-
Clue #4
The alphabet is written such that there are 4 rows and 5 columns of letters. There are also 4 different ornament shapes and 5 different ornament colors. Each letter is uniquely identified by each ornament's shape and color combination.
-
Clue #5
The image below depicts which shapes correspond to which rows, and which colors correspond to which columns.
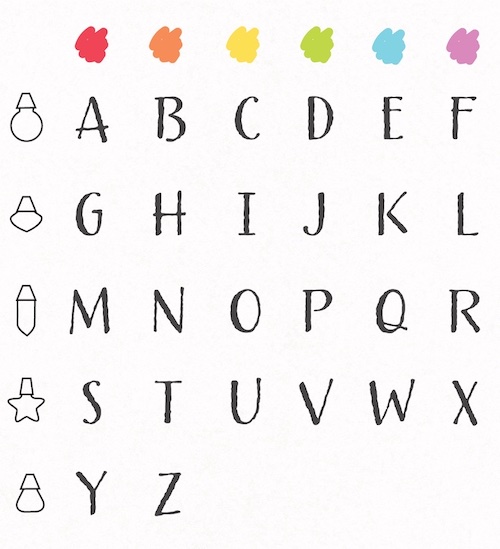
Use this key to decode the message on the other tree.
-
Answer
The encoded message is ADD BRAN FLAKES.
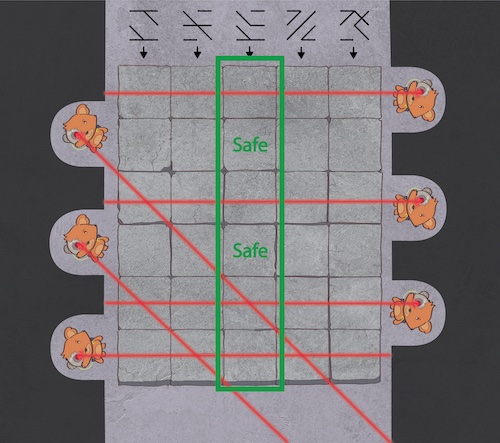
Laser Maze
-
Clue #1
Look at the materials in the journal. See if you can figure out a connection between the square pattern at the top and the laser configurations.
-
Clue #2
Try out some ideas by moving Tinsel around. Most spaces won't work but if you find one that does, it will provide additional information on which squares are safe to step on.
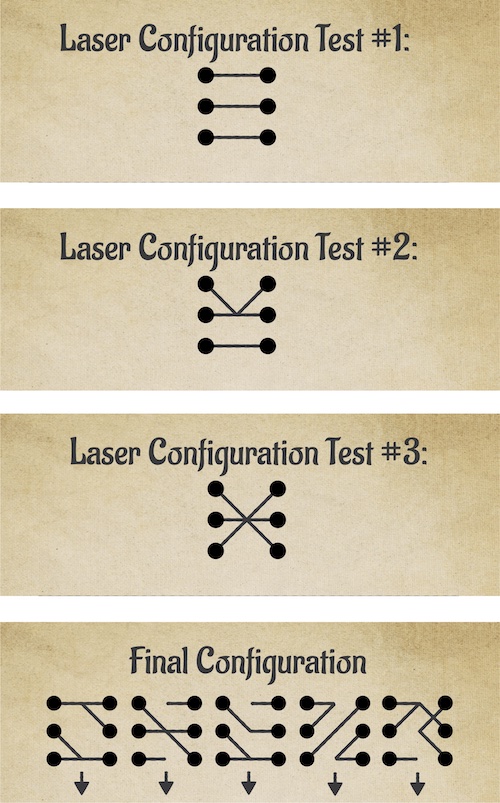
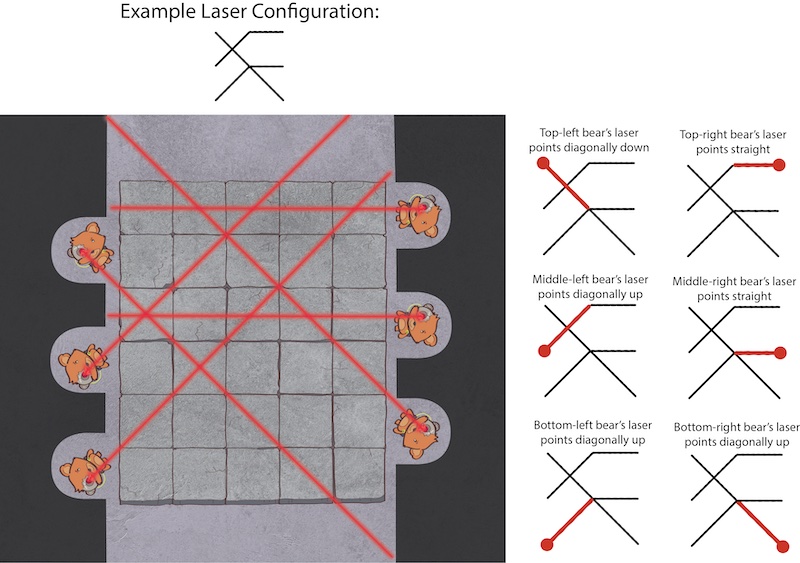
Also, notice that each symbol has six points that always are the beginning of a line: three on the left, and three on the right.
-
Clue #3
There are also three laser bears on the left of the hall, and three laser bears on the right of the hall. You will notice the lines coming from the six points in each symbol always match the direction the laser is shot from the corresponding bear. An example of a valid laser configuration is shown below:
-
Clue #4
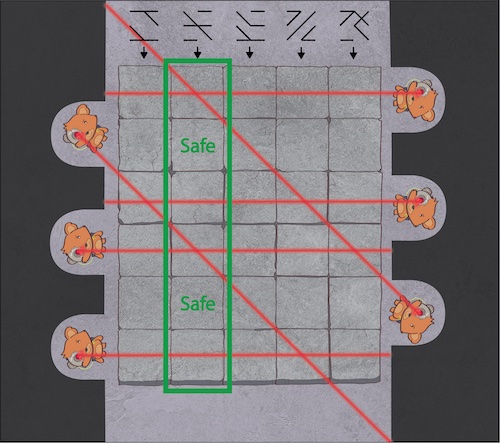
There are 5 columns in the laser maze and 5 square patterns, one above each column. This suggests that when you step on a tile in a particular column, the laser configuration you get is derived from the symbol above that column.
Using this information, you can figure out which tiles are safe to step on ahead of time.
The first tile Tinsel should go to is D. The second tile is C.
-
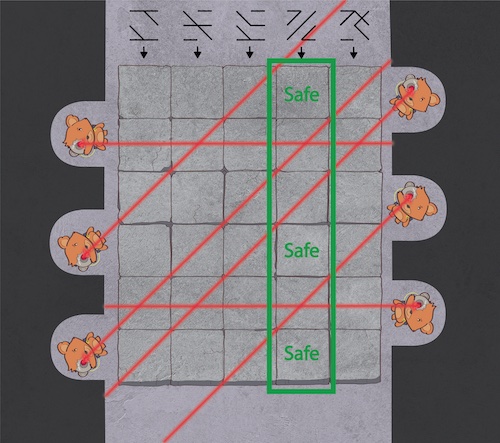
Clue #5
To reach the end, you may have to go backwards and across before you can keep going towards the other side.
Below are the laser configurations depending on which column Tinsel is at.


-
Answer
The sequence to get to the other side is: D, C, A, H, G, A, A, B, D, C.
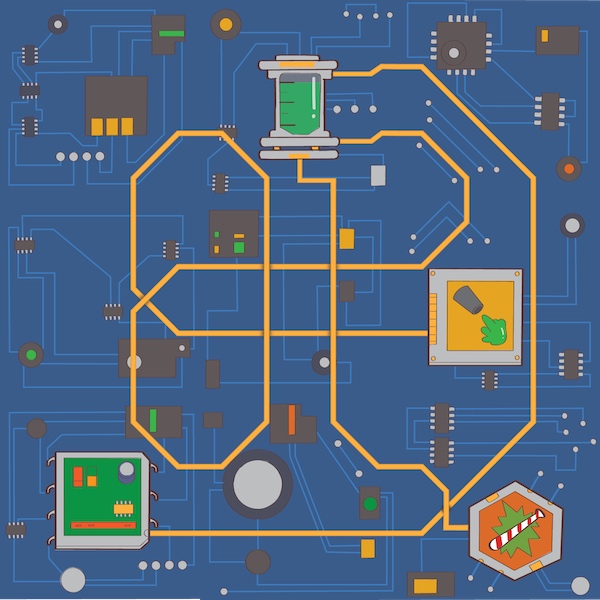
Nutcracker Circuit
-
Clue #1
Try to figure out which pieces go in the center, the corners, and the middle edges. You can do this for each piece by figuring out how many sides have wires that leave it. No wires will be unconnected or go off the diagram when the puzzle is finished.
-
Clue #2
The piece that looks like a # must be in the center, because all four sides have wires that leave it.
Pieces that have wires exiting 2 sides go in the corners of the diagram.
Pieces that have wires exiting 3 sides, go in the middle of each of the four sides.
-
Clue #3
Now use the number of wires that exit each side of each piece to determine the exact locations of the pieces.
-
Answer for the Circuit
-
Clue for Wire Cutting
Look at the complete circuit diagram and the orientation of the battery. The motherboard is the green, square component because the others correspond to the battery, the goo gun, and the bat.
-
Answer for Wire Cutting
The answer is the top wire.
Penguin Lock
-
Clue #1
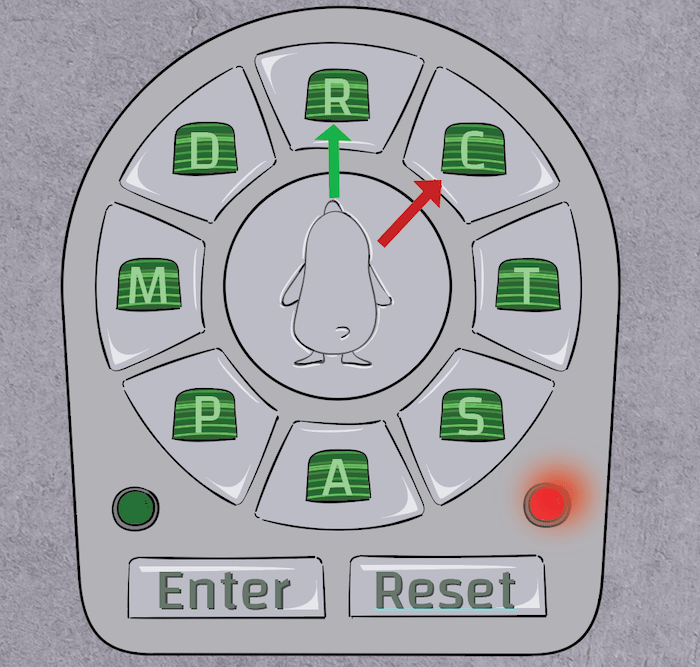
Note that the drawn penguin in the center of the lock is facing the top letter. Further, recall that Bell mentioned penguins are great at recognizing landmarks and remembering directions such as which way to turn when they reach said landmarks.
-
Clue #2
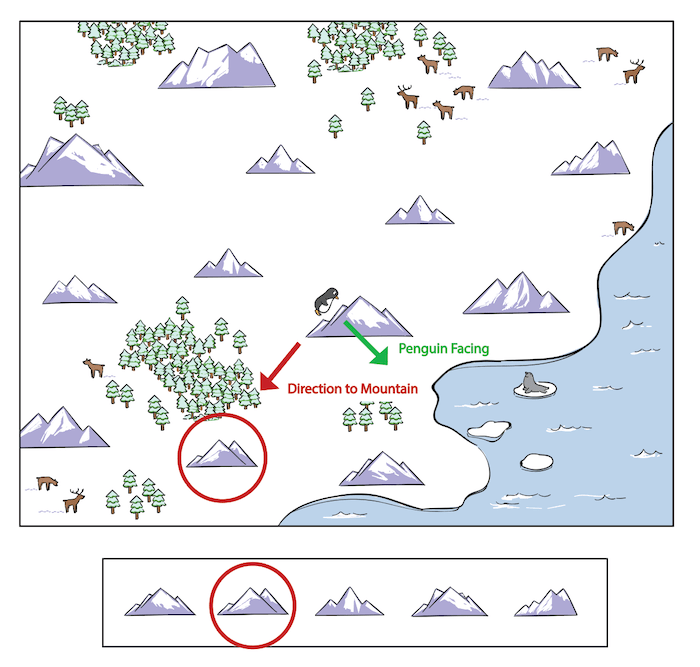
Look at the map and strip of paper in the journal. The strip of paper contains unique mountains that appear just once in the map. Some mountains look very similar, so be careful! Also, notice that there is a penguin in the top left corner of the map facing right. Can you think of a way the mountains can correspond to which letters to press for the lock, from the perspective of the penguin?
-
Clue #3
Imagine that you are the penguin in the top left corner of the map, and you are walking to each of the 5 mountains on the strip of paper, one after the other. Which directions would you take to get to each of the 5 mountains? Make sure you are using the penguin's perspective.
-
Clue #4
The first mountain is directly SE on the map from the penguin. From the penguin’s perspective, he needs to go diagonally forward and right.
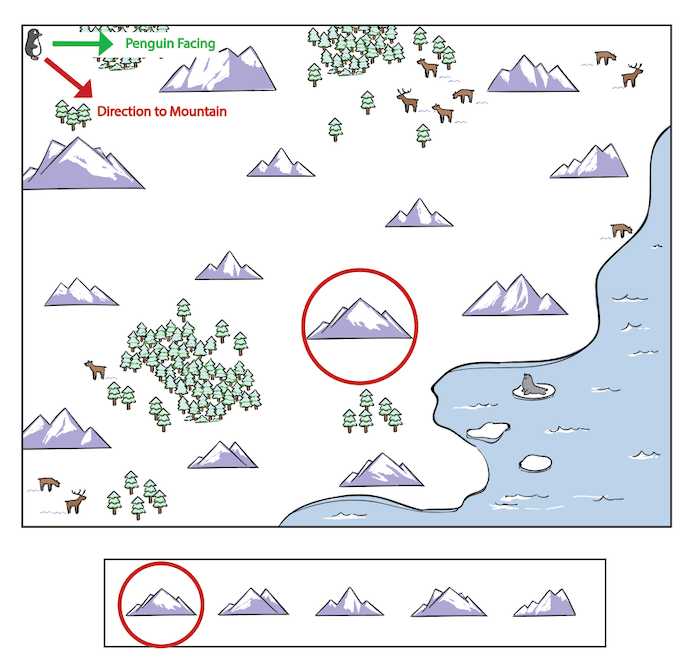
The penguin on the keypad is facing straight at the R. Diagonally and to the right for him is the letter C. This is the first letter in the passcode.
You can check your work on the way by making sure the letters are spelling out a word.
Once you have spelled your complete word, type "enter" in the response window.
-
Clue #5
When finding the next letter, make sure you are taking the penguin’s current position and direction into account. After arriving at the first mountain, the penguin is facing SE on the map. The second mountain is SW of him.
From the penguin’s perspective, this is directly to his right. The corresponding letter on the keypad is H.
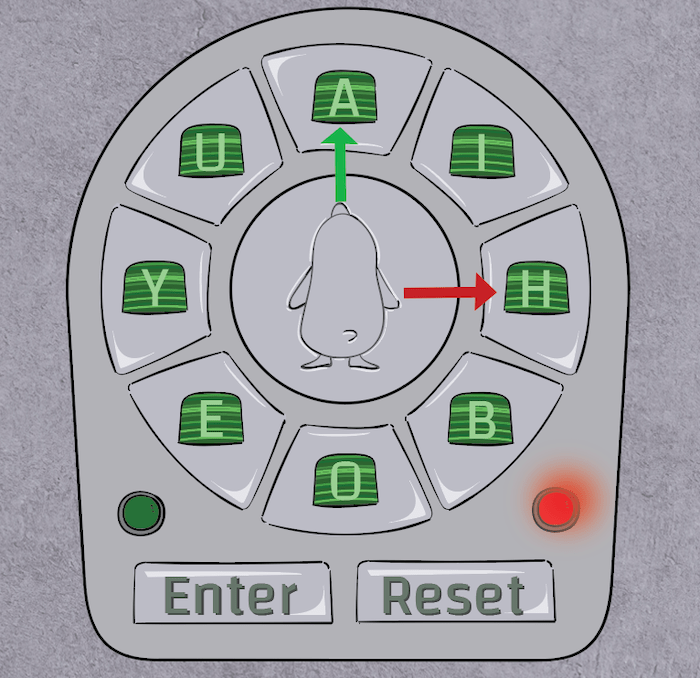
Each mountain corresponds with one letter. You should end with a five letter word.
-
Answer
The passcode is CHAOS.
Which Santa
-
Clue #1
You will need to use information you've been told earlier in the game about Nick and Terry.
-
Clue #2
Look back at the original email that Pip sent. Read how she described Terry.
-
Clue #3
Look closely at each twin's face with the looking glass. Do you see something on one of them that you'd only find on Nick but not on Terry?
-
Answer
The twin on the left is Nick, because there are cookie crumbs in his beard. Terry hates cookies and would never eat them. This is also how Terry put Nick to sleep!